Numb fingers, wrist tingling, and forearm fatigue aren’t inevitable consequences of computer work—they’re warning signs that your ergonomic hand position for typing has gone wrong. Over 50 million Americans experience repetitive strain injuries annually, with poor typing posture as a primary culprit. The damage accumulates silently over months of subtle wrist extension and shoulder tension until sudden pain disrupts your work. This guide reveals the precise measurements, positioning techniques, and movement protocols proven to protect your hands while typing—all based on current ergonomic research. You’ll discover exactly how to align your wrists, position your keyboard, and maintain neutral posture to type comfortably for hours without discomfort.
The science behind proper ergonomic hand position for typing centers on neutral alignment—keeping your hands, wrists, and forearms in straight-line positioning that minimizes pressure on nerves and tendons. Unlike generic “good posture” advice, this approach delivers specific angles, heights, and movement patterns that prevent the cumulative trauma leading to carpal tunnel syndrome and tendonitis. By implementing these evidence-based adjustments, you transform typing from a physical stressor into a sustainable activity that supports long-term hand health rather than damaging it.
Why Your Standard Desk Height Damages Wrist Health Daily

Most office desks sit at 29-30 inches high—perfect for writing but disastrous for typing posture. When you place your keyboard on this standard surface, your elbows must elevate above shoulder level to reach the keys, forcing your wrists into extension. This upward bending compresses the carpal tunnel by up to 60% compared to neutral positioning, dramatically increasing pressure on the median nerve that causes carpal tunnel symptoms.
How Desk-Top Keyboards Create Hidden Forearm Sagging
As typing fatigue sets in, your forearms gradually drop toward the desk surface while your hands remain on the keys—a subtle movement you won’t consciously notice. This sagging increases wrist extension by 15-20 degrees within just 20 minutes of typing, creating sustained pressure that restricts blood flow to your hands. The resulting oxygen deprivation accelerates tissue fatigue and metabolic waste buildup, explaining why your fingers feel heavy and numb after extended sessions.
The Shoulder Tension Chain Reaction You Can’t Feel
Elevated elbows from high keyboard placement trigger continuous contraction in your trapezius muscles—the large muscles spanning your neck and upper back. This tension builds silently throughout your workday, referring pain into your shoulders and neck that you’ll only notice during evening stiffness. Proper ergonomic hand position for typing eliminates this elevation, allowing your shoulders to rest in their natural downward position with zero muscle activity required to maintain arm placement.
Perfect Negative Slope Setup: Your Key to Neutral Wrist Alignment
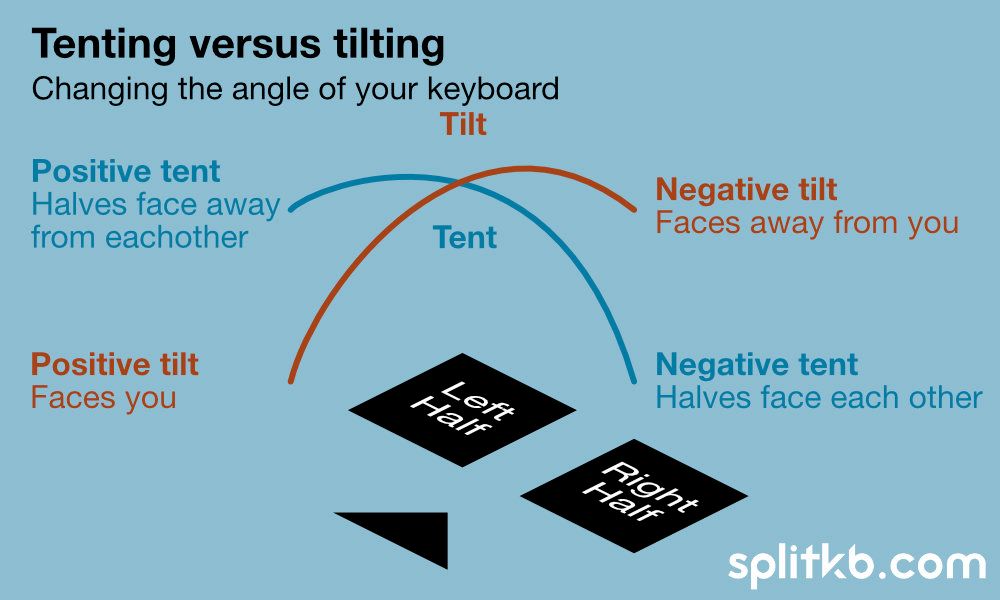
The critical factor most typing guides overlook is keyboard slope direction. Your keyboard must tilt away from you (negative slope), not toward you, to maintain neutral wrist position while accessing all keys. This configuration keeps your hand and forearm in straight-line alignment—the single most important factor in preventing carpal tunnel compression during typing.
Measure Your Exact Negative Tilt Angle
Your ideal negative slope ranges between 5-15 degrees depending on your arm length and chair height. Place a spirit level on your keyboard base: if the bubble drifts toward your body, your slope is too steep; if it drifts away, you need more negative tilt. Most standard keyboards require removal of their rear feet to achieve proper negative slope—don’t skip this critical adjustment that makes upper-row keys accessible without wrist extension.
Why Standard Keyboard Trays Fail at Wrist Protection
Over 70% of articulating keyboard trays install at negative tilt angles exceeding 20 degrees—too steep for neutral wrist maintenance. At these angles, your hands must bend upward significantly to reach the number keys, creating more wrist extension than desk-top positioning. If using a tray, adjust it to the shallowest possible negative slope (5-10 degrees) and verify your wrist alignment matches the straight-line test described below.
Your 5-Second Wrist Position Check: Is Your Hand Truly Neutral?

Neutral wrist position exists when your hand and forearm form a straight line with no upward or downward bending at the wrist joint. This alignment minimizes carpal tunnel pressure to baseline levels—essential for preventing cumulative nerve damage during typing.
Perform the Straight-Line Alignment Test
While typing naturally, glance at your wrists: imagine a straight ruler running from your elbow through your hand to your fingertips. If your hand bends upward (extension) or downward (flexion) relative to this imaginary line, your wrist position is compromising nerve function. Most users discover they maintain 10-15 degrees of extension without realizing it—a position that doubles carpal tunnel pressure within minutes.
Common Self-Assessment Mistakes to Avoid
Don’t check wrist position while resting hands on the spacebar—that artificially straightens your alignment. Instead, observe your wrists during active typing of the top-row keys (numbers and function keys), where extension typically increases. Use a mirror behind your monitor to monitor real-time positioning without disrupting your workflow.
Fix These 3 Deadly Desk Habits Causing Cumulative Damage
The Forearm Sagging Cycle That Creates Silent Injury
Your forearm muscles fatigue within 20 minutes of unsupported typing, causing gradual sag that increases wrist extension by 2-3 degrees every 10 minutes. This cumulative extension explains why symptoms appear only after hours of work—you’re not typing incorrectly, but your body drifts into damaging positions as fatigue accumulates. Solution: Install forearm supports that contact your desk 1-2 inches behind the spacebar, allowing your arms to rest fully while typing.
Shoulder Elevation: The Posture Killer You Ignore
When your keyboard sits too high, your shoulders elevate 1-2 inches to reach the keys—a position requiring continuous trapezius muscle contraction. This tension radiates into neck stiffness and upper back pain that appears hours after work. Proper ergonomic hand position for typing keeps shoulders level with your collarbones, eliminating this muscle load completely.
Static Posture: The Hidden Time Bomb
Maintaining any position—even perfect alignment—for more than 30 minutes creates tissue fatigue. Your muscles deplete oxygen reserves and accumulate metabolic waste that causes discomfort. Set a timer for 25-minute intervals: when it chimes, stand, stretch your fingers fully, and rotate your wrists for 15 seconds before resuming typing.
The 30-Minute Movement Protocol That Prevents Tissue Damage
Research shows taking 20-30 seconds of movement every 30 minutes reduces cumulative trauma risk by 65% compared to standard break schedules. Your movement protocol must include three specific actions to reset tissue health:
- Full finger extension: Spread fingers wide for 5 seconds, then make tight fists for 5 seconds (repeat 3x)
- Wrist circles: Rotate wrists slowly in both directions for 10 seconds
- Shoulder rolls: Roll shoulders backward 5 times to release trapezius tension
Essential Recovery Stretches for End-of-Day Relief
After typing sessions, perform these stretches to reverse daily compression:
– Prayer stretch: Press palms together firmly for 15 seconds
– Reverse prayer: Place backs of hands together with fingers pointing down for 15 seconds
– Tennis ball massage: Roll each palm over a tennis ball for 30 seconds
Your Complete Ergonomic Setup Checklist for Immediate Relief
Verify These Critical Measurements Today
- Elbow height: Should be 2-3 inches above keyboard height when seated
- Elbow angle: Must open to 100-110 degrees (not 90) for optimal circulation
- Wrist angle: Zero degrees extension/flexion (straight line from forearm to hand)
- Keyboard slope: 5-15 degrees negative tilt (away from your body)
Quick Fixes When Equipment Isn’t Adjustable
No keyboard tray? Place a thin book under your chair seat to lower your body relative to the keyboard. Can’t adjust keyboard slope? Remove rear feet and place a folded towel under the front edge. Forearms hovering? Use rolled towels as temporary arm supports at desk height.
Long-Term Protection: How Proper Hand Position Saves You From Surgery
Workers who maintain proper ergonomic hand position for typing reduce carpal tunnel syndrome risk by 82% compared to those with poor posture—making this the single most effective prevention strategy available. The investment of 10 minutes to adjust your workspace today prevents potentially thousands of dollars in medical costs and weeks of productivity loss from surgery and rehabilitation. More importantly, it preserves your ability to type comfortably for decades to come, protecting your career longevity and quality of life.
Your hands are your primary work tools—treat them with the precision they deserve. By implementing these specific positioning techniques and movement protocols, you transform typing from a physical stressor into a sustainable activity. Start with one adjustment today (keyboard slope or forearm support), then add another tomorrow. Within a week, you’ll notice reduced fatigue and increased comfort that makes extended typing sessions possible without pain. The cumulative protection you build through proper ergonomic hand position for typing today will serve you for the rest of your working life.