Mopping shouldn’t leave you feeling like you’ve run a marathon. Yet millions of people experience back pain, shoulder strain, and persistent fatigue after what should be a simple household chore. The culprit? Most of us are using improper ergonomic mopping techniques that place unnecessary stress on our bodies. When you bend, reach, and twist incorrectly while mopping, you’re not just working harder—you’re inviting chronic pain that can develop over months and years of improper technique. The good news is that by adjusting how you move, position your body, and select your equipment, you can transform mopping from a painful chore into a comfortable routine that leaves you energized rather than exhausted.
This guide reveals proven ergonomic mopping techniques that protect your back, shoulders, and joints while actually improving your cleaning results. You’ll learn specific movements that engage your strongest muscles, handle adjustments that maintain proper spinal alignment, and equipment choices that prevent repetitive strain injuries. Whether you mop floors daily as part of your job or tackle this chore occasionally at home, these evidence-based methods will help you work smarter and feel better—starting with your very next mopping session.
Master Side-to-Side Foot Movement Instead of Overreaching
Most people instinctively stretch across the floor with their mop while keeping their feet planted, creating a dangerous pattern of overreaching that concentrates stress in vulnerable upper body muscles. This approach forces your shoulders, arms, and lower back to bear the brunt of the work while your powerful leg muscles remain underutilized—a recipe for rapid fatigue and potential injury.
How to Shift Your Feet Properly During Mopping
Position your feet shoulder-width apart and take deliberate lateral steps as you progress across the floor. For every mop stroke, adjust your stance so the mop remains comfortably within your natural reach zone—roughly the area between your waist and shoulders when your arms are relaxed at your sides. Think of mopping as a coordinated dance where your feet carry you through the space rather than a static position where you stretch to reach distant areas.
When approaching a new section of floor, step laterally or pivot on your heel to reposition rather than lunging forward or twisting your torso. This continuous foot movement engages your quadriceps, glutes, and core—your body’s largest and most resilient muscle groups—while protecting your smaller, more vulnerable upper body muscles. You’ll notice immediate benefits: less arm fatigue, reduced back strain, and the ability to cover larger areas without exhaustion.
Common Foot Movement Mistakes to Avoid
Many people unknowingly sabotage their ergonomic mopping techniques by taking steps that are too small or keeping their feet too close together. This creates an unstable base that forces your upper body to compensate. Instead, maintain a stable stance with feet at least shoulder-width apart, and take steps that match the width of your mop head—typically 12-18 inches. Avoid crossing your feet while moving, as this compromises balance and forces awkward twisting motions that strain your spine.
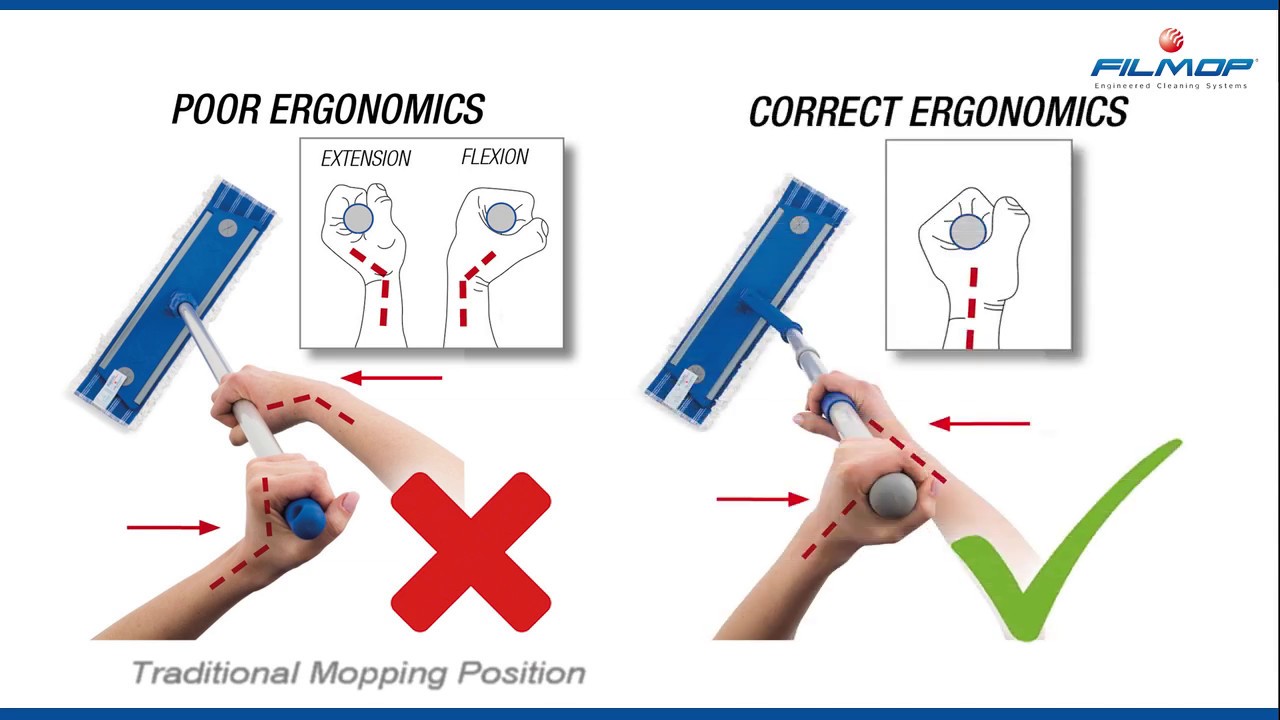
Optimize Your Mop Handle Length for Proper Spine Alignment

Handle length is the silent culprit behind most back pain during mopping. Handles that are too short force you into a hunched position that compresses spinal discs and strains supporting muscles with every stroke. The ideal handle length allows you to maintain a neutral spine position—ears aligned with shoulders, shoulders aligned with hips—while keeping your elbows slightly bent.
Finding Your Perfect Handle Length
Stand upright with good posture and have someone measure from the floor to your elbow when your arm is bent at 90 degrees. This measurement represents your ideal handle length for maintaining proper biomechanics during mopping. Most standard mops range from 48-60 inches, but telescoping handles allow you to customize length based on your height. When gripping the mop, your arms should form a comfortable 90-degree angle—not fully extended or excessively bent.
Adjustable Handle Solutions for Different Tasks
Consider investing in a mop with a telescoping handle that can be shortened for detailed work near baseboards and extended for general mopping. This eliminates the need to bend forward for edge cleaning—a common cause of lower back strain. If you share cleaning duties with others of different heights, an adjustable handle ensures everyone can use proper ergonomic mopping techniques without compromising their posture.
Protect Your Knees During Detailed Floor Work

When cleaning near baseboards or tackling stubborn spots, many people drop to their knees without protection, subjecting their joints to direct impact on hard surfaces. This repeated stress can lead to chronic knee pain and tissue damage over time, especially for professional cleaners or frequent household moppers.
Proper Kneeling Technique with Protection
Always use knee pads when working near the floor for extended periods. Position yourself by stepping one foot forward and lowering your body by bending the front knee while keeping your back straight—never dropping directly onto your knees from a standing position. When you need to move while kneeling, “walk” by shifting your weight from one knee to the other rather than dragging yourself across the floor, which creates dangerous shear forces on your joints.
Alternating Positions to Prevent Joint Fatigue
For tasks requiring prolonged time near the floor, alternate between kneeling, squatting, and standing positions every few minutes. When squatting, keep your heels on the ground if possible and maintain a neutral spine position by sending your hips back as you lower—imagine sitting in an invisible chair. This position engages your powerful leg muscles while reducing pressure on your knees compared to deep kneeling.
Position Your Bucket Strategically to Eliminate Awkward Twisting
The placement of your mop bucket dramatically affects how many times you bend, twist, and reach during a cleaning session. Most people position their bucket too far away, forcing them to make awkward movements dozens of times during a single mopping session—movements that cumulatively strain your spine and shoulders.
Ideal Bucket Placement for Ergonomic Efficiency
Position your bucket centrally within your work zone, placing it within easy arm’s reach without requiring you to bend forward or twist your spine. The perfect location allows you to step sideways to dip the mop, wring it out with a simple vertical motion, and step back to continue cleaning—all without any reaching or spinal rotation. For larger rooms, move the bucket periodically rather than stretching across greater distances as you work.
Wheeled Bucket Solutions for Heavy Lifting
When filling or emptying buckets, use wheeled options to prevent the dangerous act of lifting heavy water loads. Carrying a full bucket places sudden stress on your back muscles and spinal discs—stress that can cause acute injuries even in otherwise healthy individuals. Wheels transform this high-risk lifting task into a simple pushing motion that your legs can handle safely.
Alternate Hands and Maintain Proper Posture Throughout
Repetitive strain injuries develop when the same muscles perform identical motions without adequate recovery. During extended mopping sessions, favoring your dominant hand causes fatigue to accumulate in specific muscle groups while neglecting others, accelerating exhaustion and increasing injury risk.
Hand Alternation Technique for Balanced Muscle Engagement
Every 2-3 minutes, switch your grip so your non-dominant hand leads the pushing or pulling motion. This simple practice distributes the workload across different muscle groups, allowing fatigued muscles to recover while others engage. When pushing the mop, lead with your left hand for several strokes, then switch to leading with your right. For pulling motions, reverse the pattern. Many professional cleaners report being able to work 30-50% longer before fatigue sets in when they consciously alternate hands.
Posture Maintenance Checklist for Every Mop Stroke
As you work, periodically check your posture using this quick mental checklist:
– Ears aligned with shoulders (no forward head posture)
– Shoulders relaxed and down (not hunched toward ears)
– Elbows slightly bent (approximately 90 degrees)
– Spine neutral (neither rounded forward nor excessively arched)
– Mop pushing rather than pulling (engages stronger leg muscles)
Push the mop whenever possible rather than pulling it, as pushing engages your stronger leg and core muscles while placing less strain on your shoulder joints. When you need to change directions, step around the mop rather than reaching across your body or twisting your spine to reposition.
Implement Post-Mopping Recovery Routines
Completing your cleaning task with targeted stretching prevents the stiffness and discomfort that often follows physical work. These few minutes of recovery transform mopping from a punishing chore into a manageable activity your body can handle regularly without accumulating damage.
Essential Post-Mopping Stretches
Perform this 3-minute recovery sequence immediately after finishing:
1. Standing back stretch: Place hands on lower back, gently arch backward while looking slightly upward, hold for 15 seconds
2. Shoulder rolls: Roll shoulders forward 5 times, then backward 5 times to release rotator cuff tension
3. Wrist rotations: Extend arms, rotate wrists slowly in both directions for 10 seconds each
4. Hamstring stretch: Place one foot slightly forward, hinge at hips (not waist) to feel gentle stretch in back of thigh
If you experience persistent discomfort despite following proper ergonomic mopping techniques, take time to evaluate your method and equipment. Sometimes small adjustments to handle length, bucket position, or movement patterns can resolve ongoing issues before they develop into chronic conditions. Your body sends signals through discomfort, and paying attention to these signals helps you refine your technique for long-term comfort and effectiveness.