Ultrasound sonographers face a silent career threat that affects over 90% of practitioners: work-related musculoskeletal disorders (WRMSDs). Unlike acute injuries, these conditions develop gradually through thousands of repetitive motions, sustained awkward postures, and physical strain during scanning sessions. The consequences are severe—with studies showing that nearly half of all sonographers eventually leave the profession due to chronic pain and injury. What’s most alarming is that these career-ending conditions are almost entirely preventable with proper ergonomics for ultrasound sonographers.
The physical demands of ultrasound work have intensified dramatically in recent years. Heavier patient populations require greater transducer pressure, detailed imaging protocols extend scan times, and high-volume workloads reduce recovery time between patients. This perfect storm of factors transforms what should be a rewarding medical career into a physical endurance test. Without intervention, the repetitive stress of scanning accumulates silently until pain becomes unavoidable.
This guide delivers actionable, evidence-based ergonomic strategies specifically designed for ultrasound practitioners. Whether you’re experiencing early discomfort or proactively protecting your career, these seven critical adjustments will help you scan smarter, reduce physical strain, and extend your professional longevity. Implement these changes today to prevent the chronic pain that sidelines so many talented sonographers.
Fix Your Monitor Position to Eliminate Neck Strain in 60 Seconds
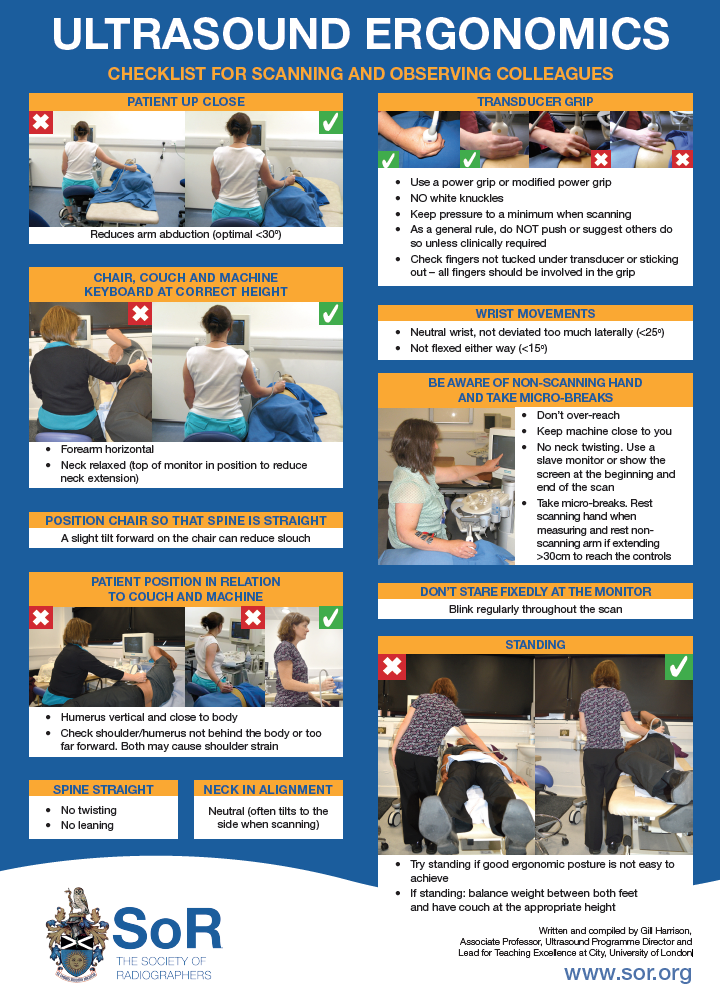
Improper monitor placement causes cervical strain in 78% of sonographers within their first five years of practice. The most common mistake? Positioning the display too far to the side, forcing sustained neck rotation during scanning. This seemingly minor deviation creates asymmetric loading on cervical structures that accumulates damage with each scan.
Position Your Screen at Eye Level with Slight Downward Tilt
Your ultrasound monitor must sit directly in front of your primary scanning position—not off to one side. The top of the screen should align with your natural eye level, requiring only a slight downward gaze (15-20 degrees) to view the entire display. This neutral neck position reduces cervical disc pressure by 40% compared to looking upward or twisting.
Pro Tip: If your machine has a fixed monitor, place books under your feet to raise your height rather than craning your neck downward. Anti-glare filters become essential when lighting conditions can’t be optimized.
Avoid These Three Monitor Positioning Mistakes
- The “Over-the-Shoulder” Setup: Scanning while viewing a monitor positioned behind your opposite shoulder creates rotational stress that accelerates disc degeneration
- Excessive Viewing Distance: Monitors placed beyond arm’s length force squinting and forward head posture, doubling neck muscle activity
- Unstable Mounts: Wobbly monitor arms require constant micro-adjustments that fatigue neck stabilizers
Adjust your display before your next patient and notice immediate relief. Consistent proper positioning prevents the chronic neck pain that affects 63% of sonographers by mid-career.
Optimize Transducer Grip to Prevent Carpal Tunnel Syndrome

Wrist injuries represent the second most common occupational hazard for ultrasound practitioners after back pain. The repetitive transducer manipulation combined with sustained non-neutral wrist positions creates ideal conditions for carpal tunnel syndrome and tendonitis. The solution starts with how you hold your most essential tool.
Maintain Neutral Wrist Position During All Scans
Your wrist should remain in a straight, neutral alignment—not flexed upward, downward, or deviated side-to-side. Imagine holding a glass of water without spilling—this natural position minimizes pressure in the carpal tunnel. Transducer grip force should be the minimum necessary for control (approximately 2-3 pounds), not a white-knuckle death grip many sonographers develop unconsciously.
Warning: Excessive grip force increases carpal tunnel pressure by 600% compared to light holding. Check your grip every 15 minutes during scanning sessions.
Implement the “Golf Club” Transducer Holding Technique
Hold the transducer as you would a golf club—with fingers wrapped around the body and thumb positioned along the side for stability. This technique:
– Distributes pressure across the entire hand rather than concentrating force in the thenar eminence
– Allows wrist movement through the transducer rather than your joint
– Reduces thumb strain by 45% compared to traditional “pencil grip” methods
Practice this grip during low-stress scanning before implementing it with challenging patients. Your future self will thank you when colleagues are struggling with wrist pain.
Transform Patient Positioning to Reduce Back Stress by 50%
Forward bending and spinal rotation during scanning creates cumulative damage that leads to chronic low back pain in 82% of sonographers. The key to protection isn’t avoiding patient contact—it’s strategically positioning both you and your patient to maintain neutral spinal alignment throughout the examination.
Bring the Anatomy to You, Not Your Body to the Anatomy
Instead of leaning over patients to reach target areas, adjust the patient position so the scanning site comes to your neutral working zone. For abdominal scans, elevate the patient’s knees with a pillow to bring the abdomen closer to you. For extremity exams, position supportive wedges under limbs to eliminate the need for you to reach across the table.
Time-Saver: Proper patient positioning reduces average scan time by 12% because you’re not fighting gravity and awkward positions to obtain images.
Use Strategic Table Height Adjustments for Every Exam Type
- Abdominal/Pelvic: Raise table to hip level (prevents forward bending)
- Vascular: Lower table slightly below hip level (reduces shoulder elevation)
- Obstetric: Position table at waist height with patient slightly lateralized
Document your ideal heights for each exam type and adjust before your first patient. Consistent proper table height reduces lumbar disc compression forces by 50% compared to working at fixed-height tables.
Implement Micro-Breaks That Actually Prevent Injury
Most sonographers take breaks when they feel pain—but by then, damage has already occurred. The most effective injury prevention strategy requires scheduled micro-breaks that interrupt the cumulative strain before it reaches critical levels.
Take 90-Second Recovery Breaks Every 45 Minutes
Set a timer for 45-minute intervals during scanning sessions. When it chimes, immediately:
1. Step away from the machine (don’t finish “just one more image”)
2. Perform 30 seconds of shoulder rolls and neck stretches
3. Walk to the break room or window for 30 seconds of movement
4. Return with fresh focus for the next patient
Critical Insight: These brief interruptions reduce muscle fatigue by 65% compared to traditional longer but less frequent breaks. The key is frequency—micro-breaks prevent the fatigue buildup that leads to compensatory postures.
Five Essential Stretches to Perform During Micro-Breaks
- Chin Tucks: 5 repetitions holding 3 seconds (counteracts forward head posture)
- Doorway Chest Stretch: 20 seconds each side (reverses rounded shoulder position)
- Wrist Flexor Stretch: 15 seconds each hand (relieves carpal tunnel pressure)
- Seated Spinal Twist: 10 seconds each side (releases rotational spinal stress)
- Shoulder Blade Squeezes: 10 repetitions holding 5 seconds (activates scapular stabilizers)
These targeted stretches address the exact muscle imbalances created during scanning. Perform them consistently to maintain the flexibility needed for optimal posture.
Configure Sit-Stand Workstations for Maximum Spinal Relief
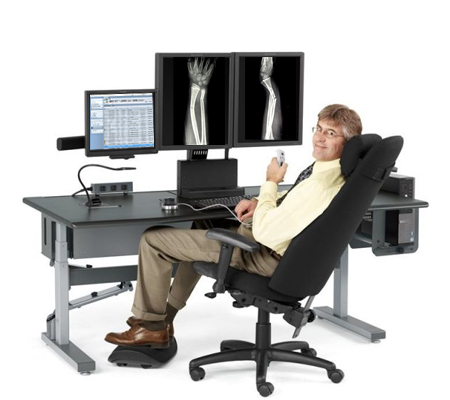
Standing all day creates different problems than sitting—all day. The solution isn’t choosing one position but strategically alternating between both to distribute mechanical load across different muscle groups and spinal structures.
Set Up Your Sit-Stand Station for Seamless Transitions
When standing:
– Position the machine at elbow height with transducer controls within 12 inches
– Use an anti-fatigue mat and footrest to shift weight periodically
– Maintain slight knee flexion (5-10 degrees) to absorb shock
When sitting:
– Adjust chair height so feet rest flat with knees slightly lower than hips
– Position lumbar support at natural waist curvature
– Keep transducer within 18 inches to avoid reaching
Pro Tip: Alternate positions every 20-30 minutes—don’t wait until discomfort appears. This pattern reduces cumulative spinal loading by 35% compared to static positioning.
Customize Machine Controls to Eliminate Repetitive Strain
Reaching for controls during scanning creates micro-trauma that accumulates into significant injury over time. The most ergonomic machines place frequently used functions within a “golden triangle” that requires no wrist deviation or shoulder elevation.
Program Your Most Used Functions Within Thumb Reach
Identify the 5-7 controls you access most during typical exams (commonly gain, depth, freeze, measure). Reprogram these to the most accessible buttons—typically those reachable by your thumb while maintaining neutral wrist position. Reduce unnecessary movements by 70% through strategic button mapping.
Warning: Avoid “button hunting” during scans—this creates erratic movement patterns that accelerate tissue damage. If you must look away from the screen to find controls, your setup needs adjustment.
Build Long-Term Resilience Through Targeted Strength Training
General fitness won’t protect you from the specific demands of ultrasound work. You need targeted exercises that address the exact muscle groups stressed during scanning, performed with proper technique to avoid creating new problems.
Three Essential Exercises for Sonographer-Specific Strength
- Prone Y-T-I Raises: 2 sets of 10 each position (strengthens lower trapezius to counteract rounded shoulders)
- Pallof Press: 3 sets of 12 each side (builds anti-rotation core stability for scanning posture)
- Wrist Roller: 2 minutes daily (balances forearm flexors/extensors to prevent tendonitis)
Perform these exercises 3 times weekly. Proper form matters more than resistance—start with minimal weight and focus on perfect movement patterns.
Time Commitment: Just 15 minutes, 3x/week delivers 80% of the protective benefits. Consistency beats intensity for injury prevention.
Ultrasound sonographers possess exceptional technical skills, but without proper ergonomics for ultrasound sonographers, those skills become compromised by preventable physical limitations. The seven adjustments outlined here address the root causes of career-threatening injuries rather than just treating symptoms. Start with one change today—proper monitor positioning takes less than a minute but delivers immediate relief. Within three months of consistent implementation, you’ll notice reduced fatigue, improved scanning efficiency, and the confidence that your career won’t be cut short by occupational injuries.
Your body is your most essential diagnostic tool. Treat it with the same care you give your ultrasound machine, and you’ll enjoy a long, pain-free career helping patients through diagnostic imaging. Share these strategies with colleagues to create a culture where ergonomic excellence becomes the department standard rather than the exception.