Spending hours behind the wheel with poor posture creates more than just temporary discomfort—it leads to chronic back pain, neck strain, and reduced driving focus that affects millions of commuters and professional drivers. When your car seat isn’t positioned correctly, your spine bears unnecessary pressure that accumulates over time, eventually causing long-term musculoskeletal damage. This guide delivers precise, actionable steps to configure your driving position properly regardless of your vehicle type or body size, transforming your daily commute from a pain trigger into a supportive experience that protects your spinal health.
Most drivers unknowingly adopt compromised positions that force the body to work harder just to stay balanced behind the wheel. The good news is that nearly every modern vehicle offers sufficient adjustment range to achieve proper ergonomic alignment—you just need to know exactly how to manipulate those controls for your specific anatomy. By the end of this guide, you’ll understand precisely how to position every element of your driving setup to minimize fatigue, prevent injury, and maintain optimal control during every journey.
Position Your Seat at the Correct Height Before Anything Else
Your seat height forms the foundation for all other ergonomic adjustments and should be your first step toward proper driving posture. Sit in your vehicle and locate the height adjustment control, typically a lever or knob on the outer edge of the seat base. Raise or lower yourself until you can see at least three inches above the steering wheel’s top edge without craning your neck forward.
When properly positioned, your thighs should rest fully on the seat cushion with no pressure points behind your knees, while your feet rest flat on the floor when not operating pedals. Your knees should bend at approximately 90 degrees in this neutral position. If you feel your weight shifting forward toward the seat edge or notice numbness in your legs after short drives, your seat is likely too high.
What to Check for Proper Height Alignment
- Your line of sight clears the steering wheel without leaning forward
- You maintain full contact between your lower back and the seat back
- Your hips sit level with or slightly higher than your knees
- You can operate pedals without lifting your heel off the floor
Many drivers make the critical mistake of setting their seat too low, forcing them to hunch forward to see the road properly. This position strains cervical discs and accelerates disc degeneration over time. Conversely, sitting too high creates excessive pressure on your ischial tuberosities (sitting bones), leading to discomfort within 20-30 minutes of driving.
Set the Perfect Seat Distance from Pedals for Control and Comfort
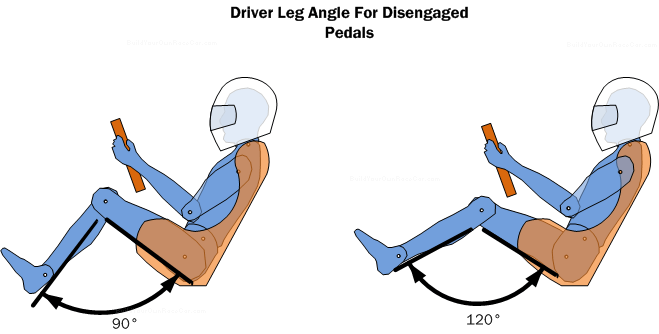
After establishing correct height, adjust your seat’s fore-aft position to achieve optimal pedal control without compromising spinal alignment. Your seat should allow full depression of the brake pedal while maintaining a slight bend in your knee—approximately 25 to 30 degrees of flexion.
To test this, place your heel on the floor with your foot on the brake pedal and press it to the floor. Your knee should remain slightly bent, not fully extended. If your leg straightens completely, move the seat rearward. If your knee bends sharply beyond 90 degrees, move the seat forward. This position gives you maximum braking control while maintaining proper circulation to your lower extremities.
Common Distance Mistakes to Avoid
- Over-reach position: Causes shoulder strain and reduces steering precision
- Excessive knee bend: Creates pressure behind knees and reduces pedal sensitivity
- Hip-pivoting: Driving from your knees instead of ankles stresses lumbar discs
Professional driving instructors recommend simulating an emergency stop to verify your position: with your foot on the brake, you should be able to push through the pedal’s full travel without your shoulder lifting off the seat back. If your body rocks forward during hard braking, move the seat slightly closer to the pedals.
Optimize Your Seat Back Angle for Spinal Support
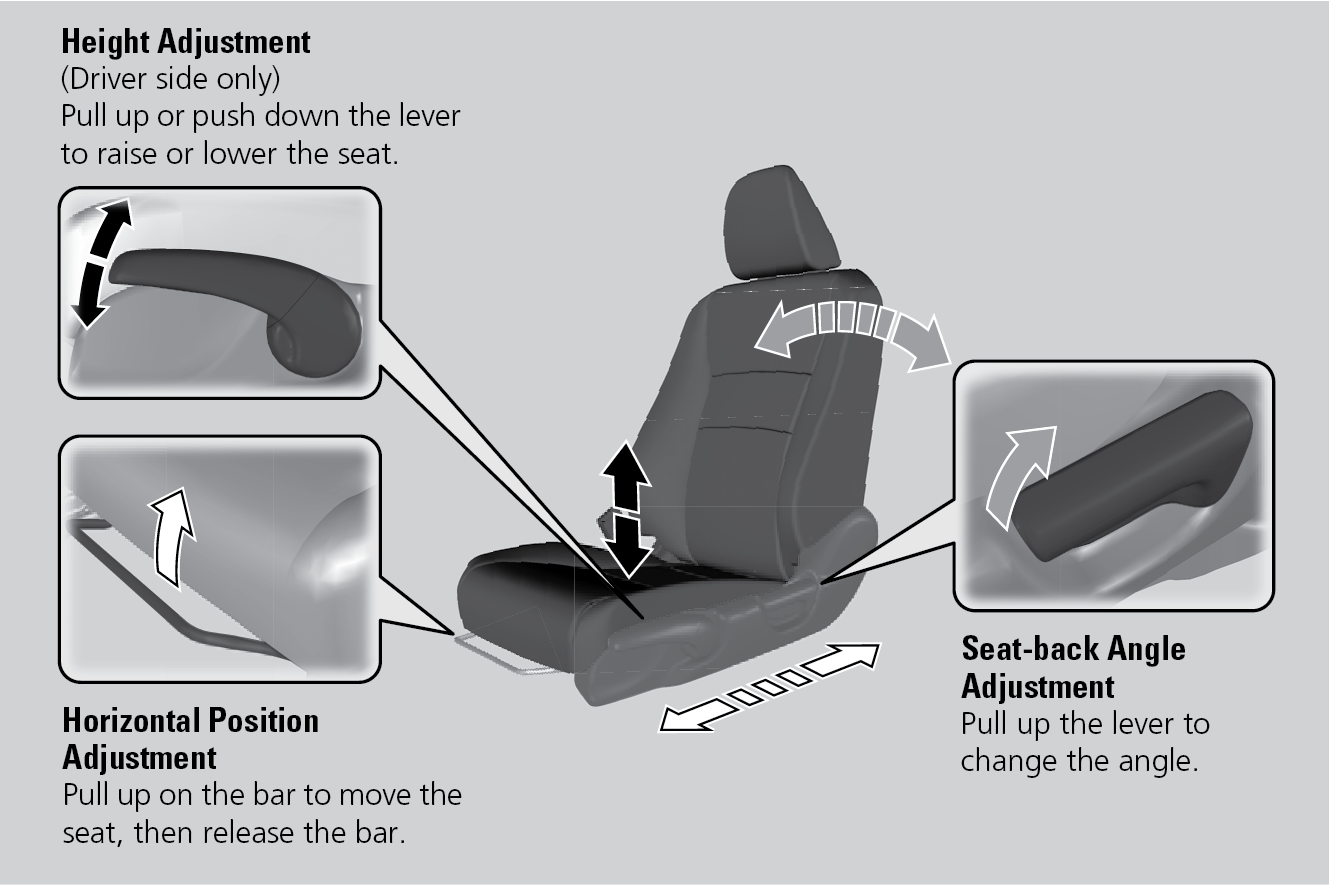
The angle of your seat back dramatically affects spinal loading during driving—too upright increases disc pressure while excessive recline compromises vehicle control. Adjust your seat back to position your torso at 100 to 110 degrees relative to your thighs, creating a slight recline that reduces lumbar disc pressure by up to 40% compared to a 90-degree position.
Your shoulders should make complete contact with the seat back without forcing your head forward. If you find yourself sliding down the seat during drives, your angle is too reclined. If your lower back loses contact with the seat when you relax your posture, the angle is too upright. The ideal position allows you to maintain the natural inward curve of your lumbar spine without muscular effort.
Customizing Lumbar Support for Maximum Benefit
Most modern vehicles feature adjustable lumbar support—use it to fill the space between your lower back and the seat. The support should create gentle pressure at belt-line level, enhancing your natural spinal curve without pushing you forward. If your vehicle lacks this feature, a small rolled towel or purpose-built lumbar cushion provides equivalent support.
Pro Tip: Adjust lumbar support while seated normally, not while consciously arching your back. The support should maintain your natural curve, not create an artificial one. Check your position every 15-20 minutes during long drives, as body fatigue often causes subtle slouching that reduces support effectiveness.
Position the Steering Wheel for Natural Arm Alignment
Your steering wheel position must complement your seat adjustments to complete the ergonomic triangle between seat, pedals, and wheel. Modern vehicles typically offer tilt and telescope adjustment—use both to achieve optimal positioning.
Grasp the wheel at 9 and 3 o’clock positions with elbows slightly bent at 15 to 20 degrees. Your arms should hang naturally from your shoulders without lifting your shoulders toward your ears. The top of the steering wheel should sit at or slightly below shoulder level, allowing your head to remain in a neutral position without tilting forward.
Maintain at least 10-12 inches between your sternum and the center of the wheel for proper airbag deployment in collisions. If you’re tall and struggle with this distance even with the seat fully rearward, consider a steering wheel cover that adds thickness without compromising grip.
Configure Headrests to Support Your Cervical Spine

Most drivers position their headrests incorrectly, eliminating their protective function and creating neck strain. Adjust your headrest so the top edge aligns with the top of your head—approximately at eye level when seated normally.
When properly positioned, the headrest should sit close enough that only a fist fits between your head and the restraint. This proximity provides crucial support during rear-end collisions, reducing whiplash risk by limiting head hyperextension. If your vehicle allows, tilt the headrest slightly backward (10-15 degrees) to cradle your head comfortably without pushing it forward.
Take Strategic Movement Breaks During Long Drives
Even perfect ergonomic setup cannot compensate for prolonged static sitting. Plan to stop every 90-120 minutes during extended drives to reset your posture and restore circulation to compressed spinal tissues.
During these breaks, perform simple stretches: stand and place your hands on your lower back, gently leaning backward to counteract the flexed driving position. Roll your shoulders backward 10 times to release upper trapezius tension. Walk for at least 3-5 minutes to reactivate circulation in your legs and spine. These brief interventions significantly reduce cumulative fatigue and prevent stiffness that builds during continuous driving.
Troubleshoot Common Discomfort Patterns Quickly
Different pain patterns indicate specific adjustment needs—learn to interpret these signals for immediate relief. Lower back pain worsening during drives typically means insufficient lumbar support; add a cushion or increase your seat’s lumbar adjustment. Neck pain often relates to mirror positioning—recheck that you can see surrounding traffic without craning your neck.
Quick Reference for Pain Patterns
- Thigh numbness: Seat pressing against sciatic nerve—adjust seat angle or add a wedge cushion
- Shoulder fatigue: Steering wheel too far away—move seat forward or extend steering column
- Foot cramps: Pedal position forcing unnatural ankle angle—reposition seat or adjust pedal angle
Special Adjustments for Taller and Shorter Drivers
Taller drivers (over 6 feet) often need to lower their seat height while maintaining pedal access—consider removing seat cushions if available. Shorter drivers frequently require seat risers to achieve proper visibility and pedal control without compromising lumbar support.
Tall drivers should prioritize steering wheel telescope extension to maintain proper chest-to-wheel distance, while shorter drivers benefit from tilt-down steering adjustment to prevent reaching upward. Both groups should verify headrest positioning carefully, as standard settings often don’t accommodate extreme heights properly.
Final Verification Checklist Before Driving
Before starting your engine, confirm these critical alignment points:
- Your eyes clear the steering wheel by 3+ inches without leaning forward
- Shoulders maintain full contact with seat back during steering maneuvers
- Elbows bend naturally at 15-20 degrees when holding the wheel at 9 and 3
- Knees maintain 25-30 degree bend when pedals are fully depressed
- Headrest top aligns with crown of your head with minimal gap
Taking just three minutes to properly configure your driving position pays exponential dividends in reduced fatigue, enhanced focus, and long-term spinal health. Your vehicle’s adjustment mechanisms exist specifically to support your body—use them correctly, and you’ll transform every drive from a physical challenge into a comfortable, controlled experience that protects your most valuable asset: your body.