If your wrist aches after hours at the computer, the problem might not be your mouse—it’s how you’re using it. Millions of computer users unknowingly damage their wrists through improper ergonomic mouse technique, leading to preventable pain and potential long-term injuries. Unlike keyboarding, which allows brief rests between typing bursts, mouse operation requires continuous movement patterns that either protect or harm your delicate wrist structures. This guide reveals the exact techniques professional ergonomists recommend for using an ergonomic mouse correctly—techniques that reduce carpal tunnel pressure by up to 50% compared to conventional usage.
The most critical mistake? Thinking your mouse is the problem when it’s actually your movement patterns. Proper ergonomic mouse usage applies across all input devices—trackballs, touchpads, pen tablets, and traditional mice—but requires specific techniques that most users never learn. Whether you’re experiencing early discomfort or simply want to prevent future problems, mastering these evidence-based techniques will transform your computing experience while protecting your hands, wrists, and arms from cumulative strain.
Stop Crushing Your Mouse: The Relaxed Grip Technique That Prevents Wrist Pain
Your grip pressure directly impacts your risk of developing repetitive strain injuries. Most computer users unconsciously squeeze their mouse too tightly—like white-knuckling a steering wheel during rush hour—creating unnecessary tension that travels up your forearm and into your shoulder. This excessive grip force fatigues muscles faster and increases pressure on the median nerve passing through your carpal tunnel.
How to check if you’re gripping too tightly: Place your non-mouse hand on your opposite forearm while moving the mouse. If you feel muscles tensing excessively or see your knuckles turning white, you’re applying too much pressure. The ideal grip feels like holding a small bird—you need enough contact to control it, but too much pressure would harm both the bird and your hand over time.
The “hover and glide” method for perfect pressure: Practice lifting your entire hand slightly off the mouse between clicks, then gently lowering it back for movement. This creates natural breaks in grip tension and trains your muscles to use minimal force. Start with 5-minute intervals of this technique throughout your workday, gradually increasing as your muscles adapt to lighter pressure.
Ditch Wrist Flicking: How to Move Your Mouse Using Elbow Pivot Technique
Wrist flicking—the quick, darting movements many users employ to navigate their cursor—is the single biggest contributor to mouse-related injuries. This movement doubles pressure inside your carpal tunnel and concentrates strain on delicate wrist structures not designed for repetitive pivoting. Instead, you should move your mouse using your elbow as the primary pivot point while keeping your wrist completely straight.
Why wrist movement doubles carpal tunnel pressure: Your carpal tunnel has a flexible ligament floor that transmits external pressure directly into the confined space containing your median nerve. When you bend or flick your wrist against a surface (even a soft wrist rest), this pressure compresses the nerve, leading to tingling, numbness, and potential long-term damage.
Step-by-step elbow pivot training: Position your mouse at elbow height, then imagine your forearm is a pendulum swinging from your elbow joint. Keep your wrist locked in a neutral “handshake” position as you move the mouse. For small adjustments, move your entire arm rather than your wrist. Practice this for 10 minutes daily by tracing shapes on your screen until the movement feels natural—most users adapt within 3-5 days.
Right-Handed vs Left-Handed: Optimal Mouse Placement for Your Workstation
Improper mouse positioning forces your arm into sustained awkward postures that increase injury risk over time. The correct position depends on your dominant hand and workspace configuration, but follows one universal rule: your mouse should sit at approximately elbow height without requiring you to reach or stretch.
The one-two inch rule for right-handed users: Position your mouse on an adjustable platform one to two inches above your keyboard, ideally over the numeric keypad area. This height allows your elbow to maintain a 90-110 degree angle while keeping your shoulder relaxed. If you frequently use the numeric keypad, choose a platform that slides easily out of the way rather than one permanently fixed to the side of your keyboard.
Left-handed solutions for standard keyboards: Left-handed users face unique challenges with standard right-handed keyboards. Instead of placing a platform over the alphabetic keys (which would obstruct typing), position an angle-adjustable platform immediately to the left side of your keyboard. Set the slope downward slightly to maintain a neutral wrist position while keeping the mouse close enough that you don’t have to reach across your body.
Why Wrist Rests Are Hurting You: The Shocking Truth About Carpal Tunnel Pressure
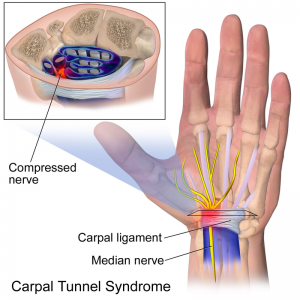
Despite their popularity, wrist rests significantly increase your risk of developing carpal tunnel syndrome. Research confirms that using a wrist rest doubles pressure inside the carpal tunnel by compressing the flexible ligament floor against the rigid bone roof, trapping tendons and the median nerve in a confined space.
The anatomy behind wrist rest dangers: Your wrist naturally curves away from contact surfaces—place your relaxed arm on a desk and notice the space beneath your wrist where you could slide a pen. Any surface contact disrupts this natural curvature and compresses blood vessels near your pulse point, reducing circulation to your hand. This compromised blood flow dramatically increases injury risk during extended computer use.
What to use instead of a wrist rest: Keep your forearm fully suspended while moving the mouse, resting only your palm lightly on the mouse itself. During natural breaks in mousing (when you’re reading or thinking), let your entire hand rest in your lap or on a soft surface away from your workstation. If you need arm support, use a height-adjustable armrest that supports your upper arm without restricting elbow movement.
Flat vs Curved Mice: Which Shape Actually Prevents Wrist Strain?

Mouse shape significantly impacts your wrist positioning and long-term comfort. Contrary to popular belief, curved “ergonomic” mice often force your wrist into unnatural extension that increases carpal tunnel pressure. The ideal ergonomic mouse remains as flat as possible while fitting comfortably in your hand.
How to test mouse shape comfort in 60 seconds: Place your hand on the mouse without gripping it. Your wrist should remain completely straight—no bending upward, downward, or to the sides. If you feel any tension in your forearm or notice your wrist bending, the mouse shape isn’t right for you. The back of your hand should form a straight line from your knuckles to your forearm.
Why larger mice reduce wrist strain: A bigger mouse encourages you to use your entire hand rather than just your fingers, distributing pressure evenly across your palm. This naturally promotes elbow pivot movement instead of wrist flicking. When shopping, choose the largest mouse that still allows your fingers to rest comfortably on the buttons without stretching.
Double Your Mouse Endurance: How Switching Hands Reduces Cumulative Strain
Alternating mouse usage between hands is one of the most effective but underutilized ergonomic strategies. This simple technique allows each hand to recover while the other works, dramatically reducing cumulative trauma risk for heavy computer users.
Equipment needed for effective hand switching: You’ll need a symmetrical mouse (works equally well in either hand) and either a repositionable mouse platform or space for two platforms (one on each side of your keyboard). Start by switching hands during natural breaks in your workflow—after completing a document, during phone calls, or when waiting for files to load.
Building ambidextrous skills without slowing down: Begin with 5-minute intervals using your non-dominant hand during low-stakes tasks. Focus on basic movements before attempting precise work. Most users develop sufficient proficiency within 2-3 weeks. The initial awkwardness pays off with significantly reduced fatigue and injury risk over time.
The 20-20-20 Rule: Simple Break Strategies to Prevent Mouse-Related Injuries
No ergonomic technique works if you never give your hands and wrists a break. The 20-20-20 rule—taking a 20-second break every 20 minutes to look at something 20 feet away—is clinically proven to reduce cumulative strain and prevent mouse-related injuries.
Effective micro-breaks during intensive work: Every 20 minutes, lift your hands completely off your mouse and keyboard for 20 seconds. Shake out your hands gently and stretch your fingers wide. This brief rest resets muscle tension and improves circulation. Set a timer initially until the habit becomes automatic.
Desk-friendly stretches that actually help: While seated, extend your arm straight out and gently pull your fingers back toward your body with your other hand for 15 seconds. Then reverse the stretch by pointing fingers down and gently pulling them toward you. Perform both stretches hourly to maintain flexibility and reduce tension buildup.
By implementing these evidence-based ergonomic mouse techniques consistently, you’ll protect your hands and wrists from preventable strain while maintaining productivity. Remember that proper ergonomic mouse usage isn’t a one-time adjustment—it’s an ongoing practice of awareness and correction. Check your grip, wrist position, and movement patterns throughout the day, and don’t hesitate to experiment with different techniques until you find what works best for your unique physiology and workflow. Your future self will thank you when you’re still computing comfortably years from now.