
Gripping a pen incorrectly can transform a simple writing task into a painful experience. Millions of people develop hand fatigue, cramping, or even chronic conditions from years of poor pen-holding habits. Whether you’re a student taking lecture notes, a professional drafting reports, or someone who loves journaling, learning how to hold a pen ergonomically protects your hand health and improves your writing endurance. The good news is that proper pen technique is a learnable skill—you can retrain your muscles and develop habits that keep your hand comfortable during extended writing sessions.
This guide walks you through the fundamental principles of ergonomic pen holding, from mastering the classic tripod grip to selecting the right writing instruments and setting up an optimal workspace. You’ll discover precise finger placements, wrist alignments, and pen angles that reduce strain while enhancing your handwriting clarity. By implementing these techniques and incorporating simple hand exercises, you can make writing a comfortable, sustainable activity for years to come.
Master the Tripod Grip Technique
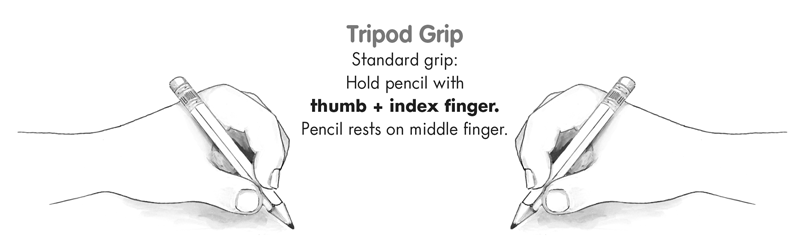
The tripod grip forms the foundation of comfortable, sustainable writing and represents the most efficient way to control your pen while minimizing muscle strain. This technique gets its name from the three contact points that create stability: your thumb, index finger, and middle finger working together to form a natural triangular support system. When you use this grip correctly, your hand moves fluidly across the page with minimal effort, allowing larger arm muscles to handle movement rather than forcing your fingers to do all the work.
To achieve the proper tripod grip, rest the pen barrel on the side of your middle finger near the first knuckle, while your index finger curves gently over the top and your thumb provides counterbalance from below. The pen should rest comfortably in the webbing between your thumb and index finger, creating a stable fulcrum point. Your ring finger and pinky should rest naturally beneath the pen, providing a rolling surface but not bearing significant weight.
Many writers instinctively grip too close to the pen tip, thinking this gives them more precision. However, ergonomic experts recommend holding your pen approximately one inch from the tip. This slightly longer lever arm reduces the fine motor demands on your fingers and allows your hand to write from a more natural, relaxed position. During your next writing session, consciously move your grip back and notice how this small adjustment immediately reduces finger strain while maintaining control.
Position Your Fingers for Minimal Strain
Proper finger positioning creates the foundation for pain-free writing sessions that can last for hours. Each finger plays a specific role in controlling the pen, and understanding these roles helps you distribute effort efficiently across your entire hand. The goal is relaxed control—applying just enough pressure to guide the pen without tensing your muscles.
Your index finger should curve gently around the pen’s top, applying light downward pressure to guide movement. Avoid pressing the index finger straight down or locking the joint—this creates tension that travels up your arm. Instead, imagine you’re holding a delicate bird; you need enough pressure to keep it from flying away, but not so much that you harm it. This mental image helps you find the light touch that ergonomic writing requires.
Place your thumb slightly lower than your index finger’s joint, creating a natural pinching motion that feels comfortable rather than forced. Some writers benefit from positioning their thumb slightly forward on the pen, while others find a more centered position works better. Test both positions to determine which allows your hand to remain relaxed during extended writing. Your ring finger and pinky should rest gently beneath the pen, providing a rolling surface that helps the pen glide smoothly across the paper without bearing significant weight.
Maintain Neutral Wrist Alignment
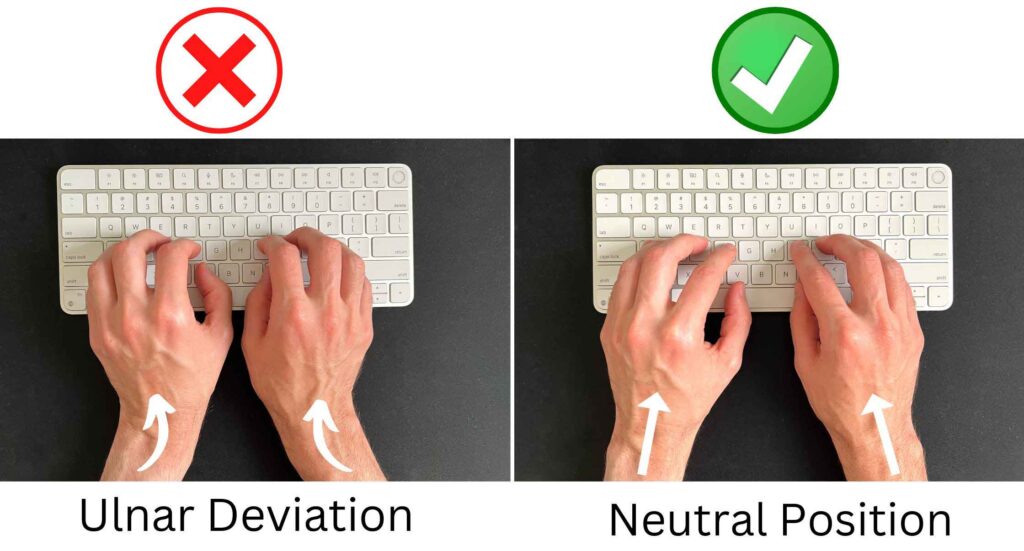
Wrist alignment dramatically impacts your writing comfort and long-term hand health. When your wrist bends at an extreme angle during writing, tendons passing through your carpal tunnel compress, gradually irritating sensitive nerves. Over time, this improper alignment can lead to chronic discomfort or repetitive strain injuries.
Keep your wrist as neutral as possible while writing—neither bent sharply upward nor pressed flat against the desk. Imagine your forearm and hand forming a straight line, with your wrist acting as a gentle, natural bend rather than a sharp angle. This alignment allows tendons to glide smoothly through the carpal tunnel without friction. If you notice your wrist angling sharply upward as you write, your chair may be too low relative to your desk, or you may be reaching too far across your writing surface.
Elevate your writing surface to a height that keeps your forearms parallel to the floor or slightly angled downward. When your forearms rest comfortably on your desk with shoulders relaxed, your wrists naturally adopt a more neutral position. Avoid writing with your arm suspended in the air or with your wrist pressed hard against the desk edge—both positions create problematic strain patterns that fatigue your hand quickly.
Optimize Your Pen Angle for Comfort

The angle at which you hold your pen affects both comfort and handwriting quality. Most ergonomic recommendations suggest holding the pen at a 35 to 45-degree angle relative to the writing surface, though individual hand anatomy may require slight adjustments. This angle allows the pen tip to contact the paper efficiently while keeping your wrist in a comfortable, neutral position.
Angles steeper than 45 degrees force your wrist into extension, pressing the palm-side tendons against the carpal tunnel and creating gradual strain. Writers who hold their pens nearly vertical often develop forearm and wrist fatigue because their fingers must work harder to control fine movements. Conversely, holding the pen too flat—below 30 degrees—can cause you to press harder to achieve line visibility, requiring awkward finger positioning that tires quickly.
To find your optimal angle, sit at your writing desk with proper posture, place your arm on the desk in a relaxed position, and let your hand naturally fall into its comfortable writing pose. Notice the angle your hand naturally adopts, then adjust slightly to fall within the 35 to 45-degree range if needed. Mark this angle mentally or use a small desktop protractor to train your muscle memory. Over time, your hand will naturally seek this comfortable position without conscious effort.
Correct Common Grip Mistakes
Understanding common grip errors helps you identify and correct habits that undermine your writing comfort. These mistakes often develop in childhood and persist into adulthood, gradually causing cumulative damage that manifests as fatigue, pain, or reduced writing endurance.
Gripping too tightly ranks as the most common ergonomic pen error. Many writers believe a firm grip produces better control, but the opposite is true—tight grip tires hand muscles quickly and actually reduces fine motor precision. Your grip should be firm enough to prevent the pen from slipping, but loose enough that someone could gently pull the pen from your fingers with minimal resistance. Practice periodic grip checks during writing sessions, deliberately loosening your fingers whenever you notice tension building.
Gripping too close to the tip forces your fingers into cramped positions and eliminates the natural lever arm that reduces muscle effort. If you find yourself writing with the pen nearly touching your fingertips, consciously slide your grip back toward the recommended one-inch position. Similarly, the “death grip” where all fingers wrap tightly around the pen eliminates the independent finger movements that allow fluid, comfortable writing. Train yourself to use only the three fingers necessary for the tripod grip, keeping your ring finger and pinky relaxed and free-moving beneath the pen.
Select the Right Ergonomic Writing Instrument
Choosing the appropriate pen amplifies your ergonomic efforts, transforming comfortable writing into an almost effortless experience. Ergonomic pens feature designs that reduce the grip strength required, cushion pressure points, and promote neutral wrist positioning. While proper technique matters more than pen selection, the right instrument makes maintaining good habits significantly easier.
Look for pens with a slightly thicker barrel diameter, which reduces the grip force required to maintain control. Standard pens often require you to squeeze tightly to manage their thin profiles, but thicker barrels distribute pressure across a larger hand surface. Pens with rubberized or soft-touch grips provide cushioning that prevents pressure hotspots, though ensure the grip isn’t so soft that it collapses under pressure. Some ergonomic pens feature molded indentations that guide your fingers into optimal positions automatically.
Consider pen weight when selecting an ergonomic option. Heavier pens require less grip pressure to control—their momentum does some of the work for you—but can fatigue your hand during extended sessions. Lighter pens reduce overall hand effort but may require firmer grip to prevent skipping. Test several weights to discover what feels best during 20-minute writing sessions, as initial impressions often differ from comfort during prolonged use.
Implement Strategic Hand Fatigue Relief
Even with perfect technique, extended writing sessions eventually produce hand fatigue. Incorporating strategic breaks and exercises into your writing routine prevents this fatigue from progressing to pain or injury. These simple practices take seconds but dramatically extend your writing endurance while protecting long-term hand health.
The 20-20-20 rule applies beautifully to writing: every 20 minutes, look away from your page and move your hands and arms for 20 seconds. During this brief pause, shake your hands loosely, stretch your fingers wide, and rotate your wrists in gentle circles. This movement flushes metabolic waste from working muscles and restores blood flow to fatigued tissues. Set a quiet timer during writing sessions to ensure you take these micro-breaks consistently.
Strengthening and stretching exercises prepare your hands for writing demands and help them recover afterward. The tennis ball squeeze builds grip endurance—simply hold a soft ball in your palm and squeeze gently 10 to 15 times, repeating with each hand. Finger stretches extend flexibility: extend your arm with palm facing away, then use your other hand to gently press fingers toward your body. Hold each stretch for 15 to 20 seconds. These exercises take fewer than five minutes but significantly improve your hand’s writing capacity over time.
Build Sustainable Writing Habits Through Practice
Transforming ergonomic technique into automatic habit requires consistent practice and conscious reinforcement. Your current grip pattern likely developed over years of unconscious writing, and changing it demands patient effort over a similar timeframe. However, even partial improvement in your grip technique yields meaningful reductions in hand strain during daily writing tasks.
Begin by practicing proper grip for short periods—perhaps five to ten minutes daily—rather than attempting to overhaul your technique during marathon writing sessions. Use these practice sessions to focus purely on finger positioning, wrist alignment, and grip relaxation without worrying about handwriting quality. As comfortable grip becomes more automatic, gradually extend these practice periods while maintaining awareness of your technique during all writing activities.
Set up environmental cues that remind you to check your grip. A small sticky note on your monitor, a phone reminder before writing sessions, or a textured sticker on your pen can trigger conscious awareness of your positioning. When you notice grip errors, correct them gently without self-criticism—habit change is a gradual process that benefits from patience more than perfection. Over weeks and months of consistent practice, proper technique gradually replaces old patterns, making comfortable writing your new automatic default.
Leave a Reply