Few decisions impact your daily comfort and long-term health as much as the configuration of your workspace seating. An improperly adjusted chair creates a cascade of physical problems—from lower back strain and neck tension to reduced circulation and fatigue—that compound over hours and weeks of use. Yet most people sit in chairs they have never properly configured, accepting discomfort as inevitable when the solution requires only a few minutes of thoughtful adjustment. Understanding how to tune your ergonomic chair transforms a generic seating surface into a personalized support system that adapts to your body’s unique dimensions and your work’s dynamic demands.
This guide walks through the complete adjustment process, covering the six essential adjustment categories that determine whether your chair supports or undermines your physical wellbeing. Whether you sit in a premium Herman Miller Aeron or a more accessible task chair like the Sayl, the principles remain consistent: proper setup requires attention to how your body relates to the seat, the backrest, and your work surface. By following this systematic approach to ergonomic chair adjustments, you will establish a configuration that promotes healthy posture, reduces strain during extended work sessions, and adapts to your natural movements throughout the day.
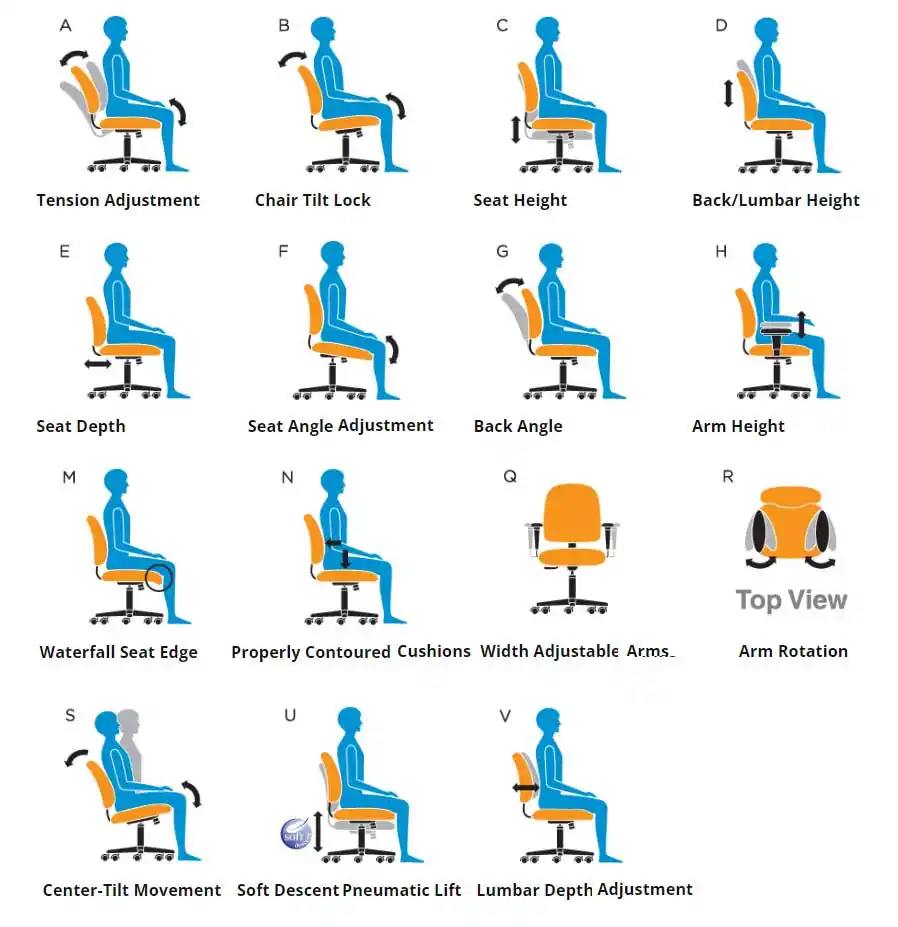
Set Your Seat Height First
Seat height serves as the foundation for every other adjustment, establishing the relationship between your lower body and everything else in your workspace. Beginning here ensures subsequent adjustments build upon a solid reference point rather than compensating for an incorrect baseline.
The correct seat height positions your thighs parallel to the floor with your feet resting flat on the ground. This orientation distributes your weight evenly across the seat surface and prevents pressure buildup under your thighs that can restrict blood flow and cause discomfort over time. When your feet dangle or your knees sit above your hip level, the seat height requires adjustment—typically elevation to lower your knees or lowering to raise them.
Most ergonomic chairs use pneumatic cylinders controlled by levers positioned beneath the seat. To adjust, sit in the chair, locate the height adjustment lever, and while holding your weight in the seat, push the lever upward or downward depending on the mechanism. Test the height by allowing your knees to bend naturally; your thighs should form roughly a 90-degree angle with your lower legs.
If your feet do not reach the floor when properly positioned, a footrest provides the necessary elevation. Do not tuck your feet beneath the seat or let them dangle, as both positions create leg tension and disrupt circulation. A simple footrest—even a sturdy box or stack of books—completes your height configuration when your work surface sits too high for flat-footed positioning.
Calibrate Seat Depth for Proper Thigh Support
Once seat height establishes your lower body position, seat depth adjustment determines how much of your thigh contacts the seat surface. This setting directly affects circulation behind your knee and the stability of your posture throughout work movements.
The optimal seat depth position maintains a gap of approximately two to four inches between the front edge of the seat and the back of your knee. This gap—roughly the width of two to four fingers—prevents the seat edge from pressing against the underside of your thigh, which can restrict blood flow and create numbness or tingling in your legs during extended sitting. When the gap closes completely, the seat pan extends too far forward and requires shortening; when the gap exceeds four inches, your thighs lack adequate support.
Seat depth adjustment mechanisms vary by chair model but typically involve a lever or handle positioned beneath the seat. Some chairs, like the Aeron and Mirra 2, use a sliding seat pan that moves forward and backward, while others adjust through a front-edge mechanism. To adjust, sit with your back pressed firmly against the backrest, place your fingers behind your knee to measure the gap, and activate the adjustment mechanism to slide the seat pan until the proper clearance exists.
Pro tip: Test your seat depth by sitting normally and checking the gap behind your knee. You should be able to slide your fingers comfortably between the seat edge and your leg without forcing them. When you recline slightly, the gap should remain consistent; if the seat edge contacts your leg during reclining movements, the depth requires adjustment.
Optimize Lumbar Support for Spinal Alignment

Lumbar support addresses the inward curve of your lower spine, maintaining the natural S-shape of your vertebral column during seated work. Without adequate lumbar support, the lumbar curve flattens or reverses, placing stress on spinal discs and surrounding muscles—leading to the lower back pain that affects an estimated 80% of workers.
Effective lumbar support fills the space between your lower back and the backrest, providing gentle resistance that maintains spinal curvature without forcing your spine into an unnatural position. The support should feel comfortable and stabilizing, not like a hard push that creates pressure points.
Adjustment mechanisms for lumbar support range from simple height adjustment to sophisticated tension control systems. The Aeron chair features lumbar tension control that allows precise pressure adjustment, while the Embody incorporates backfit technology that automatically adjusts to your spinal curvature. The Mirra 2 uses tri-flex back suspension that adapts to your movement while still allowing manual fine-tuning.
To configure lumbar support, sit with your back against the backrest and locate the adjustment mechanism—often a lever, dial, or slider. Adjust the height so the support centers on the curve of your lower back, typically at belt level. Then adjust the tension to your preference: you should feel supported without experiencing pressure that makes you lean forward.
Fine-Tune Tilt Tension and Recline Limits
https://www.hermanmiller.com/products/chairs/aeron-chair.html
The tilt mechanism controls how your chair responds to reclining movements, providing balanced support that moves with your body rather than resisting your natural shifts in position. Proper tilt calibration ensures the chair supports your weight throughout reclining motions while allowing freedom to move fluidly.
Tilt tension determines the resistance you feel when leaning back. Too little tension allows the chair to recline too easily, making it difficult to maintain an upright position. Too much tension makes reclining difficult, forcing your core muscles to work continuously and increasing fatigue.
Tilt limit adjustment controls how far back the chair reclines, preventing extreme angles that might compromise your access to work surfaces. To adjust tilt tension, locate the mechanism—typically a knob or lever beneath the seat. Sit in the chair and experiment with the tension, reclining slowly to gauge the resistance. Adjust until you can recline comfortably with smooth, controlled movement.
Many ergonomic chairs incorporate advanced tilt features. Synchronous tilt systems connect seat and back movement, allowing them to move in coordinated proportions. The Cosm chair features an auto-harmonic tilt mechanism that automatically adjusts to your weight and movement patterns without requiring manual tuning.
Position Armrests for Shoulder and Arm Support
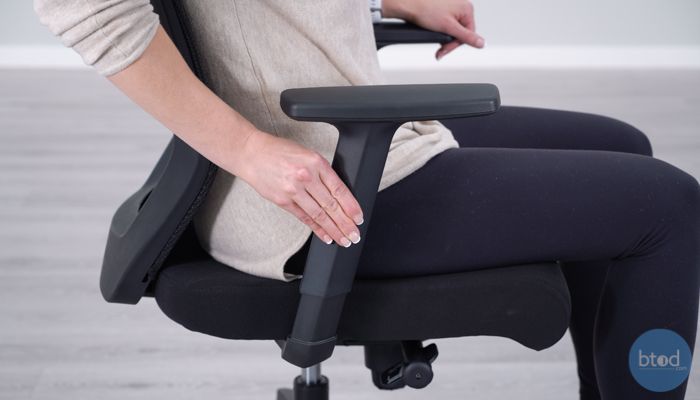
Armrests complete your chair configuration by supporting your arms at the proper height and position for keyboard and mouse work. Properly positioned armrests reduce shoulder strain by providing a resting surface for your arms, preventing the shoulder elevation that develops when arms hang unsupported.
The correct armrest height positions your arms at approximately a 90-degree angle when your hands rest on your keyboard. Your shoulders should remain relaxed—not lifted toward your ears—while your forearms rest comfortably on the armrests.
Advanced armrest systems offer additional positioning options. The Aeron features eight-way adjustment, allowing positioning for keyboard work, reading, and phone use. The Mirra 2 provides multiple armrest configurations to accommodate different body sizes and work preferences.
To configure armrests, begin by adjusting height to achieve the proper 90-degree arm angle with shoulders relaxed. Then adjust width and depth to position the armrests where your arms naturally rest during work. The armrests should support your arms without requiring you to lean inward to reach them.
Model-Specific Adjustment Considerations
Different ergonomic chair models offer varying levels of adjustment sophistication. Premium chairs like the Aeron and Embody provide the most comprehensive adjustment systems, offering fine-tuned control across every dimension of ergonomic support.
The Aeron features eight-point arm adjustment, seat depth with front seat angle modification, lumbar tension control, tilt tension, seat height, and arm width positioning. This extensive adjustment range accommodates an exceptionally wide range of body types.
The Embody takes a different approach with its backfit adjustment technology, which allows the backrest to conform to your spinal curvature while maintaining consistent support throughout reclining movements. This adaptive system responds to your natural movements without requiring constant manual adjustment.
Mid-range chairs like the Sayl and Mirra 2 provide essential ergonomic adjustments within more accessible design frameworks. The Sayl focuses on height, tilt tension, and arm positioning through an intuitive adjustment interface, while the Mirra 2 incorporates tri-flex back suspension that adapts to spinal curvature.
Quick Reference Adjustment Checklist
When configuring your ergonomic chair, work through these adjustments in order:
- Adjust seat height until your thighs are parallel to the floor and feet rest flat
- Configure seat depth to maintain a two-to-four inch gap behind your knee
- Position lumbar support to fill the curve of your lower back without pressure
- Calibrate tilt tension to allow smooth reclining with adequate support
- Position armrests to support your arms at a 90-degree angle with relaxed shoulders
After completing initial configuration, test each setting through your normal work activities. Reclining should feel supported without requiring excessive effort. Armrests should support your arms without forcing shoulder elevation. The lumbar support should maintain contact with your lower back throughout all seated positions.
Maintain Your Chair’s Adjustments
Ergonomic chairs require periodic attention to maintain their adjusted settings. Check your chair’s adjustment settings monthly, particularly those you use most frequently. Mechanical components can settle or shift slightly over time, and your preferences may evolve as your body adjusts to proper ergonomic positioning.
Keep adjustment mechanisms clean and free from debris that might interfere with their function. Dust and lint can clog adjustment levers and limit their range of motion. Periodic cleaning around adjustment mechanisms keeps your chair’s adjustment system responsive.
When adjustment mechanisms begin to feel loose or unresponsive, consult your chair’s manufacturer documentation for service options. Many ergonomic chairs include warranty coverage for mechanical components.
Configure Your Chair for Long-Term Comfort
Mastering ergonomic chair adjustments transforms your seating from a generic surface into a personalized support system calibrated to your body’s unique dimensions. The systematic approach outlined in this guide establishes a complete configuration that promotes healthy posture throughout extended work sessions.
Proper chair adjustment requires patience and experimentation. Your first attempt may not yield perfect results, and fine-tuning over several days helps identify adjustments that feel better as your body adapts to proper postural support. Pay attention to how your body feels during and after work sessions, using any discomfort as a signal that further adjustment may be needed.
The investment of time required to properly configure your ergonomic chair pays dividends in reduced fatigue, decreased discomfort, and improved focus throughout your workday. Take the time to get your chair right—and revisit your settings whenever your work setup or physical needs change.