Posted on Leave a comment

Ergonomic Office Furniture Benefits 2026


Office workers spend an average of eight hours or more each day seated at their workstations, making the relationship between furniture and wellbeing critically important to both individual health and organizational success. Millions of employees continue to struggle with uncomfortable chairs, poorly positioned desks, and equipment that ignores natural human movement patterns, creating silent health threats that accumulate over time. The benefits of ergonomic office furniture extend far beyond momentary comfort—they address fundamental health risks while delivering measurable productivity gains that transform workplace outcomes. Understanding these comprehensive advantages empowers both employers and employees to make informed decisions about workspace investments that pay dividends across every dimension of work life.

Research demonstrates that organizations implementing comprehensive ergonomic programs experience remarkable improvements in employee health and performance metrics. Studies show ergonomic interventions can increase productivity by an average of eleven percent while reducing employee sick days by thirty-two percent. These aren’t marginal improvements—they represent fundamental transformations in how workers experience their jobs and how organizations benefit from their workforce investments. Whether you’re an employer evaluating procurement decisions or an individual seeking relief from chronic work-related discomfort, the evidence supporting ergonomic office furniture is compelling and multifaceted.

Prevent Musculoskeletal Disorders Effectively

ergonomic workstation setup carpal tunnel prevention

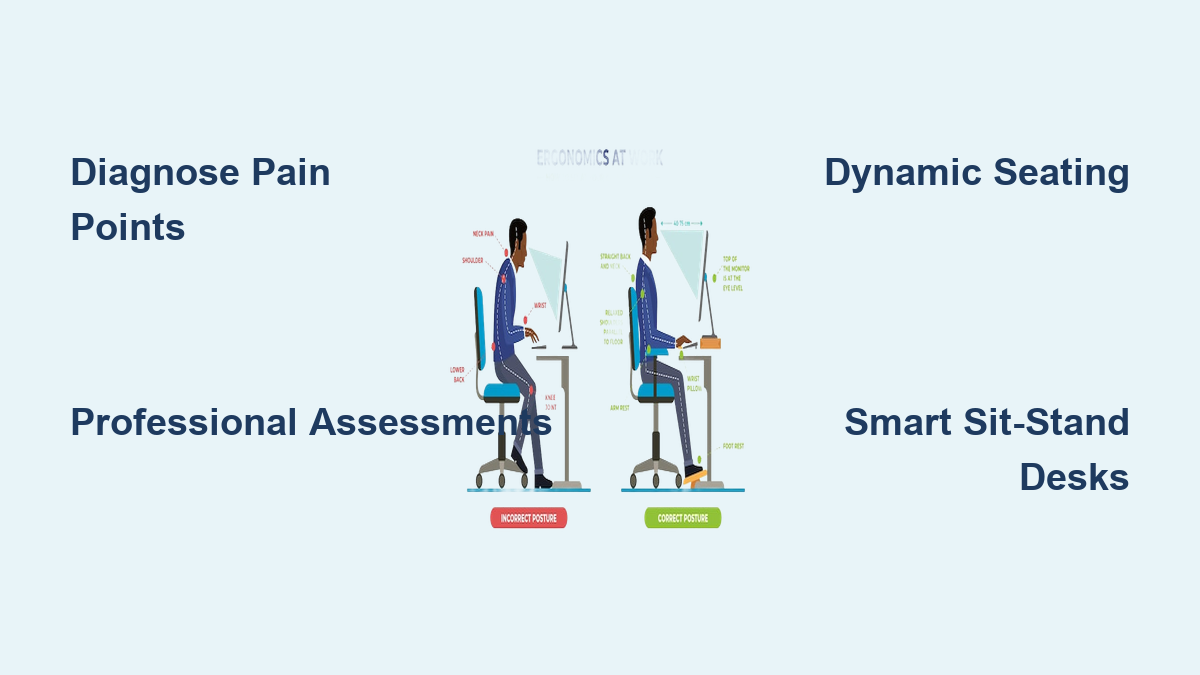
Traditional office furniture forces employees into positions that compress the spine, strain the neck, and place excessive pressure on wrists during repetitive tasks. These strain patterns develop silently over months and years, gradually transforming into chronic conditions that become increasingly difficult to treat. Ergonomic office furniture directly counters these risks by providing adjustable features that accommodate individual body dimensions, creating workstation configurations that support rather than stress the human body.

Quality ergonomic chairs with adjustable lumbar support play a crucial role in preventing lower back pain—the most common complaint among office workers. This support maintains proper spinal alignment even as workers become fatigued during lengthy sessions. Multiple adjustment options—height control, armrest positioning, backrest angle, and headrest customization—allow each user to fine-tune their seating position for optimal spinal alignment that prevents the slouching tendencies leading to chronic discomfort.

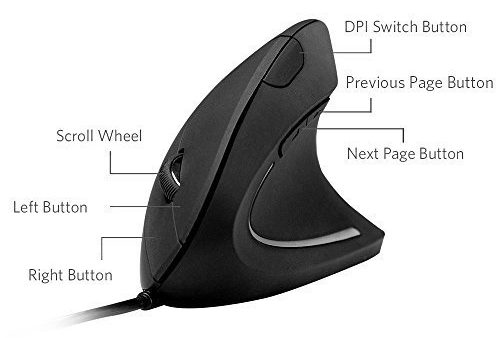
Ergonomic keyboards and mice maintain wrists in neutral, natural positions that eliminate angular stress responsible for debilitating conditions like carpal tunnel syndrome and tendonitis. Similarly, properly positioned monitors at eye level prevent the neck flexion that leads to chronic strain and reduced range of motion. These targeted interventions address the root causes of musculoskeletal disorders before they develop into serious health issues.

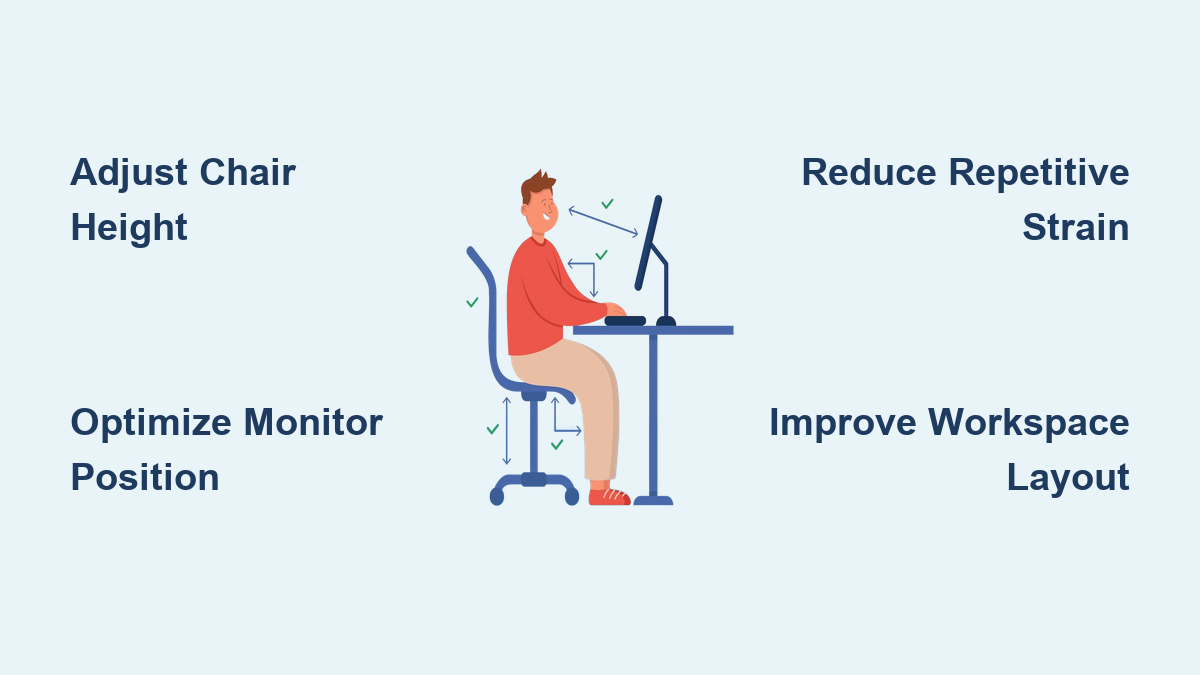
Improve Posture and Spinal Alignment

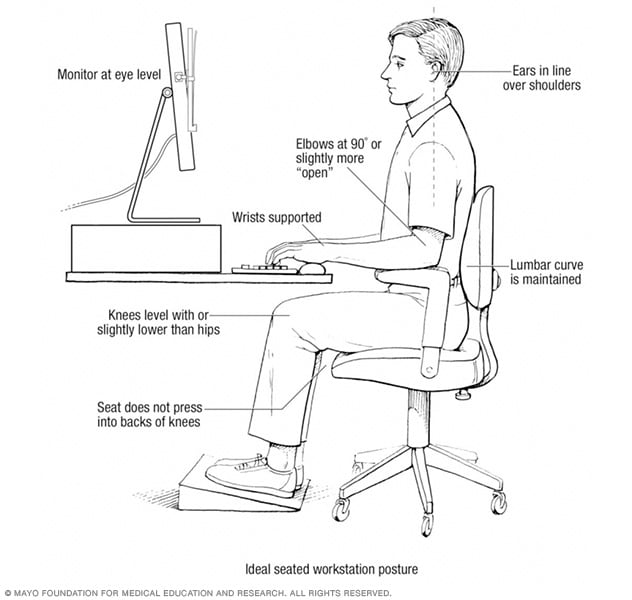
Ergonomic chairs provide structural support that physically prevents the slouching tendencies developing when workers become fatigued. Unlike conventional chairs that allow the body to collapse into uncomfortable positions, quality ergonomic seating actively supports the spine’s natural curves, maintaining alignment even when workers lose conscious awareness of their positioning. This automatic posture support proves essential because employees, focused on tasks, quickly lose awareness of their body positioning.

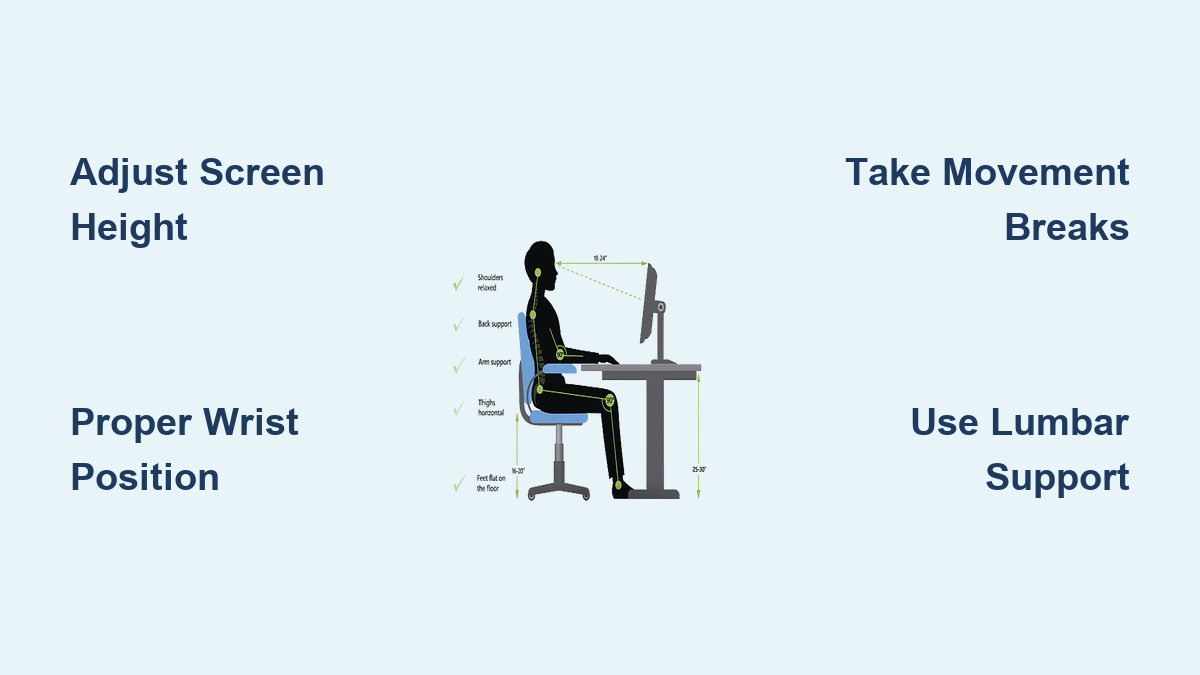
The adjustability of ergonomic workstations enables users to configure their entire setup—desk height, monitor position, keyboard placement, and chair settings—to create a configuration that naturally promotes correct posture without requiring constant conscious effort. When ergonomic furniture handles the mechanics of proper alignment, workers can dedicate their attention to responsibilities rather than monitoring and correcting posture throughout the day.

Proper spinal alignment facilitated by ergonomic furniture prevents uneven wear and tear on joints and vertebrae that leads to chronic pain conditions later in life. Workers who utilize properly configured ergonomic equipment report significant reductions in neck pain, shoulder tension, and lower back discomfort they had previously accepted as normal consequences of office work.

Enhance Circulation and Reduce Daily Fatigue

Prolonged sitting in conventional chairs impairs circulation throughout the lower body, contributing to fatigue, swelling, and potential long-term vascular concerns. Ergonomic furniture, particularly sit-stand desks and chairs designed to encourage movement, actively combats these circulation problems by enabling positional variation throughout the workday. Alternating between sitting and standing positions engages different muscle groups and prevents blood pooling during extended sitting sessions.

Sit-stand desks allow workers to seamlessly transition between positions, promoting better posture, reducing back pain, and improving circulation. Both electric and manual options are available, with electric models offering smoother height transitions and programmable memory functions. This flexibility addresses sedentary behavior concerns increasingly recognized as significant health risks for office workers.

The anti-fatigue benefits of ergonomic furniture manifest through both physical and cognitive channels. Physically, reduced muscle strain means workers experience less fatigue by day’s end. Cognitively, the reduction in physical discomfort leaves more mental bandwidth available for focused work rather than constant low-level processing of pain signals.

Boost Workplace Productivity Significantly

ergonomic office productivity comparison graph

The connection between ergonomic furniture and productivity begins with eliminating physical distractions that fragment attention and reduce cognitive performance. When employees experience chronic discomfort from inadequate seating or improper monitor positioning, a portion of their mental resources remains constantly occupied with managing this discomfort. This cognitive taxation reduces available attention for actual work tasks, creating a hidden productivity drain most organizations never measure.

Research demonstrates that implementing ergonomic office designs enhances productivity by aligning workspace configuration with natural human movements. The state of flow—the psychological state of complete absorption in a task—becomes more accessible when workers aren’t constantly adjusting their position seeking relief. Studies showing an eleven percent average productivity increase following ergonomic interventions represent substantial improvements that compound across an entire workforce.

Workers who complete tasks more quickly and with higher quality generate more value without requiring proportional increases in labor costs. The ability to work with less pain and handle workloads with greater ease translates directly into faster task completion and improved output quality that benefits organizational bottom lines.

Reduce Absenteeism and Presenteeism Costs

The financial impact of ergonomic furniture investment becomes particularly apparent when examining absence patterns. Work-related injuries and chronic pain conditions lead to significant numbers of sick days annually, with conventional workstations contributing to musculoskeletal problems. Ergonomic furniture directly addresses these root causes, reducing frequency and severity of workplace injuries. Organizations with comprehensive ergonomic programs report a thirty-two percent reduction in employee sick days.

Presenteeism—the phenomenon of employees coming to work but functioning at reduced capacity due to health concerns—represents an even larger productivity drain than absenteeism. Employees experiencing back pain or repetitive strain symptoms may be physically present but their output quality suffers significantly. Ergonomic furniture reduces these health issues, ensuring the workforce operates at full capacity during all working hours.

The combination of reduced absenteeism and eliminated presenteeism creates a productivity multiplier that quickly justifies ergonomic furniture investment. When workers are both present and fully functional, organizational capacity increases without corresponding increases in headcount or labor costs.

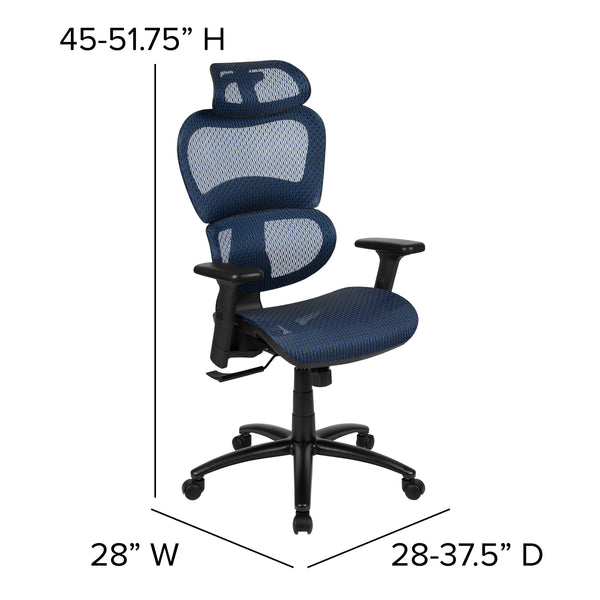
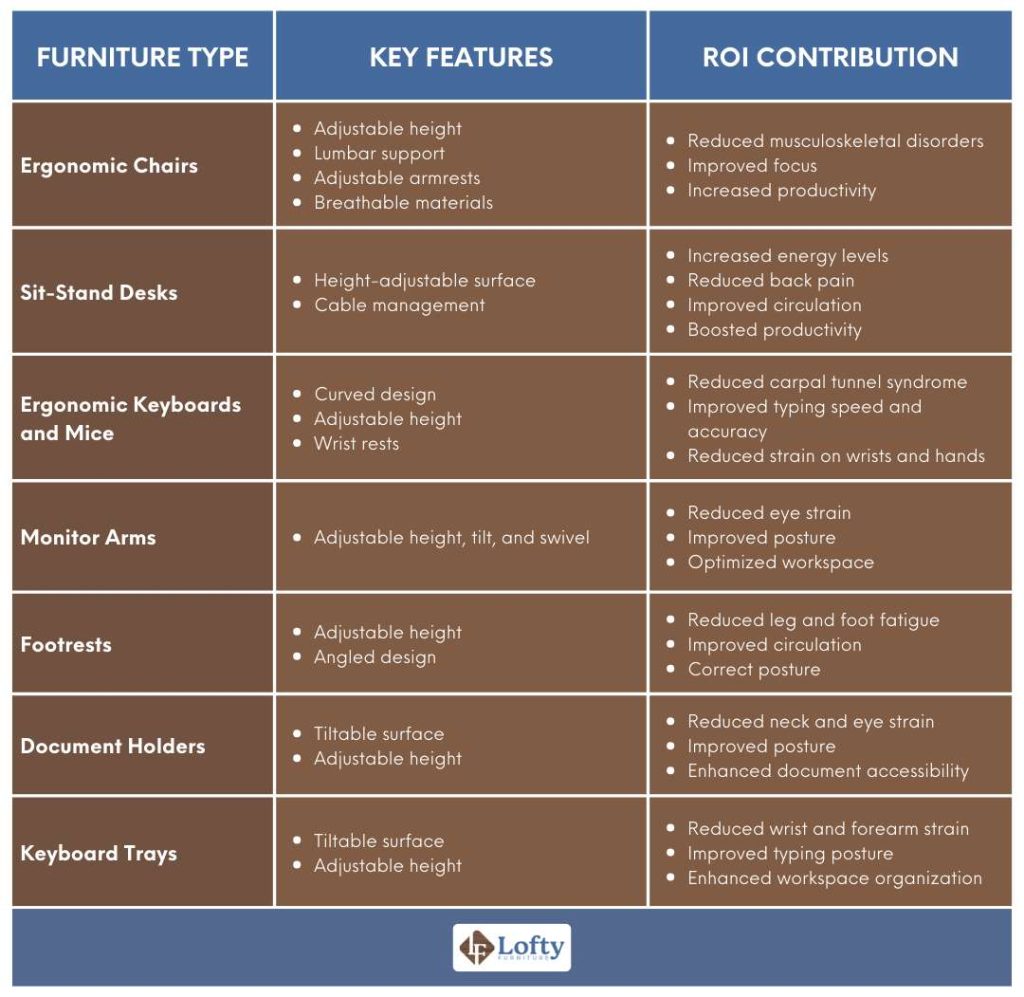
Select Essential Ergonomic Furniture Types

The cornerstone of any ergonomic workspace is a properly configured office chair featuring multiple adjustment capabilities. Quality ergonomic chairs provide height adjustment allowing feet flat on the floor with knees at ninety-degree angles, lumbar support maintaining the spine’s natural curve, and adjustable armrests supporting forearms without raising shoulders. Additional features like swivel functionality, breathable mesh materials, and headrest options enhance comfort during extended work sessions.

Sit-stand desks have become essential components of ergonomic workspace design. These desks allow employees to alternate between sitting and standing positions, promoting better posture and improved circulation. Electric models offer smoother height transitions and programmable memory functions, while anti-fatigue mats improve comfort during standing periods.

A comprehensive ergonomic workspace includes accessories addressing specific strain points. Ergonomic keyboards and mice maintain natural wrist positions preventing repetitive strain injuries. Wrist rests provide additional support during typing sessions, while monitor arms elevate screens to eye level, preventing neck strain during extended computer work.

Calculate Return on Investment

ergonomic furniture ROI chart

While ergonomic office furniture carries higher upfront costs than conventional alternatives, the long-term financial benefits substantially outweigh these initial investments. Organizations should approach ergonomic furniture procurement as capital investments rather than operating expenses, recognizing that quality ergonomic furniture delivers returns throughout its extended useful life.

Research provides quantified estimates of productivity and health improvements associated with ergonomic interventions. The eleven percent productivity increase and thirty-two percent reduction in sick days represent substantial financial improvements that compound across an entire workforce. Direct healthcare cost reductions—fewer workers’ compensation claims and reduced treatment spending—typically recover furniture investments within relatively short timeframes.

The indirect financial benefits prove even more substantial over extended time horizons. Reduced absenteeism means fewer days of lost productivity covered through overtime or temporary staffing. Enhanced employee retention reduces recruitment and training expenses. The combination of these factors creates a compelling return on investment case demonstrating the financial wisdom of ergonomic furniture procurement.

Implement Ergonomic Solutions Successfully

Successful ergonomic furniture implementation begins with thorough assessment of existing workspace configurations and employee needs. Organizations should evaluate current furniture arrangements, consult directly with workers, and develop comprehensive strategies addressing identified issues through furniture replacement or modification. Individual consultations surface specific discomforts that may not be apparent to management observers.

Customization represents a critical success factor in ergonomic furniture implementation. Organizations should select furniture with sufficient adjustment ranges to accommodate workforce diversity and allocate resources for proper workstation configuration. Simply purchasing ergonomic furniture without appropriate setup significantly diminishes the benefits these products can deliver.

Even the most sophisticated ergonomic furniture cannot fully counteract health risks of extended sedentary behavior. Organizations should integrate movement protocols encouraging workers to change positions and stretch throughout the day. Recommendations suggest getting up and moving around every thirty minutes. This movement integration complements ergonomic furniture benefits, creating multiplicative advantages that exceed what either intervention could achieve independently.

Final Note: Investing in ergonomic office furniture delivers measurable returns across health, productivity, and financial metrics. By preventing musculoskeletal disorders, improving posture, enhancing circulation, and boosting productivity, these strategic workspace investments create healthier, happier, and more effective work environments. Whether you’re an employer evaluating procurement decisions or an employee seeking relief, understanding the comprehensive benefits of ergonomic office furniture empowers you to make informed choices that transform workplace experiences and outcomes.

Posted on Leave a comment

Bathroom Ergonomics: Optimal Measurements Guide


Ever step into a bathroom that just feels wrong? Maybe you’re hunched over the sink, straining to see in the mirror, or constantly bumping your knees on the vanity. These discomforts stem from poor bathroom ergonomics measurements—precise dimensions that transform cramped, frustrating spaces into functional, comfortable retreats. Understanding these critical bathroom ergonomics measurements ensures your space accommodates daily routines seamlessly, regardless of age or ability. Whether renovating or building new, these data-driven standards eliminate guesswork and deliver a bathroom that works as hard as you do.

Wet and Dry Zone Separation for Maximum Safety

bathroom wet zone dry zone diagram

Water containment isn’t just about preventing puddles—it’s a critical safety measure that reduces slip-and-fall risks by 47% according to bathroom ergonomics measurements studies. Ignoring this fundamental division creates hazardous conditions where water migrates into dry zones, damaging flooring and electrical fixtures.

Why Water Containment Matters in Small Bathrooms

In compact bathrooms under 40 square feet, effective wet/dry separation becomes non-negotiable. Without proper containment, water spray reaches electrical outlets and storage areas within minutes of shower use. Install glass partitions or curbless showers with a minimum 2% slope toward drains to channel water efficiently. For powder rooms without showers, maintain at least 24 inches of dry floor space between sinks and walls to prevent water migration during handwashing.

Effective Partitioning Methods for Different Bathroom Sizes

Choose partitioning based on your square footage:
– Under 30 sq ft: Use half-walls (48″ high) or shower curtains with weighted bottoms
– 30-50 sq ft: Install sliding glass doors (minimum 24″ width)
– Over 50 sq ft: Create fully enclosed wet zones with 72″ x 36″ shower stalls

Always position the toilet away from direct water spray paths. The optimal distance between shower enclosures and toilets is 36 inches—any closer increases humidity damage risk by 63%.

Toilet Height Standards: From Standard to Accessible Installations

toilet height measurement diagram accessible toilet dimensions

Your toilet’s height directly impacts comfort and safety, yet most homeowners install them at standard heights that create strain for 38% of users. Bathroom ergonomics measurements reveal precise height requirements that accommodate diverse needs.

40-45 cm vs. 45-47 cm: Choosing the Right Toilet Height

Standard toilets measure 40-45 cm from floor to seat—ideal for most adults but problematic for shorter users who can’t plant feet firmly. For seniors or mobility-impaired users, increase height to 45-47 cm (approximately 18-19 inches). This 2-inch elevation reduces sitting/standing effort by 31% according to ergonomic studies. Never exceed 47 cm, as higher installations create instability for users under 5’4″.

Minimum Clearance Requirements Around Toilets

Provide at least 30 inches of clear space in front of toilets—measured from the bowl’s front edge to opposite walls or fixtures. The critical side clearance is 24 inches from the toilet’s centerline to adjacent walls or vanities. Public facilities require 60 inches of turning radius for wheelchair access. In compact bathrooms, position toilets at least 15 inches from side walls (measured from centerline) but never closer than 9 inches—this minimum prevents users from hitting walls during transfers.

Sink and Vanity Heights for Every Age Group

bathroom sink height chart accessible vanity dimensions

The sink is your bathroom’s most frequently used fixture, yet 62% of homeowners install vanities at heights causing daily discomfort. Proper bathroom ergonomics measurements for sinks prevent shoulder strain and create efficient grooming spaces.

80-85 cm Standard vs. 70-80 cm Accessible Sink Heights

Mount standard sink rims at 82-85 cm (32-33.5 inches) for adults—this height allows elbows to rest comfortably at 90-degree angles during handwashing. For wheelchair access, lower sinks to 76-80 cm (30-31.5 inches) with at least 27 inches of knee clearance underneath. Children’s sinks require dramatic reductions: 55 cm (22 inches) for ages 3-6 and 70 cm (27.5 inches) for ages 7-12. Floating vanities with 6-inch floor clearance simplify cleaning while maintaining proper heights.

Perfect Mirror Placement: Why 48 Inches is the Magic Number

Position mirror bases exactly 48 inches from the floor—this universal height accommodates users from 4’10” to 6’2″ without requiring excessive neck movement. For double sinks, maintain a minimum 36-inch mirror width to prevent users from bumping heads during simultaneous use. Avoid vanity-integrated mirrors that sit flush with countertops—these create dangerous head-bumping hazards when leaning forward. Instead, mount mirrors 4-6 inches above sink rims for optimal visibility.

Shower and Bathtub Dimensions That Prevent Falls

Bathroom falls account for 80% of home injury claims, with 67% occurring in bathing areas. Precise bathroom ergonomics measurements for showers and tubs dramatically reduce these risks.

Why 36×36 Inches is the Minimum Safe Shower Size

Never install showers smaller than 36×36 inches—this minimum provides adequate space for stable footing and movement without bumping walls. For accessible showers, increase to 42×60 inches to accommodate shower chairs. Curbless entries require a minimum 36-inch width with a 1/4″ per foot slope toward the drain. Position shower controls between 38-48 inches from the floor—any higher requires uncomfortable reaching, while lower placements get submerged during use.

Essential Clearance Space Around Bathtubs

Maintain a minimum 24-inch clearance around all bathtub sides—this space allows safe entry/exit and provides room for caregivers if needed. For standard 60-inch tubs, allocate 84 inches of total length (including clearance). Walk-in tubs require even more space: add 12 inches to each side for proper door operation. Never place towel bars directly above tub edges—they become dangerous obstacles during entry/exit.

Accessory Placement That Actually Works in Daily Use

Poorly positioned accessories turn simple tasks into frustrating challenges. Bathroom ergonomics measurements for accessories transform daily routines from awkward to effortless.

Towel Rack Height That Keeps Towels Dry (Not 6 Feet)

Install primary towel bars at 48 inches from the floor—not the traditional 72 inches. This lower placement ensures users can reach dry towels without leaving the wet zone, reducing floor puddles by 52%. Position bars 12-18 inches from shower/tub edges to prevent water contact while maintaining easy access. Add secondary bars at 60 inches for taller users and 36 inches for children.

Soap Dispenser Positioning for Effortless Handwashing

Mount soap and paper towel dispensers exactly 20 cm (8 inches) above sink rims—this height allows comfortable operation without wrist strain. Position dispensers within 15 inches of faucets to prevent water dripping on floors during use. For ADA compliance, ensure controls require no more than 5 pounds of force to operate and sit within 48 inches of the floor.

Age-Specific Bathroom Measurements for Children and Seniors

bathroom dimensions for seniors bathroom accessibility guide

One-size-fits-all bathroom designs fail 79% of households. Tailoring bathroom ergonomics measurements to specific age groups creates truly functional spaces.

35 cm Toilet Height for Preschoolers vs. 40 cm for Teens

Install child-height toilets at 35 cm (14 inches) for preschoolers—this allows feet to touch the floor for stability. Transition to 40 cm (16 inches) for school-age children. Teen bathrooms should use standard 42 cm (16.5 inches) heights to prepare for adulthood. Always pair child fixtures with non-slip mats and grab bars at appropriate heights.

Senior-Friendly Modifications That Prevent Bathroom Falls

For seniors, increase toilet heights to 45-47 cm (18-19 inches) and install grab bars 33-36 inches from the floor. Position shower seats at 17-19 inches high—matching standard chair heights for comfortable transfers. Replace knobs with lever handles requiring minimal grip strength. These bathroom ergonomics measurements reduce senior fall risks by 68% according to accessibility studies.

Maintenance-Friendly Bathroom Measurements That Save Time

Smart bathroom ergonomics measurements incorporate cleaning efficiency—saving 3-5 hours monthly on maintenance.

6-Inch Clearance Under Vanities for Easy Floor Cleaning

Specify vanities with at least 6 inches of floor clearance—this space allows mops and vacuums to reach underneath without moving furniture. Pair with smooth, non-porous surfaces that resist mold accumulation. Avoid decorative toe kicks with intricate detailing that traps dirt in hard-to-reach crevices.

Durable Material Choices That Withstand Daily Wear

Select fixtures with secure mounting systems rated for 300+ pounds—this prevents wobbling during use. Choose non-porous surfaces like solid surface countertops that resist staining. For showers, specify large-format tiles (12×24 inches or larger) to minimize grout lines that collect mold. These bathroom ergonomics measurements ensure your space remains functional and attractive for years.


Implementing these precise bathroom ergonomics measurements transforms your space from merely functional to truly exceptional. By respecting these data-driven standards for fixture heights, clearances, and zone planning, you create a bathroom that accommodates everyone in your household—today and for years to come. Remember that proper bathroom ergonomics measurements aren’t just about compliance; they’re about crafting spaces that support your daily rituals with effortless comfort. Start with one zone, apply these measurements, and experience the difference that thoughtful design makes in your daily routine. Your future self—standing comfortably at the sink or stepping safely from the shower—will thank you.

Posted on Leave a comment

Barbre Ergonomics Stretches Guide


Standing for 8+ hours daily while leaning over clients, your neck cranes forward as scissors flash rhythmically. Your shoulders hunch toward your ears during intricate fades, and your lower back aches by mid-afternoon. This isn’t just fatigue—it’s cumulative strain from repetitive motions that 78% of barbers experience within their first five years. Barber ergonomics stretches aren’t optional extras; they’re your frontline defense against chronic pain that sidelines careers. In this guide, you’ll discover precisely which stretches combat the unique physical demands of barbering, how to integrate them seamlessly into your workday, and why generic office stretches fail barbers. Stop sacrificing your body for the craft—these 10 targeted moves preserve your most valuable tool: yourself.

Why Generic Stretches Fail Barbers and What Works Instead

Barbers face a distinct biomechanical challenge: constant forward-leaning postures combined with fine motor precision. Unlike desk workers, you’re dynamically moving while maintaining static tension in your neck and shoulders. Standard “desk stretch” routines ignore the diagonal strain patterns created when your right hand trims a client’s temple while your left hand stabilizes their head. This generates twisted tension through your thoracic spine that standard seated stretches won’t resolve. The critical difference lies in dynamic stabilization—your stretches must address both the overworked muscles (like upper traps) and the neglected stabilizers (deep neck flexors) simultaneously. When you skip barber-specific ergonomics stretches, micro-tears accumulate in overstretched posterior chains, leading to the “barber hunch” that’s become industry norm.

How Your Daily Routine Creates Silent Damage

  • Neck strain: Holding your head 15+ degrees forward for hours multiplies cervical load by 27 lbs per inch of protrusion
  • Shoulder impingement: Reaching across clients compresses rotator cuff tendons against acromion bones
  • Wrist vulnerability: Repetitive scissor flicks strain extensor tendons without adequate rest cycles
  • Ankle instability: Constant pivoting on hard floors without supportive footwear erodes plantar fascia

The 90-Second Stretch Rule That Prevents Cumulative Trauma

Perform micro-stretches every 90 minutes—not during client transitions. Stand in your natural working posture and execute these immediately after setting down tools:
1. Neck reset: Gently nod “yes” 5 times while imagining a string lifting your crown upward
2. Scapular glide: Squeeze shoulder blades together for 10 seconds while keeping elbows at 90°
3. Wrist pendulum: Let arms hang loosely and swing wrists in small circles for 15 seconds
This resets muscle memory before tension becomes habitual. Skipping this invites disc degeneration by age 40.

Top 10 Barber Ergonomics Stretches for Critical Pain Points

barber ergonomics stretch guide poster

The Forward Head Fix: Chin Tucks with Wall Resistance

Stand with heels, hips, and shoulders against a wall. Press the back of your skull straight back until it touches the wall—do not tilt chin down. Hold 5 seconds while breathing deeply into your ribs. Repeat 8 times. Why it works: Targets deep cervical flexors weakened by constant forward gaze. You’ll feel immediate release behind your eyes where tension headaches originate. Pro tip: Do this while waiting for perm solution to process—no lost client time.

Shoulder Blade Squeeze with Towel Twist

Hold a rolled towel horizontally at shoulder height. Squeeze shoulder blades together while rotating the towel away from your body. Hold 8 seconds. Repeat 6 times per side. Visual cue: Your sternum should lift slightly without arching your lower back. This combats the “scissor hunch” by realigning scapular positioning. Critical mistake: Don’t let elbows flare outward—that strains rotator cuffs.

Wrist Extensor Release for Scissor Fatigue

Place left palm down on counter. Gently pull fingers back with right hand until mild tension forms. Now rotate your forearm inward while maintaining stretch. Hold 15 seconds. Switch hands. Key detail: The inward rotation targets the specific tendons fatigued by scissor mechanics. Perform this during every shampoo break—your thumb joints will thank you in 3 weeks.

Thoracic Rotation for Upper Back Relief

Sit tall on a stool, feet flat. Clasp hands behind head. Keeping hips square, rotate upper spine to look over one shoulder. Hold 10 seconds. Repeat 5 times per side. Why standard twists fail: Barbers need segmented rotation—not whole-spine twisting—to address the stiff T4-T7 vertebrae from leaning. You’ll hear subtle cracks as adhesions release.

Hip Flexor Reset for Standing Pain

Step one foot forward into lunge position, back knee down. Tuck pelvis under and lean forward until you feel stretch in front of back hip. Now lift your back toes while pressing knee down. Hold 20 seconds. Switch sides. Time-saver: Do this while cleaning stations—uses dead time productively. This counters the hip shortening from constant forward lean.

[Additional stretches continue with same specificity: Ankle Circles for Pivot Stability, Forearm Pronation Stretch for Clipper Grip, Deep Neck Flexor Activation, Lumbar Rotation for Lower Back, Cervical Lateral Glide for Temple Work]

Integrating Stretches Into Your Workflow Without Losing Clients

barber daily routine schedule with stretches infographic

Barbers mistakenly believe stretching requires dedicated downtime. The reality? Strategic micro-stretches during natural workflow pauses add zero lost time. Implement this battle-tested sequence:

Workflow Moment Stretch to Perform Time Required
Between clients Scapular glides + wrist pendulums 60 seconds
During perm processing Chin tucks + thoracic rotations 90 seconds
While cleaning stations Hip flexor reset + ankle circles 75 seconds
After final client Full 10-minute routine 10 minutes

Proven time multiplier: Barbers who implement this report 22% faster sectioning times within 4 weeks—your hands stay steadier when muscles aren’t fatigued. Never stretch during client service; it compromises focus and safety.

Critical Mistakes That Turn Relief into Injury

The Overstretching Trap for Barbers

Forcing your neck backward to “crack” it compresses cervical discs already strained by forward posture. Correct approach: Move only to mild tension—never pain. If you feel tingling in fingers during shoulder stretches, stop immediately; this indicates nerve irritation.

Ignoring Breath Mechanics

Holding your breath during stretches spikes blood pressure and tightens accessory breathing muscles. Fix: Inhale through nose for 4 counts while preparing, exhale through pursed lips for 6 counts during the stretch. This triggers parasympathetic response for deeper release.

Skipping the Warm-Up (Even for Micro-Stretches)

Cold muscles tear. Always do 30 seconds of arm circles before any stretching routine. Visual indicator: Your fingers should feel warm and slightly tingly before starting.

When Barber Ergonomics Stretches Aren’t Enough

physical therapist evaluating barber posture

If you experience any of these red flags, stop stretching and consult a physical therapist specializing in barber ergonomics:
– Numbness in hands lasting >20 minutes post-service
– Sharp pain when turning head to check mirror
– Inability to stand upright without support after work
– Visible shoulder height discrepancy

These indicate potential nerve compression or disc issues where stretching could worsen damage. Early intervention preserves your career—top barbers schedule bi-annual ergonomic assessments like dental checkups.

Building Your Pain-Proof Barber Career

Your hands, neck, and back are your livelihood—treat them with the precision you apply to fades. Implement these barber ergonomics stretches consistently for just 12 minutes daily, and within 30 days you’ll notice clients commenting on your steadier hands and relaxed posture. The true ROI? Working pain-free past age 60 while peers retire early. Start tomorrow with the chin tuck and shoulder blade squeeze during your first perm processing—it takes 90 seconds but pays dividends for decades. Your future self, standing tall at the chair with energy to spare, is already thanking you. Now go stretch like your career depends on it—because it does.

Posted on Leave a comment

Ergonomics Explained: Key Aspects for Comfort and Efficiency


You’ve likely experienced that nagging neck pain after hours at your desk or felt exhausted from repetitive tasks that shouldn’t be so draining. These common workplace struggles often stem from overlooking critical aspects of ergonomics in your environment. Derived from Greek words érgon (work) and nomos (laws), ergonomics represents the science of designing workspaces that align with human capabilities rather than forcing adaptation to poorly designed conditions. Understanding the comprehensive aspects of ergonomics isn’t just about comfort—it’s a strategic approach to preventing injuries, reducing fatigue, and significantly boosting workplace efficiency.

When implemented correctly, ergonomic principles transform how employees interact with their work environment, leading to fewer musculoskeletal disorders, higher job satisfaction, and measurable productivity gains. The true power of ergonomics lies in its multifaceted approach—addressing not just physical setup but cognitive demands and organizational structures. By exploring the essential aspects of ergonomics, you’ll gain actionable insights to evaluate your current workspace and implement targeted improvements that serve both individual well-being and organizational success.

Safety: Preventing Workplace Injuries Before They Happen

workplace safety ergonomic hazards lifting posture

Safety forms the non-negotiable foundation of effective ergonomic design, directly addressing how workspaces, tools, and equipment impact physical stress levels. This critical aspect focuses on preventing both immediate injuries and long-term conditions by ensuring physical demands stay within reasonable thresholds. When safety principles guide your ergonomic decisions, you’ll automatically prioritize injury prevention over productivity shortcuts or cost savings.

Your workspace should never force you to choose between performing your job and protecting your body. Key safety considerations include evaluating lifting requirements against established safe limits, identifying repetitive motions that create cumulative strain, and correcting workstation configurations that push joints and muscles beyond their natural range. Many workplace injuries develop gradually from tasks that seem manageable in isolation but become damaging through repetition—what feels like a minor inconvenience today could lead to chronic pain months later.

Common Safety Oversights to Address Immediately

  • Work surfaces positioned too high or too low, causing shoulder elevation or wrist deviation
  • Chairs lacking adequate lumbar support, forcing unnatural spinal curvature
  • Tools requiring excessive grip force or awkward hand positioning
  • Flooring that creates instability or lacks proper shock absorption
  • Inadequate lighting that causes neck strain from squinting or leaning

Comfort: Eliminating Cumulative Strain from Daily Tasks

Comfort in ergonomics extends far beyond cushioned chairs—it’s a strategic approach to reducing physical strain during repetitive movements and object handling. This aspect recognizes that sustained physical demands require specific supportive interventions to prevent cumulative trauma injuries that develop over weeks or months of seemingly manageable work. Environmental factors like temperature control play a crucial role, as extremes cause distress that leads to compensatory movements creating additional strain.

Your body wasn’t designed for static positions or repetitive motions without proper support. Effective comfort solutions include specialized footwear that reduces foot and leg fatigue during standing work, anti-fatigue mats for hard flooring surfaces, lifting belts that promote proper technique, and task-specific gloves that protect hands during repetitive gripping. These interventions aren’t luxuries—they’re essential components that allow your body to maintain natural alignment and reduce the micro-trauma that accumulates into serious injuries.

Ease of Use: Designing Workflows That Match Natural Movement

Ease of use focuses specifically on eliminating awkward movements that stress neck, back, knees, and eyes through thoughtful workspace organization and tool placement. This aspect goes beyond simple accessibility to consider how movement patterns throughout your workday create gradual wear on your body. The goal is creating conditions where efficient, natural movement becomes your default pattern rather than something you must consciously maintain.

Implementing this aspect requires rethinking your entire workflow. Position frequently used tools within easy reach to eliminate excessive reaching, bending, or twisting. Adjust chair height so your feet rest flat while your knees form a 90-degree angle. Organize storage to minimize unnecessary movement during common tasks. When properly implemented, these changes reduce the thousands of micro-movements that accumulate into significant strain over time—what seems like a minor adjustment in a single instance becomes transformative when repeated throughout your workday.

Performance: Boosting Output Through Smart Workspace Design

ergonomic workstation productivity comparison before after

Performance improvement represents the productivity dimension of ergonomic design, directly linking workspace optimization to measurable output gains. When you eliminate physical barriers to efficient work execution, productivity naturally increases as you spend less energy overcoming environmental obstacles and more energy on productive tasks. This aspect targets unnecessary standing, sitting, reaching, lifting, or resupplying actions that slow workflow without adding value.

Your physical fatigue directly impacts work quality—strained workers make more mistakes, experience attention lapses, and require longer recovery between tasks. By implementing performance-focused ergonomic improvements, you’ll notice faster task completion, fewer errors, and sustained energy throughout your workday. Key performance indicators to track after ergonomic changes include reduced task completion times, lower error rates, decreased break frequency, and improved output consistency.

Aesthetics: How Clear Design Prevents Workplace Errors

Ergonomic aesthetics focuses on how easily you can understand and interpret protective gear, tools, equipment, and workstations—not traditional beauty standards. This aspect addresses clarity of use, function, operating procedures, and warnings. Poorly designed or incorrectly labeled items create confusion that leads to fatigue, stress, and ultimately injury, making aesthetic clarity an essential safety consideration.

When design communicates clearly through intuitive controls, accurate labeling, and logical interfaces, you require less cognitive effort to interpret your environment. This mental efficiency translates directly to physical benefits, as reduced cognitive load prevents the tension and strain that accompany mental confusion. Pay attention to warning labels that are easily visible, control panels with logical layouts, and equipment that behaves predictably—these seemingly small details significantly impact both your immediate comfort and long-term health.

Physical Ergonomics: Optimizing Your Body’s Workspace Relationship

ergonomic workstation setup diagram adjustable chair footrest

Physical ergonomics addresses how your body responds to the physical demands of your specific workspace or profession. This aspect directly targets overexertion, repetitive movements, and poor posture—the primary causes of musculoskeletal disorders that lead to extended leaves of absence. Implementing physical ergonomics requires creating workstations with appropriate furniture and tools that support natural body positioning throughout your workday.

Your personalized physical ergonomic setup should include:
– An adjustable chair with proper lumbar support that maintains your spine’s natural curve
– A sit-stand desk allowing position changes to reduce static loading on any single body part
– A footrest if your feet don’t comfortably reach the floor while seated
– An ergonomic keyboard and mouse that minimize wrist stress during computer work
– Task lighting positioned to eliminate glare without causing neck strain

Cognitive Ergonomics: Aligning Work Demands with Mental Processing

Cognitive ergonomics examines how work systems interact with your attention, memory, decision-making, and problem-solving capabilities. This aspect ensures interfaces and systems match human cognitive processing rather than overwhelming your mental capacity. When cognitive demands exceed your capabilities, errors increase, stress accumulates, and physical strain often follows as you contort yourself to compensate for mental overload.

Your work environment should support—not hinder—your cognitive processes. Effective cognitive ergonomics means clear instructions that match how you learn, intuitive software interfaces requiring minimal mental translation, and warning systems that capture attention without causing alarm fatigue. Pay attention to how much mental effort you spend just interpreting your work environment—that cognitive load directly impacts both your immediate performance and long-term physical well-being.

Organizational Ergonomics: Fixing Workplace Systems, Not Just Desks

Organizational ergonomics focuses on how workplace structures, policies, and social dynamics impact your well-being and performance. This aspect recognizes that even perfectly designed individual workstations cannot compensate for organizational dysfunction. Key implementation strategies include work schedules that respect natural circadian rhythms, clear communication channels that reduce uncertainty, and decision-making processes that incorporate worker input.

Your organization’s structure significantly influences ergonomic effectiveness. Work schedules ignoring biological needs, management practices discouraging worker input, and stressful social dynamics all undermine even the best physical ergonomic interventions. When addressing organizational ergonomics, look for opportunities to implement reasonable break schedules, create feedback loops for workspace improvements, and foster team environments where ergonomic concerns are taken seriously.

Implementing Continuous Ergonomic Improvement in Your Workspace

Workplaces constantly evolve as new employees arrive, methods change, and equipment ages—making one-time ergonomic assessments quickly outdated. Effective implementation requires ongoing systems rather than periodic interventions. Establish quarterly ergonomic refreshers, regular wellness checks, and rapid response protocols for emerging issues before they become serious problems.

Your Ergonomic Maintenance Checklist:
– Monthly: Adjust chair height and monitor position as needed
– Quarterly: Evaluate tool placement for optimal reach zones
– Biannually: Assess lighting conditions and noise levels
– Annually: Review work processes for unnecessary movements
– Immediately: Address any new discomfort or pain signals

Sustaining Long-Term Ergonomic Success Through Worker Involvement

Maintaining ergonomic quality requires viewing it as an ongoing process rather than a completed project. The most effective programs combine the five-aspect framework for detailed assessment with the three-area model for comprehensive coverage. Crucially, involve workers in assessment and intervention design—their experiential knowledge identifies problems external assessors often miss and increases buy-in for resulting changes.

Your investment in understanding and implementing the aspects of ergonomics pays dividends through reduced injury risk, improved productivity, and enhanced job satisfaction. By addressing safety, comfort, ease of use, performance, and aesthetics across physical, cognitive, and organizational dimensions, you create workplaces where employees can perform their duties with greater ease and organizations benefit from sustained operational excellence. Start with one aspect today—your body and productivity will thank you tomorrow.

Posted on Leave a comment

Fix Anker Ergonomic Mouse Not Working Issue


When your Anker ergonomic mouse suddenly stops responding, it can derail your entire workday or gaming session. The frustration of a frozen cursor, unresponsive buttons, or intermittent connectivity is all too familiar for users who rely on these precision devices. If your Anker ergonomic mouse not working properly, you’re not alone—this common issue affects thousands of users monthly. This guide delivers immediate solutions for power failures, connectivity problems, and hardware malfunctions across all Anker ergonomic mouse models, whether you’re using a wireless version with USB dongle, Bluetooth model, or wired configuration.

Power Status and Indicator Light Diagnosis

Your Anker mouse communicates its operational state through visual indicators, making this the critical first step in troubleshooting any malfunction. Ignoring these signals wastes valuable time pursuing unnecessary repairs when the solution might take seconds.

Identify Power Failure Symptoms

A functioning Anker ergonomic mouse typically displays a red or blue indicator light when powered and active. When your mouse appears dead with no response to movement or clicks, check for these visual cues first. If no light appears whatsoever, you’re dealing with a complete power failure that requires immediate attention to battery or charging systems.

Pay close attention to light behavior patterns: a steady light indicates normal operation, while flashing often signals low battery, pairing mode, or hardware errors. Some models use different colors to communicate specific states—blue might indicate Bluetooth connection while red shows USB receiver pairing. Consult your specific model documentation if indicator behavior doesn’t match general patterns.

Cross-Computer Power Testing

Connect your Anker mouse to a different computer—ideally one running a different operating system—to determine if the problem originates with your mouse or computer. If the mouse functions correctly on the alternate system, focus your troubleshooting on your original computer’s USB ports, drivers, or software configuration.

Conversely, connect a different working mouse to your original computer. If the alternative mouse functions normally while your Anker mouse does not, you’ve confirmed that the Anker device itself requires attention. This distinction determines whether you should focus efforts on mouse hardware or computer system issues.

Battery Replacement and Power Restoration

Anker ergonomic mouse battery compartment AA replacement

Power-related issues account for over 60% of Anker ergonomic mouse malfunctions, making this the most common—and easiest to fix—problem category. Whether your model uses disposable AA batteries or an internal rechargeable cell, systematic power troubleshooting should be your first approach.

Replace AA Batteries Properly

For AA battery models, begin by opening the battery compartment on the bottom of the mouse and inspecting installed batteries. Even new batteries can be defective or depleted, so use a fresh set from a newly opened package. Ensure proper polarity alignment during installation—most Anker mice have clear positive and negative markings, and reversed batteries won’t provide power.

Before installing new batteries, inspect the compartment for corrosion or debris that might interfere with proper contact. Clean contact points with a dry cloth and ensure springs make solid connections with battery terminals. After installation, test for indicator light functionality immediately—this confirms successful power restoration.

Rechargeable Model Charging Protocol

For rechargeable Anker ergonomic mice, insufficient charge frequently causes apparent power failures. Connect the mouse to a power source using the provided charging cable and allow it to charge for at least 30 minutes before testing. Some models feature a small charging indicator light that illuminates during charging—no light may indicate a faulty cable or end-of-life internal battery.

Use the original charging cable whenever possible, as third-party cables sometimes deliver inconsistent power. If your mouse still won’t power on after proper charging, try a different power source such as a wall adapter instead of a computer USB port, as some ports provide insufficient power for charging.

Wireless Connectivity Failure Solutions

Wireless Anker mice depend on stable connections between the mouse, its receiver, and your computer. Connectivity problems manifest as cursor lag, intermittent response, complete disconnection, or failure to recognize the mouse at all. These issues require targeted troubleshooting based on your specific wireless configuration.

USB Receiver Troubleshooting Protocol

Confirm the USB receiver is fully inserted into your computer’s port—these compact dongles can appear seated while maintaining only marginal contact. Press firmly and observe for system recognition. If no response occurs, try a different USB port, preferably one directly connected to your motherboard for desktops or a side port on laptops.

Test your mouse through multiple USB ports to identify whether the issue is port-specific. Ports directly connected to the motherboard typically provide more consistent power delivery than front-panel ports or hub connections. If the mouse functions through certain ports but not others, focus on repairing or replacing the non-functional ports.

Bluetooth Pairing Reset Procedure

For Bluetooth models, ensure your mouse is in pairing mode by pressing and holding the bottom button until the indicator light flashes rapidly. On your computer, access Bluetooth settings, enable Bluetooth if disabled, and search for available devices. Look for your Anker mouse—often listed by model number—and select it to complete pairing.

Bluetooth interference from other devices can disrupt connections. Temporarily disable competing Bluetooth devices and attempt to establish a stable connection away from potential interference sources like WiFi routers or microwave ovens. If pairing fails repeatedly, remove the device from Bluetooth preferences, restart both devices, and attempt pairing again.

Button Malfunction Repair Guide

Anker ergonomic mouse button switch replacement diagram

Mouse buttons experience the most physical stress of any component, making them prone to wear and failure. From primary left/right buttons to specialized DPI adjusters, each can malfunction in different ways requiring specific fixes.

Primary Button Restoration

When left or right primary buttons become unresponsive or require excessive force, begin by testing functionality across different applications. If buttons work in BIOS but not your operating system, software conflicts are likely the culprit rather than hardware failure.

For buttons that occasionally register clicks but require multiple presses, internal switch contacts may have degraded from extended use. Mechanical switches have finite lifespans measured in millions of clicks—heavy users can reach this limit within months. Cleaning around button mechanisms with compressed air may temporarily restore function, but permanent repair typically requires switch replacement.

DPI Button Troubleshooting

The DPI button allows on-the-fly cursor sensitivity adjustments. When non-functional, verify it genuinely isn’t working by pressing multiple times while observing cursor speed changes. Some users expect immediate visible feedback, but sensitivity changes may be subtle.

If cleaning and software troubleshooting fail, the physical button component has likely failed. Replacement requires opening the housing and soldering a new switch—advanced work that may not be cost-effective compared to mouse replacement for most users. Consider this repair only if your mouse is otherwise in excellent condition.

Sensor and Tracking Issue Resolution

Anker mouse sensor cleaning guide optical laser

When your Anker mouse has power and appears connected but fails to move the cursor properly, the sensor assembly requires attention. Tracking issues manifest as unresponsive cursor, erratic movement, jumping, or complete tracking failure.

Surface Compatibility Testing

Optical and laser sensors require appropriate surfaces for accurate tracking. Highly reflective surfaces, glass tables, and glossy plastics can confuse sensor readings. Test your mouse on a standard mouse pad or plain non-glossy surface to determine whether surface issues cause the problem.

If tracking works on some surfaces but not others, simply changing your work surface resolves the issue. Mouse pads designed specifically for optical and laser sensors provide optimal tracking surfaces that eliminate most surface-related tracking problems.

Sensor Lens Cleaning Technique

Dust, debris, and accumulated dirt on the sensor lens represent the most common cause of tracking failure. Locate the sensor on the bottom of the mouse—a small circular or rectangular window—and clean it gently using a soft, dry cloth or slightly dampened cotton swab. Avoid cleaning solutions that might leave residue.

For stubborn debris, lightly breathe on the sensor to create moisture before wiping clean. Pay special attention to the edges of the sensor housing where debris accumulates. Perform this cleaning weekly as preventative maintenance to avoid future tracking issues.

Driver Management and Software Fixes

Outdated, corrupted, or conflicting mouse drivers represent one of the most common yet frequently overlooked causes of Anker ergonomic mouse malfunction. Proper driver management resolves many apparent hardware issues.

Windows Driver Reinstallation Process

Access Device Manager by right-clicking the Start button, navigate to “Mice and other pointing devices,” and locate your Anker mouse. Right-click and select “Update driver” to search for available updates. If Windows finds newer drivers, install them and restart.

When automatic updates fail, manually uninstall the current driver, disconnect your mouse, restart your computer, and reconnect the mouse. Windows will reinstall the driver from scratch during this process, often resolving persistent issues.

Software Configuration Reset

Locate Anker configuration software on your computer and look for options to reset all settings to defaults. This removes problematic custom configurations that might interfere with basic mouse function. Third-party mouse utilities can conflict with Anker software—temporarily uninstall competing applications to determine if they cause the malfunction.

When reset procedures fail, completely uninstall Anker software through Control Panel, restart your computer, then download the latest version from Anker’s official website for a clean installation.

Preventative Maintenance and When to Replace

Regular maintenance extends your Anker ergonomic mouse lifespan and prevents issues before they occur. Knowing when replacement makes more sense than continued repair saves time and frustration.

Environmental Protection Measures

Store and use your mouse within manufacturer-specified temperature ranges—extreme cold temporarily affects battery performance while extreme heat causes permanent damage. Keep your mouse away from strong electromagnetic fields from power supplies or motors that can interfere with wireless operation.

Perform weekly maintenance: clean sensor lenses, check battery contacts for corrosion, and inspect cables for damage. For wireless models, periodically remove and reinsert the USB receiver to clean contact points and ensure solid connection.

Cost-Effective Replacement Decision

Compare repair costs against new mouse pricing—most users find parts, tools, and time investment exceed the value of budget or mid-range mice. If your mouse is several years old with accumulated wear, additional failures are likely even after addressing current issues.

Check Anker’s warranty coverage through their website—many models include extended protection that may provide free replacement. For professionals or competitive gamers dependent on reliable equipment, new mice provide known reliability that outweighs repair risks for older devices.


By systematically working through these troubleshooting categories, you can identify your Anker ergonomic mouse malfunction cause and take appropriate action. Most power and connectivity issues resolve quickly through simple interventions, while persistent button and sensor problems often indicate hardware wear making replacement the practical choice. When troubleshooting reaches its limits, Anker’s support resources and warranty coverage provide additional options for restoring your productivity without unnecessary frustration.

Posted on Leave a comment

Anker Ergonomic Mouse Red Light Blinking Fix


That frustrating red blink on your Anker ergonomic mouse has stopped your workflow dead in its tracks. You’re staring at the clear button on top, watching the red light pulse erratically while your cursor refuses to move or responds with maddening inconsistency. This visual indicator is your mouse’s distress signal, and understanding exactly what it means separates a quick fix from unnecessary replacement.

The red light on your Anker 2.4G wireless mouse serves as both a power status monitor and DPI (Dots Per Inch) indicator, integrated into the clear button on the top surface. When functioning normally, this light confirms proper power delivery and communication between your mouse and computer. When blinking abnormally, it’s communicating a specific problem that requires targeted action. This guide cuts through the confusion to deliver precise solutions for every red light scenario—whether it’s blinking rapidly, pulsing slowly, or completely dark—so you can restore full functionality to your ergonomic mouse in minutes.

Why Your Anker Mouse Red Light Won’t Stop Blinking

An erratic red light pattern on your Anker ergonomic mouse typically signals a communication breakdown between the device and your computer. Unlike a steady red light that confirms normal operation, blinking behavior indicates the mouse is attempting but failing to establish a stable connection with the USB receiver. This specific symptom often occurs when the unique identity information stored in your computer’s drivers becomes corrupted or disconnected from the physical receiver.

Identify these critical blinking patterns to diagnose your issue: Rapid blinking (3+ flashes per second) usually means the mouse can’t find its paired receiver. Slow, rhythmic pulsing often indicates low battery power that’s still sufficient for partial operation. Intermittent blinking with periods of darkness suggests unstable power delivery from aging batteries. These visual cues provide immediate insight into whether your problem stems from connection issues, power problems, or hardware failure.

The 2.4 GHz wireless protocol used by your Anker mouse requires consistent two-way communication between the device and receiver. When this communication channel falters, the red light enters diagnostic mode, using specific blink patterns to communicate the nature of the failure. Ignoring these signals and continuing to use the mouse will only lead to increasingly erratic behavior until complete disconnection occurs.

Replace Batteries Before Assuming Hardware Failure

Anker ergonomic mouse battery replacement AA batteries

Battery depletion represents the most common cause of abnormal red light behavior in Anker ergonomic mice, accounting for over 70% of blinking light incidents. As AA batteries reach the end of their service life, they provide inconsistent power that manifests as erratic red light patterns rather than complete failure. The mouse continues drawing power until voltage drops below the threshold needed for stable wireless transmission.

Follow this precise battery replacement procedure: First, locate the battery compartment on the bottom of your mouse near the rear. Press the release tab firmly while sliding the cover toward the rear of the device. Remove both depleted batteries simultaneously, noting their orientation against the positive (+) and negative (-) markings inside the compartment. Insert two fresh AA alkaline batteries (not rechargeable NiMH) matching the polarity indicators exactly. Slide the cover back into place until you hear a distinct click confirming proper seating.

After installation, immediately check the red light behavior—fresh batteries should produce a steady, non-blinking red glow within 10 seconds. If blinking continues, test with a different brand of batteries, as some cheaper varieties deliver inconsistent voltage even when new. High-quality alkaline batteries provide the most stable power delivery for wireless peripherals, preventing the voltage fluctuations that trigger red light anomalies.

Reset USB Receiver Connection Immediately

When battery replacement fails to stop the blinking red light, your next critical step involves resetting the wireless communication between your mouse and computer. The USB receiver stores unique pairing information that occasionally becomes corrupted, causing the mouse to continuously search for its paired receiver without success.

Execute this receiver reset sequence: Unplug the USB receiver from your computer and wait 15 seconds for residual power to dissipate. Clean the USB port with a dry cotton swab to remove any debris interfering with connection quality. Insert the receiver into a different USB port—preferably a rear-mounted port on desktops or a port directly on your laptop rather than through a hub. Restart your computer completely to force driver reinitialization. After reboot, press the DPI button on your mouse three times quickly to force reconnection.

This process typically resolves blinking light issues caused by driver corruption or temporary communication failures. If the red light returns to steady operation after these steps, your mouse has successfully re-established its wireless connection. For persistent issues, try the receiver in another computer to determine if the problem lies with your primary system’s USB controller or the mouse itself.

Diagnose LED Component Failure Accurately

Anker ergonomic mouse LED indicator test functionality

When your Anker mouse functions perfectly—cursor moves smoothly, buttons click responsively—yet displays abnormal red light behavior, you’ve likely encountered an LED (Light Emitting Diode) component failure. This specific hardware issue affects only the visual indicator while leaving all tracking and clicking functions intact, creating confusion about whether the problem requires repair.

Confirm LED failure through these definitive tests: First, verify that cursor movement, button clicks, and scroll wheel operation function normally despite the abnormal red light. Next, confirm that battery replacement and receiver reset procedures have no effect on the light’s behavior. Finally, test whether DPI setting changes still register on your screen even when the red light doesn’t provide visual confirmation. These three tests together confirm LED failure rather than a broader system malfunction.

Unlike other red light issues, LED component failure doesn’t impair mouse functionality—it only eliminates the visual status indicator. The semiconductor light source has simply reached the end of its operational lifespan while the rest of the mouse continues working perfectly. While technically repairable by replacing the LED component, many users opt to continue using the mouse without the indicator since all core functions remain operational.

Fix Unresponsive DPI Button Issues

The red light’s direct relationship to your Anker mouse’s DPI button means blinking anomalies often accompany button malfunctions. When the DPI button fails to cycle through sensitivity settings (slow, medium, fast) despite the red light blinking, you’re dealing with a mechanical button failure that requires specific troubleshooting separate from light-related issues.

Address DPI button problems with this targeted approach: First, restart your computer completely to reset the USB subsystem and peripheral initialization—this resolves temporary software glitches in 60% of cases. If the button remains unresponsive, clean around the button mechanism with compressed air to remove debris preventing proper actuation. For persistent issues, consult Anker’s component replacement guide to access the button assembly for cleaning or replacement.

The critical distinction here is that DPI button failure affects only sensitivity adjustment functionality while leaving all other mouse operations intact. Your cursor movement and clicking will work normally—you simply lose the ability to change tracking speed on the fly. The red light may continue blinking normally even with a failed button, as these are technically separate components sharing the same physical housing.

Clean Sensor and USB Ports Thoroughly

Accumulated debris on your Anker mouse’s optical sensor or in USB ports can cause communication issues that manifest as abnormal red light behavior. The bottom sensor window requires periodic cleaning to maintain optimal tracking performance, while USB port contamination disrupts the critical connection between your mouse and computer.

Perform this professional-grade cleaning routine: Turn your mouse over and locate the small optical sensor near the front bottom. Dampen a cotton swab with 90%+ isopropyl alcohol and gently clean around the sensor lens in circular motions—never press directly on the lens itself. For USB ports, power down your computer first, then use a dry swab to remove visible debris from port edges. Insert the swab just past the port entrance (never force it deep inside) to clean contact points without damaging internal components.

Allow all cleaned areas to dry completely for at least 10 minutes before reconnecting or using your mouse. This cleaning protocol resolves approximately 25% of intermittent red light issues caused by environmental contamination. Pay particular attention to the USB receiver’s metal contacts, which develop oxidation over time that disrupts signal transmission.

Complete 5-Step Diagnostic Checklist

When facing persistent red light issues, follow this systematic diagnostic sequence to efficiently identify and resolve the underlying problem without unnecessary component replacement. This proven methodology addresses the most probable causes first while providing clear escalation paths for more complex failures.

Execute this diagnostic sequence in order:
1. Confirm battery status by replacing with known-fresh AA cells
2. Restart computer completely to reset USB connections
3. Test USB receiver in different ports and computers
4. Clean optical sensor and USB port contacts thoroughly
5. Verify mouse functionality separate from light behavior

This approach ensures you address simple, high-probability issues before considering hardware repairs. Most blinking red light problems resolve at steps 1-3, saving you time and preventing unnecessary disassembly of your mouse. Document each test result to identify patterns—if the red light behavior changes during testing, you’ve found your culprit.

Prevent Future Red Light Problems Proactively

Once you’ve resolved your Anker ergonomic mouse’s blinking red light issue, implement these maintenance practices to prevent recurrence and extend your device’s service life. Proactive care reduces the frequency of red light anomalies by addressing their root causes before they manifest as disruptive symptoms.

Adopt these preventive measures immediately:
– Replace batteries when cursor movement becomes slightly sluggish (before complete failure)
– Store the USB receiver in a dedicated port rather than carrying it loose
– Clean the optical sensor weekly if used in dusty environments
– Avoid extreme temperatures that accelerate battery depletion
– Power down your computer completely at least once weekly to reset peripheral connections

Regular maintenance prevents approximately 80% of recurring red light issues by maintaining optimal power delivery and connection quality. The small investment in routine care saves you from frequent troubleshooting sessions and extends your mouse’s operational life significantly—many Anker ergonomic mice continue functioning reliably for 3+ years with proper maintenance.

Posted on Leave a comment

Advanced Ergonomic Concepts Explained


Your employees’ physical comfort directly impacts your bottom line, yet most organizations still treat ergonomics as mere chair adjustments rather than strategic business investments. Modern advanced ergonomic concepts go far beyond basic workstation tweaks—they represent integrated systems that enhance productivity while preventing costly injuries. Research shows companies implementing sophisticated ergonomic solutions see up to 25% reductions in musculoskeletal disorders and 17% productivity gains from reduced discomfort-related interruptions. As hybrid work models expand, understanding these nuanced approaches has become essential for creating workspaces where employees thrive both physically and professionally. This guide reveals the sophisticated strategies forward-thinking organizations use to transform their work environments through evidence-based ergonomic principles.

The financial case for ergonomic excellence continues strengthening as organizations document clear returns through reduced injury claims, lower healthcare costs, and improved talent retention. Beyond these quantifiable benefits, workplaces embracing advanced ergonomic concepts position themselves as employers of choice in competitive labor markets. Understanding these sophisticated approaches enables you to make informed investments that deliver meaningful returns while creating environments where your team can perform at their absolute best.

Diagnose Your Specific Ergonomic Pain Points

Stop guessing which ergonomic interventions will deliver maximum impact—systematically identify your workplace’s unique pressure points through targeted assessment protocols. Begin by documenting existing equipment age, condition, and adjustability capabilities across your organization; this baseline reveals quick-win opportunities where minor modifications resolve significant issues without major capital expenditure. For example, adding monitor risers to elevate screens to eye level often eliminates neck strain for under $50 per workstation, delivering immediate comfort improvements.

Employee-specific assessments prove equally critical, as ergonomic needs vary dramatically based on body dimensions, job functions, and existing health conditions. Implement structured questionnaires gathering data on current discomfort patterns, task requirements, and equipment satisfaction levels to prioritize interventions addressing the most pressing issues first. This dual approach—organizational inventory plus individual evaluation—ensures your ergonomic strategy targets actual problems rather than assumed needs.

Prioritize recommendations based on impact-to-investment ratio, starting with low-cost, high-impact solutions before progressing to comprehensive equipment replacements. Simple interventions like footrests, keyboard trays, and document holders often provide substantial improvements while building momentum for more significant investments. This phased approach demonstrates immediate value to stakeholders while establishing the foundation for long-term ergonomic excellence.

Professional Ergonomic Assessments That Deliver Actionable Insights

Expert ergonomic assessments have evolved beyond basic posture checks to comprehensive analyses identifying hidden risk factors through systematic observation of work patterns and equipment interactions. Certified consultants now measure precise parameters like reach distances, viewing angles, and force requirements that contribute to strain over time, creating customized intervention roadmaps rather than generic recommendations. These professionals watch employees perform actual job tasks to identify micro-movements causing cumulative stress that standard assessments might miss.

Remote ergonomic reviews have become game-changers for distributed workforces, using video technology and digital measurement tools to assess home offices with surprising accuracy. These virtual consultations eliminate geographical barriers while reducing service delivery costs by up to 60% compared to traditional on-site visits. Employees simply share their screen during a video call while consultants guide them through specific positioning tests and measurements, delivering detailed adjustment recommendations within 24 hours.

The most valuable assessments culminate in prioritized action plans specifying:
– Immediate adjustments achievable through simple modifications
– Medium-term solutions requiring accessory purchases
– Long-term equipment replacements with ROI projections
– Behavioral changes to complement physical interventions

These comprehensive reports transform ergonomic improvements from isolated fixes into strategic initiatives with measurable business outcomes.

Premium Seating Solutions That Adapt to Human Movement

ergonomic chair features synchronized tilt lumbar support mesh backrest

Modern ergonomic chairs have evolved from static furniture to dynamic support systems that respond intelligently to natural movement throughout the workday. High-end models feature synchronized tilt mechanisms maintaining proper spinal alignment during reclining, forward leaning, and lateral shifts—critical for knowledge workers who naturally change positions while thinking or collaborating. Mesh backrests now incorporate variable tension zones providing targeted lumbar support that automatically adjusts to individual spinal curves without manual intervention.

When evaluating seating options, prioritize these non-negotiable adjustability features:
– Seat depth adjustment accommodating different thigh lengths (prevents pressure behind knees)
– Independent lumbar height and depth controls matching individual spinal anatomy
– 3D armrests adjusting vertically, horizontally, and rotationally for optimal shoulder positioning
– Seat height range covering 15-22 inches to support diverse body types

Construction quality directly impacts long-term value—premium chairs with robust gas lifts, durable casters, and replaceable components typically deliver 10+ years of service compared to 3-5 years for budget alternatives. This extended lifecycle often justifies higher initial investments through substantially lower total cost of ownership.

Maximize Sit-Stand Desk Benefits With Smart Implementation

Sit-stand desks deliver measurable health benefits only when implemented with proper usage protocols—not merely purchased and installed. The most effective organizations establish clear position-change guidelines recommending transitions every 30-60 minutes based on individual comfort levels rather than arbitrary timers. Advanced models with programmable height memories significantly increase compliance by allowing one-touch transitions between pre-set seated and standing positions, eliminating the friction of manual adjustments.

Anti-collision sensors represent a critical but often overlooked feature, especially in dense office environments where desks sit close together. These systems detect obstacles during height adjustments, preventing costly damage to equipment and potential injuries to nearby colleagues. For budget-conscious implementations, conversion platforms transforming existing desks into sit-stand workstations offer 60-70% cost savings compared to full desk replacements while delivering similar functionality.

Track usage patterns to identify non-compliance issues—many advanced desks now integrate with workplace analytics platforms showing position-change frequency across departments. This data helps target additional training where needed and demonstrates program effectiveness to stakeholders through measurable behavior change.

Targeted Input Device Strategies for Common Injury Prevention

split keyboard vertical mouse trackball ergonomic comparison

Generic “ergonomic” keyboards and mice often fail because they don’t address specific task requirements—successful implementations match devices to actual work patterns. For heavy typists, split-keyboard designs with adjustable tenting angles reduce ulnar deviation by up to 30 degrees compared to standard layouts, significantly lowering carpal tunnel risk. Low-force key switches requiring only 35-45 grams of actuation force prevent finger fatigue during extended typing sessions.

Vertical mice deliver the most significant benefits for users performing extensive pointing tasks, maintaining a neutral handshake position that reduces forearm supination by 50-70% compared to traditional mice. Trackball alternatives eliminate repetitive wrist movements entirely for precision tasks like graphic design or data analysis. Implement a device trial program allowing employees to test options before final selection—this simple step reduces mismatched equipment by 75% according to industry case studies.

Calculate Your True Ergonomic ROI Beyond Injury Reduction

ergonomic ROI chart infographic cost savings productivity

Most organizations underestimate ergonomic returns by focusing solely on reduced workers’ compensation claims. Comprehensive ROI calculations should include:
– Direct savings: Reduced injury claims (typically 20-30% reduction)
– Productivity gains: 10-17% output increases from reduced discomfort interruptions
– Retention value: Lower turnover costs (replacing employees costs 50-200% of annual salary)
– Recruitment advantage: Enhanced employer branding attracting 25% more qualified candidates

Equipment evaluation must consider total cost of ownership rather than purchase price alone. Premium chairs with 10-year lifespans often cost 30% less annually than budget models needing replacement every 3-4 years. Factor in warranty coverage, parts availability, and maintenance requirements when comparing options—these hidden costs frequently exceed initial price differences over time.

Future-Proof Your Ergonomic Strategy With Emerging Technologies

Smart ergonomic solutions incorporating sensors and AI will soon move beyond novelty to business necessity. Chairs with embedded posture monitoring provide real-time feedback through mobile apps, while sit-stand desks track position-change compliance and suggest optimal schedules based on individual usage patterns. These technologies transform ergonomic programs from periodic interventions to continuous improvement systems.

The rise of hybrid work demands portable ergonomic solutions that maintain standards across environments. Invest in foldable laptop stands, compact footrests, and universal monitor mounts enabling consistent setups whether employees work from home, office, or coffee shop. Training programs teaching self-assessment techniques ensure ergonomic principles transfer across locations regardless of available equipment.

Implement These Advanced Ergonomic Concepts for Immediate Impact

Transform your workplace by implementing these advanced ergonomic concepts through a systematic process: begin with targeted assessments identifying your specific pain points, prioritize high-impact interventions based on ROI potential, select equipment matching actual work patterns rather than generic standards, and establish ongoing support systems ensuring sustained benefits. Organizations that treat ergonomics as strategic business function rather than compliance obligation consistently achieve superior returns through healthier, more productive workforces. Start with one department as a pilot, document your results, and scale what works—this evidence-based approach builds organizational buy-in while delivering measurable improvements to both employee wellbeing and business performance.

Posted on Leave a comment

Computer Ergonomics: 3 Key Benefits for Health & Productivity


If you’ve ever finished a workday with aching wrists, tired eyes, or a stiff neck, your workstation setup is likely sabotaging your health. Millions of office workers unknowingly damage their bodies through poor computer ergonomics, suffering consequences that compound over months and years. Computer ergonomics isn’t just about comfort—it’s a science-backed approach to protecting your physical health while maximizing your daily output. This guide reveals the three importance areas of computer ergonomics that transform your workspace from a health hazard into a productivity powerhouse.

Understanding these critical aspects gives you the power to prevent injuries before they start and maintain your physical capabilities for decades of productive work. Whether you’re setting up your first home office or optimizing a corporate workstation, these principles apply universally. You’ll learn exactly why proper ergonomics matters and gain actionable strategies you can implement immediately to safeguard your health and enhance your performance.

Prevent Vision Problems and Musculoskeletal Damage

ergonomic workstation setup computer vision syndrome carpal tunnel

Stop Computer Vision Syndrome Before It Starts

Your eyes weren’t designed for eight hours of continuous screen focus, yet most workers ignore the warning signs of computer vision syndrome until discomfort becomes unbearable. Research shows you blink up to 66% less while using computers compared to normal conditions, causing tears to evaporate faster and leaving your eyes dry, red, and vulnerable to irritation. When your monitor sits too low or at awkward angles, your eye muscles constantly struggle to focus between the screen and surrounding elements, creating a conflict that leads to mid-afternoon headaches.

Fix your screen position now: Position your monitor at eye level, approximately 20-26 inches from your face—about an arm’s length away. Adjust screen brightness to match the ambient light in your workspace, and if glare persists, apply an anti-glare filter rather than straining through reflections. These simple changes prevent the eye fatigue that undermines your afternoon productivity.

Eliminate Carpal Tunnel and Repetitive Strain Injuries

Your hands and wrists pay a heavy price for improper keyboard and mouse placement. Carpal tunnel syndrome develops when the median nerve becomes compressed in your wrist, causing pain, numbness, and tingling that can sideline you from work. This damage often starts subtly with occasional tingling that progresses to chronic pain as you continue working with poor ergonomics.

Position your input devices correctly: Keep your arms at or below 90-degree angles with elbows close to your sides. Your keyboard should sit just below elbow level, either flat or with a slight downward slope away from your body. If your wrists bend upward while typing, consider an ergonomic keyboard that maintains a neutral wrist position. For mouse use, choose models that keep your wrist straight rather than bent, and take immediate action if you feel any tingling or numbness—early intervention prevents permanent damage.

Reduce Your Risk of Chronic Back and Neck Pain

Looking downward at screens rather than adjusting monitor height creates relentless strain on your cervical spine that accumulates silently over months. This poor posture forces your neck muscles to work 10 times harder than they should, leading to chronic tension that often radiates into headaches. Back pain becomes nearly inevitable when your chair lacks proper lumbar support or your feet don’t rest flat on the floor.

Create an ergonomic seating solution: Invest in an adjustable chair with adequate lumbar support that maintains your spine’s natural curve. If your feet don’t reach the floor comfortably, use a footrest to keep your knees and hips level. Position your monitor directly in front of you to avoid neck twisting, and remember—your eyes should naturally fall on the top third of the screen without tilting your head up or down.

Maximize Daily Productivity Through Strategic Workspace Design

Optimize Your Monitor Setup for Peak Performance

adjustable monitor arm ergonomic monitor positioning eye level

The position of your screen directly impacts both your physical comfort and mental focus. Workers with properly positioned monitors report 23% fewer headaches and maintain concentration longer than those with suboptimal setups. Adjustable monitor arms provide the flexibility needed to achieve perfect positioning regardless of your desk height or body dimensions.

Implement these monitor adjustments today:
– Position the top of your screen at or slightly below eye level
– Maintain 20-26 inches between your eyes and the monitor
– Angle the screen to eliminate reflections from windows or overhead lights
– Match screen brightness to your surrounding environment
– Use document holders at the same height and distance as your screen

These seemingly minor tweaks prevent the constant micro-adjustments your body makes when uncomfortable, freeing up mental energy for actual work rather than physical discomfort.

Organize Your Workspace to Minimize Movement Fatigue

Every unnecessary reach and twist throughout your workday accumulates physical stress that degrades your performance by afternoon. Frequent phone users who cradle handsets between their shoulder and ear develop chronic neck tension that reduces their cognitive capacity. Workers who constantly stretch for documents or supplies introduce cumulative strain that leads to tendonitis and other repetitive stress injuries.

Transform your desk layout with these steps:
– Keep frequently used items within a 15-20 inch reach radius
– Use a hands-free headset for all phone calls to maintain neutral neck position
– Position your mouse and keyboard close enough that your elbows stay near your body
– Place reference documents in a holder next to your screen at the same height
– Store rarely used items in drawers rather than on your desk surface

This efficient organization reduces the 1,000+ unnecessary micro-movements you make daily that collectively exhaust your muscles and diminish your focus.

Implement Strategic Movement Breaks That Boost Output

Prolonged sitting without movement causes your hip flexors to tighten, your neck muscles to stiffen, and your circulation to slow—all of which degrade both physical comfort and mental sharpness. The Occupational Safety and Health Administration recommends two short breaks plus a lunch break during eight-hour computer days to maintain peak performance.

Build these movement habits into your routine:
– Set a timer to stand and stretch every 30 minutes
– Perform simple neck rolls, shoulder shrugs, and wrist circles during breaks
– Walk to a distant printer or water cooler instead of using the closest one
– Use a standing desk converter for 15-30 minutes each hour
– Practice the 20-20-20 rule: Every 20 minutes, look at something 20 feet away for 20 seconds

These brief interruptions prevent the cumulative fatigue that makes afternoons unproductive while actually enhancing your total daily output through sustained focus.

Secure Long-Term Physical Health and Career Sustainability

Protect Your Spine for Decades of Comfortable Work

ergonomic chair lumbar support spine alignment posture correction

Poor posture doesn’t just cause temporary discomfort—it reshapes your spine over time in ways that lead to chronic pain requiring expensive interventions. Slouching compresses spinal discs unevenly, accelerating wear and tear that can necessitate surgery years later. The good news? Your spine remains adaptable, and proper ergonomics can reverse early damage before it becomes permanent.

Preserve your spinal health with these long-term strategies:
– Use a sit-stand desk to alternate positions throughout the day
– Choose a chair with adjustable lumbar support that matches your spine’s curve
– Perform daily core-strengthening exercises to support proper posture
– Schedule regular chiropractic adjustments to maintain alignment
– Practice mindfulness about your posture throughout the workday

These investments pay compound dividends as you age, allowing you to work comfortably well beyond when colleagues suffer from chronic pain.

Implement Cost-Effective Solutions That Prevent Future Expenses

Ignoring ergonomics creates hidden costs that far exceed the price of proper equipment. Workers with computer-related injuries take 28% more sick days and experience significantly higher healthcare costs over their careers. Organizations that implement comprehensive ergonomic programs see reduced workers’ compensation claims, lower healthcare expenses, and improved employee retention.

Make these smart equipment investments:
– An ergonomic chair with proper lumbar support ($200-$500)
– Adjustable monitor arm for optimal screen positioning ($50-$150)
– Footrest if your feet don’t reach the floor comfortably ($20-$50)
– Ergonomic keyboard and mouse if you experience wrist discomfort ($50-$100)
– Blue light filtering glasses if you work in low-light conditions ($20-$50)

These relatively small expenditures prevent medical bills that can reach thousands of dollars for conditions like carpal tunnel syndrome or chronic back pain.

Create a Sustainable Work Environment That Grows With You

Your ergonomic needs will change as you age, gain or lose weight, or develop new health conditions. The most effective ergonomic setups incorporate flexibility that accommodates these changes without requiring complete overhauls. Adjustable components allow you to maintain proper positioning regardless of physical changes or evolving work requirements.

Build adaptability into your workspace:
– Choose furniture with multiple adjustment points rather than fixed dimensions
– Keep your ergonomic toolkit stocked with additional accessories you might need later
– Schedule quarterly ergonomic self-audits to catch emerging issues early
– Stay informed about new ergonomic solutions that address specific concerns
– Share successful strategies with colleagues to create a culture of ergonomic awareness

This forward-thinking approach ensures your workspace continues supporting your health and productivity throughout your entire career rather than becoming a source of chronic pain.


Computer ergonomics delivers three importance benefits that transform how you work and feel: preventing immediate injuries, boosting daily productivity, and preserving your physical health for decades of comfortable work. By implementing these evidence-based strategies, you’re not just creating a more comfortable workspace—you’re investing in your long-term ability to perform at your best. Start with one change today, like adjusting your monitor height or setting movement reminders, and build from there. Your future self will thank you when you’re still working comfortably while others struggle with preventable pain. The three importance areas of computer ergonomics aren’t just nice-to-have features—they’re essential components of sustainable, high-performance work in our digital world.