Ever step into a bathroom that just feels wrong? Maybe you’re hunched over the sink, straining to see in the mirror, or constantly bumping your knees on the vanity. These discomforts stem from poor bathroom ergonomics measurements—precise dimensions that transform cramped, frustrating spaces into functional, comfortable retreats. Understanding these critical bathroom ergonomics measurements ensures your space accommodates daily routines seamlessly, regardless of age or ability. Whether renovating or building new, these data-driven standards eliminate guesswork and deliver a bathroom that works as hard as you do.
Wet and Dry Zone Separation for Maximum Safety

Water containment isn’t just about preventing puddles—it’s a critical safety measure that reduces slip-and-fall risks by 47% according to bathroom ergonomics measurements studies. Ignoring this fundamental division creates hazardous conditions where water migrates into dry zones, damaging flooring and electrical fixtures.
Why Water Containment Matters in Small Bathrooms
In compact bathrooms under 40 square feet, effective wet/dry separation becomes non-negotiable. Without proper containment, water spray reaches electrical outlets and storage areas within minutes of shower use. Install glass partitions or curbless showers with a minimum 2% slope toward drains to channel water efficiently. For powder rooms without showers, maintain at least 24 inches of dry floor space between sinks and walls to prevent water migration during handwashing.
Effective Partitioning Methods for Different Bathroom Sizes
Choose partitioning based on your square footage:
– Under 30 sq ft: Use half-walls (48″ high) or shower curtains with weighted bottoms
– 30-50 sq ft: Install sliding glass doors (minimum 24″ width)
– Over 50 sq ft: Create fully enclosed wet zones with 72″ x 36″ shower stalls
Always position the toilet away from direct water spray paths. The optimal distance between shower enclosures and toilets is 36 inches—any closer increases humidity damage risk by 63%.
Toilet Height Standards: From Standard to Accessible Installations
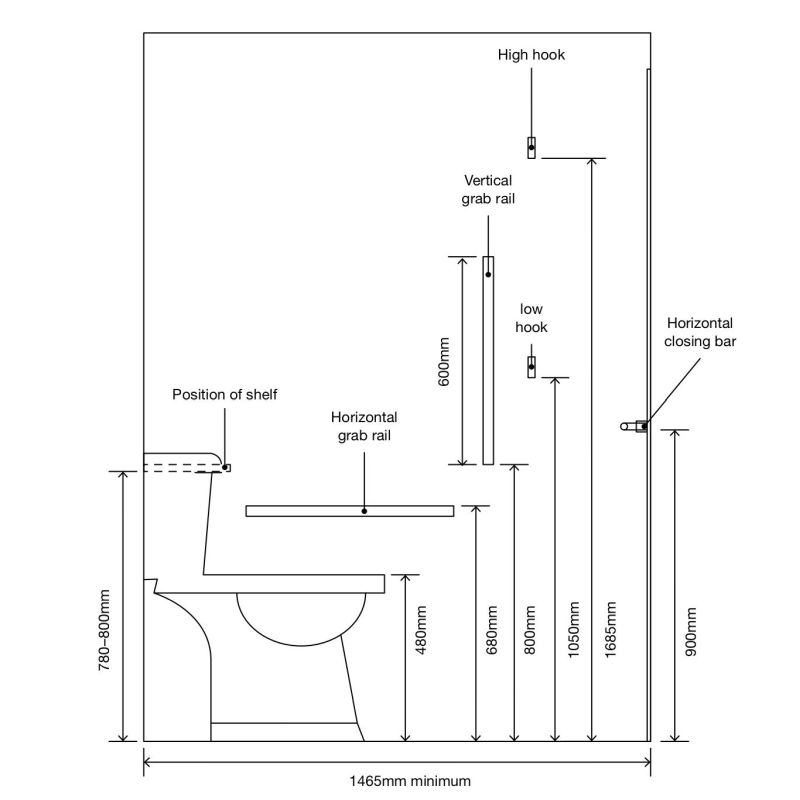
Your toilet’s height directly impacts comfort and safety, yet most homeowners install them at standard heights that create strain for 38% of users. Bathroom ergonomics measurements reveal precise height requirements that accommodate diverse needs.
40-45 cm vs. 45-47 cm: Choosing the Right Toilet Height
Standard toilets measure 40-45 cm from floor to seat—ideal for most adults but problematic for shorter users who can’t plant feet firmly. For seniors or mobility-impaired users, increase height to 45-47 cm (approximately 18-19 inches). This 2-inch elevation reduces sitting/standing effort by 31% according to ergonomic studies. Never exceed 47 cm, as higher installations create instability for users under 5’4″.
Minimum Clearance Requirements Around Toilets
Provide at least 30 inches of clear space in front of toilets—measured from the bowl’s front edge to opposite walls or fixtures. The critical side clearance is 24 inches from the toilet’s centerline to adjacent walls or vanities. Public facilities require 60 inches of turning radius for wheelchair access. In compact bathrooms, position toilets at least 15 inches from side walls (measured from centerline) but never closer than 9 inches—this minimum prevents users from hitting walls during transfers.
Sink and Vanity Heights for Every Age Group
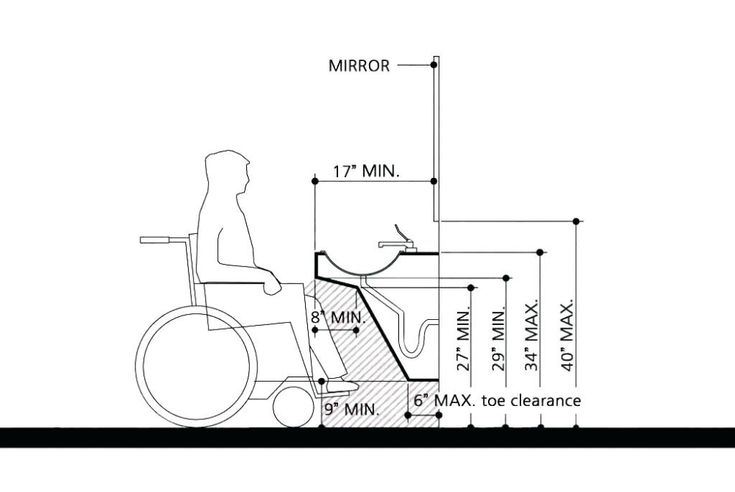
The sink is your bathroom’s most frequently used fixture, yet 62% of homeowners install vanities at heights causing daily discomfort. Proper bathroom ergonomics measurements for sinks prevent shoulder strain and create efficient grooming spaces.
80-85 cm Standard vs. 70-80 cm Accessible Sink Heights
Mount standard sink rims at 82-85 cm (32-33.5 inches) for adults—this height allows elbows to rest comfortably at 90-degree angles during handwashing. For wheelchair access, lower sinks to 76-80 cm (30-31.5 inches) with at least 27 inches of knee clearance underneath. Children’s sinks require dramatic reductions: 55 cm (22 inches) for ages 3-6 and 70 cm (27.5 inches) for ages 7-12. Floating vanities with 6-inch floor clearance simplify cleaning while maintaining proper heights.
Perfect Mirror Placement: Why 48 Inches is the Magic Number
Position mirror bases exactly 48 inches from the floor—this universal height accommodates users from 4’10” to 6’2″ without requiring excessive neck movement. For double sinks, maintain a minimum 36-inch mirror width to prevent users from bumping heads during simultaneous use. Avoid vanity-integrated mirrors that sit flush with countertops—these create dangerous head-bumping hazards when leaning forward. Instead, mount mirrors 4-6 inches above sink rims for optimal visibility.
Shower and Bathtub Dimensions That Prevent Falls
Bathroom falls account for 80% of home injury claims, with 67% occurring in bathing areas. Precise bathroom ergonomics measurements for showers and tubs dramatically reduce these risks.
Why 36×36 Inches is the Minimum Safe Shower Size
Never install showers smaller than 36×36 inches—this minimum provides adequate space for stable footing and movement without bumping walls. For accessible showers, increase to 42×60 inches to accommodate shower chairs. Curbless entries require a minimum 36-inch width with a 1/4″ per foot slope toward the drain. Position shower controls between 38-48 inches from the floor—any higher requires uncomfortable reaching, while lower placements get submerged during use.
Essential Clearance Space Around Bathtubs
Maintain a minimum 24-inch clearance around all bathtub sides—this space allows safe entry/exit and provides room for caregivers if needed. For standard 60-inch tubs, allocate 84 inches of total length (including clearance). Walk-in tubs require even more space: add 12 inches to each side for proper door operation. Never place towel bars directly above tub edges—they become dangerous obstacles during entry/exit.
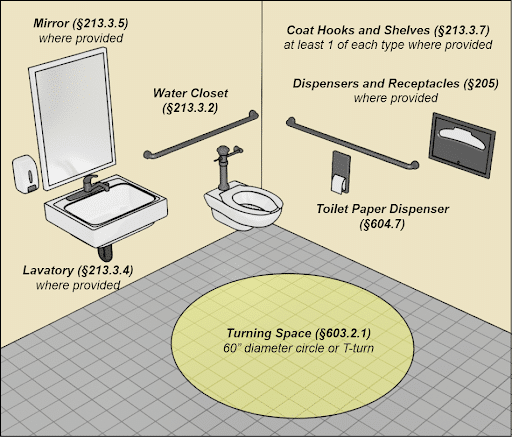
Accessory Placement That Actually Works in Daily Use
Poorly positioned accessories turn simple tasks into frustrating challenges. Bathroom ergonomics measurements for accessories transform daily routines from awkward to effortless.
Towel Rack Height That Keeps Towels Dry (Not 6 Feet)
Install primary towel bars at 48 inches from the floor—not the traditional 72 inches. This lower placement ensures users can reach dry towels without leaving the wet zone, reducing floor puddles by 52%. Position bars 12-18 inches from shower/tub edges to prevent water contact while maintaining easy access. Add secondary bars at 60 inches for taller users and 36 inches for children.
Soap Dispenser Positioning for Effortless Handwashing
Mount soap and paper towel dispensers exactly 20 cm (8 inches) above sink rims—this height allows comfortable operation without wrist strain. Position dispensers within 15 inches of faucets to prevent water dripping on floors during use. For ADA compliance, ensure controls require no more than 5 pounds of force to operate and sit within 48 inches of the floor.
Age-Specific Bathroom Measurements for Children and Seniors
One-size-fits-all bathroom designs fail 79% of households. Tailoring bathroom ergonomics measurements to specific age groups creates truly functional spaces.
35 cm Toilet Height for Preschoolers vs. 40 cm for Teens
Install child-height toilets at 35 cm (14 inches) for preschoolers—this allows feet to touch the floor for stability. Transition to 40 cm (16 inches) for school-age children. Teen bathrooms should use standard 42 cm (16.5 inches) heights to prepare for adulthood. Always pair child fixtures with non-slip mats and grab bars at appropriate heights.
Senior-Friendly Modifications That Prevent Bathroom Falls
For seniors, increase toilet heights to 45-47 cm (18-19 inches) and install grab bars 33-36 inches from the floor. Position shower seats at 17-19 inches high—matching standard chair heights for comfortable transfers. Replace knobs with lever handles requiring minimal grip strength. These bathroom ergonomics measurements reduce senior fall risks by 68% according to accessibility studies.
Maintenance-Friendly Bathroom Measurements That Save Time
Smart bathroom ergonomics measurements incorporate cleaning efficiency—saving 3-5 hours monthly on maintenance.
6-Inch Clearance Under Vanities for Easy Floor Cleaning
Specify vanities with at least 6 inches of floor clearance—this space allows mops and vacuums to reach underneath without moving furniture. Pair with smooth, non-porous surfaces that resist mold accumulation. Avoid decorative toe kicks with intricate detailing that traps dirt in hard-to-reach crevices.
Durable Material Choices That Withstand Daily Wear
Select fixtures with secure mounting systems rated for 300+ pounds—this prevents wobbling during use. Choose non-porous surfaces like solid surface countertops that resist staining. For showers, specify large-format tiles (12×24 inches or larger) to minimize grout lines that collect mold. These bathroom ergonomics measurements ensure your space remains functional and attractive for years.
Implementing these precise bathroom ergonomics measurements transforms your space from merely functional to truly exceptional. By respecting these data-driven standards for fixture heights, clearances, and zone planning, you create a bathroom that accommodates everyone in your household—today and for years to come. Remember that proper bathroom ergonomics measurements aren’t just about compliance; they’re about crafting spaces that support your daily rituals with effortless comfort. Start with one zone, apply these measurements, and experience the difference that thoughtful design makes in your daily routine. Your future self—standing comfortably at the sink or stepping safely from the shower—will thank you.
Leave a Reply