
If you’ve ever experienced the tingling, numbness, or pain in your hands after a long day at your desk, you’re not alone. Millions of office workers develop carpal tunnel syndrome from improper workspace configurations that place unnecessary pressure on the median nerve in the wrist. The good news is that simple, strategic adjustments to your desk setup can significantly reduce this pressure and either prevent symptoms from developing or provide meaningful relief if you’re already experiencing discomfort. Most of these changes require minimal investment but deliver maximum impact on your wrist health and overall work comfort.
Your workspace directly influences the health of the narrow passageway in your wrist that houses the median nerve and finger tendons. When repetitive motions or sustained awkward positions cause inflammation in this area, the resulting compression creates the familiar symptoms of carpal tunnel syndrome. By optimizing your desk environment to maintain neutral wrist positioning and reduce strain, you’re not just addressing symptoms—you’re attacking the root cause of the problem. This guide provides actionable steps to transform your workspace into a carpal tunnel-friendly environment.
Achieve Proper Chair Configuration to Support Natural Arm Positioning
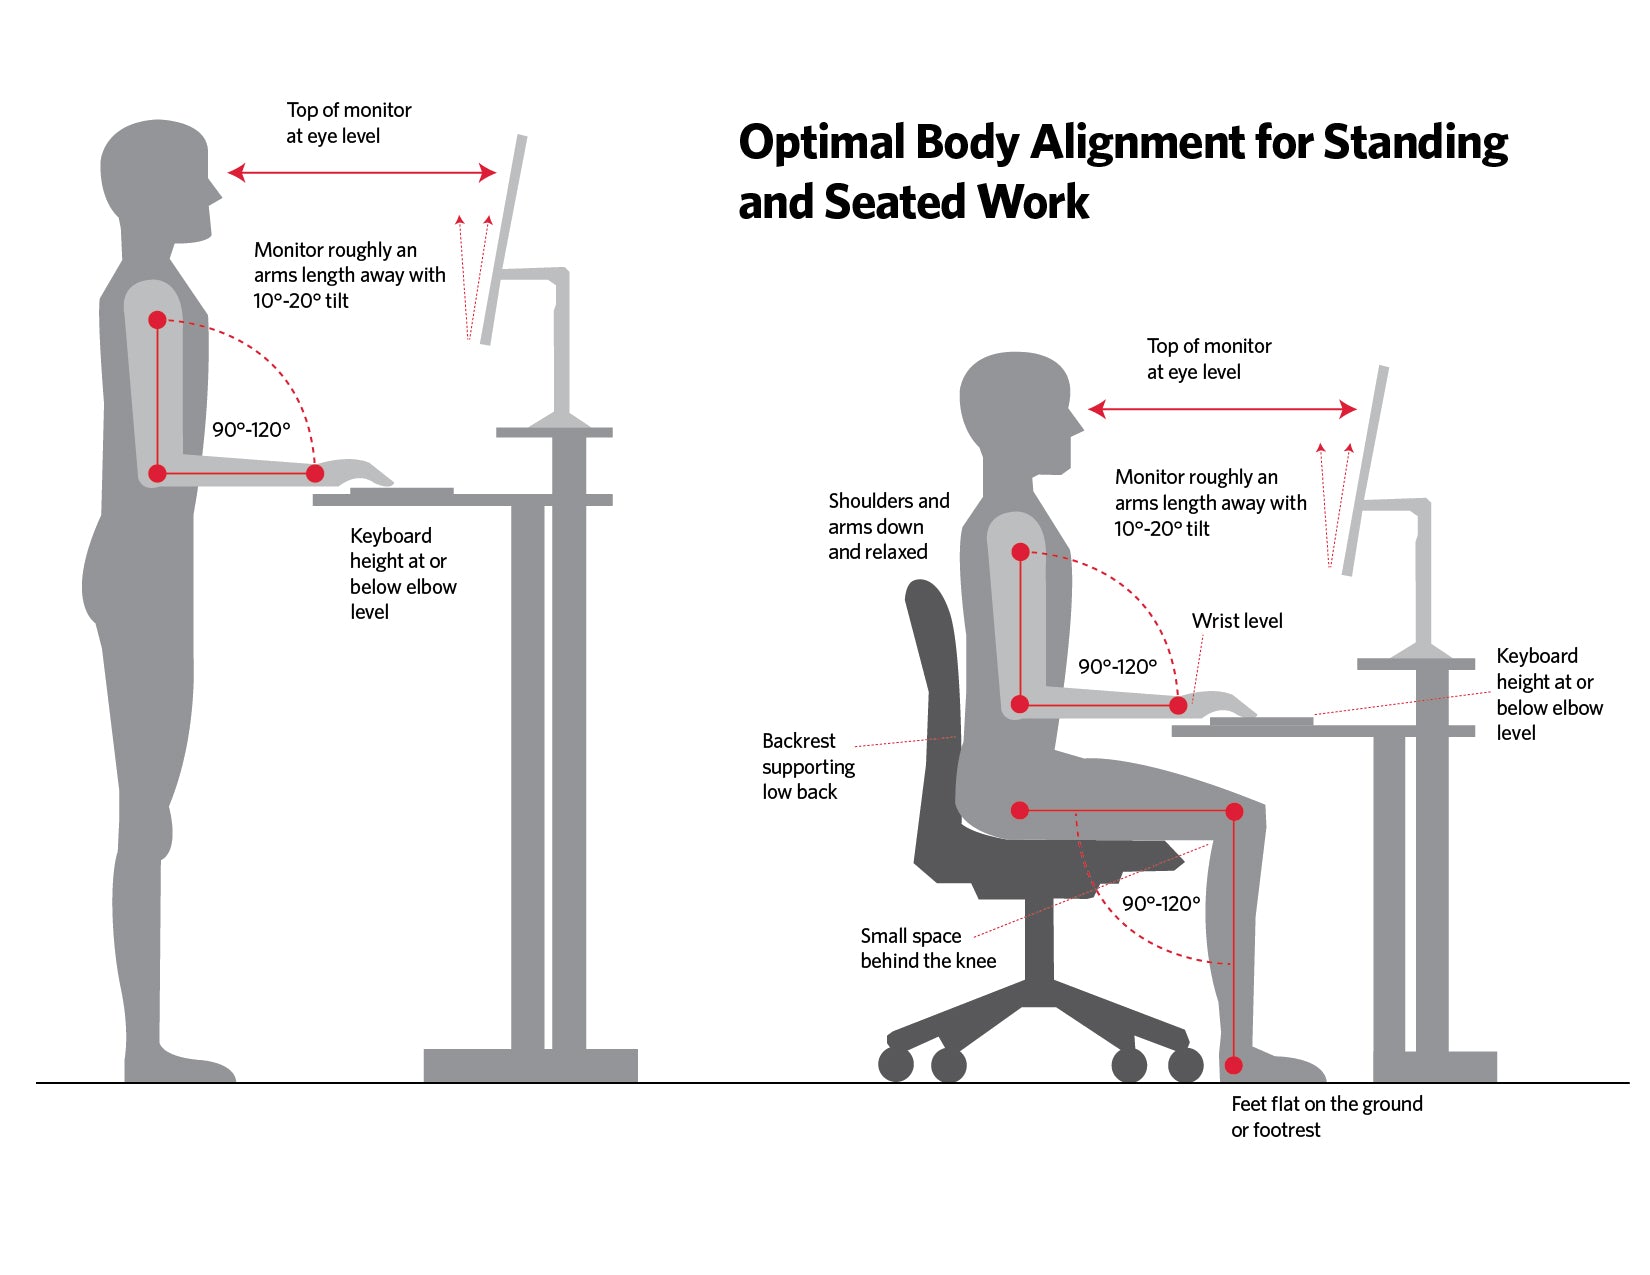
Your chair serves as the foundation for your entire ergonomic setup, directly affecting how your arms and wrists align with your work surface. Begin by adjusting your seat height so your feet rest completely flat on the floor with your thighs parallel to the ground. If your feet don’t reach the floor comfortably, use a footrest rather than allowing them to dangle, which creates tension that travels up through your body to your wrists.
For optimal spinal alignment, position your lumbar support to maintain the natural inward curve of your lower back. This upright posture prevents shoulder rounding that forces your arms inward and bends your wrists to reach your keyboard. Without proper back support, your entire upper body shifts forward, placing unnecessary strain on your wrists as you reach for your input devices.
Adjust your armrests to support your forearms without raising your shoulders—typically just below elbow level when seated properly. These supports should allow your elbows to rest at 90 to 110 degrees with your shoulders relaxed. Properly positioned armrests prevent you from resting your wrists on hard desk edges, a common practice that creates concentrated pressure on the carpal tunnel. Remember to use armrests only during pauses in typing, not while actively working.
Optimize Keyboard Position to Maintain Neutral Wrist Angles

Your keyboard placement determines whether your wrists remain in a safe neutral position or bend into harmful angles that compress the median nerve. Position your desk height so your elbows form approximately 90 to 110 degrees with your forearms parallel to the floor or slightly angled downward. This alignment allows gravity to assist your typing motion rather than fighting against it.
Place your keyboard close enough to the desk edge that you don’t need to reach forward—your elbows should stay comfortably at your sides. If your standard desk is too high, consider a keyboard tray mounted beneath the desk surface to lower your typing position without compromising your chair height. The keyboard should sit centered in front of your body, not offset to one side, which creates uneven shoulder positioning.
Avoid the common mistake of using keyboard feet to tilt the back edge upward. This position forces your wrists into extension, dramatically increasing pressure inside the carpal tunnel. Instead, keep your keyboard flat or use a negative tilt (front slightly higher than back) to maintain straight wrists during typing. Many ergonomic keyboard trays offer adjustable tilt options specifically designed to preserve neutral wrist positioning.
Select Input Devices That Minimize Wrist Strain

The standard keyboard and mouse design contributes significantly to carpal tunnel development by forcing your hands into unnatural positions. Transitioning to ergonomic alternatives provides immediate relief by aligning with your body’s natural posture rather than working against it.
Split keyboards separate the key sections, allowing your arms to rest in a more natural outward position instead of crowding inward toward your body. Tented keyboards raise the center point so your hands slope downward toward the outside, keeping your wrists straight while your forearms angle outward comfortably. When switching to an ergonomic keyboard, allow two to four weeks for adaptation—start with short sessions and gradually increase usage time.
Vertical mice represent a game-changer for carpal tunnel sufferers by positioning your hand in a neutral handshake position rather than the palm-down orientation of traditional mice. This simple change significantly reduces pressure on the median nerve. Trackball mice offer another excellent alternative by eliminating wrist movement entirely—you control cursor movement with your thumb or fingers while keeping your wrist completely still.
Position Your Monitor to Prevent Compensatory Posture
Your screen placement directly affects your head, neck, and shoulder alignment, which in turn influences how your arms and wrists position themselves at the keyboard. Incorrect monitor height forces your entire upper body into positions that strain your wrists.
Adjust your monitor so the top of the screen aligns with your eye level when sitting upright. If you wear progressive lenses, you may need to lower it slightly to view through the correct portion of your lenses without tilting your head. Position the screen an arm’s length away (20-26 inches) to prevent leaning forward. For multiple monitors, keep your primary display directly in front of you to avoid twisting your neck.
Laptop users face unique challenges since the screen and keyboard form one unit. Solve this by connecting an external keyboard and mouse, then raising your laptop screen to eye level using a stand or books. This configuration maintains proper wrist positioning while giving you the benefits of laptop portability.
Implement Strategic Breaks to Relieve Nerve Pressure
Even perfect ergonomics cannot compensate for uninterrupted work sessions. Your median nerve needs periodic relief from the pressure of continuous typing and mouse use. Research confirms that brief, frequent breaks reduce cumulative strain more effectively than longer, infrequent pauses.
Follow the extended 20-20-20 rule: every 20 minutes, look 20 feet away for 20 seconds and incorporate wrist micro-breaks. During these pauses, shake your hands loosely, stretch your fingers wide, and gently flex and extend your wrists to restore blood flow. The Pomodoro technique (25 minutes work, 5 minutes break) provides a natural rhythm for these essential recovery periods.
While on breaks, perform specific stretches that target the carpal tunnel area: extend one arm forward with palm up, then gently pull your fingers back toward your body with your other hand. Hold for 15-20 seconds, feeling the stretch along your forearm. These targeted movements flush inflammatory byproducts from the carpal tunnel before they accumulate to painful levels.
Reduce Force and Repetition During Computer Use
The pressure you apply when typing and clicking matters as much as your posture. Many people press keys with far more force than necessary, intensifying muscle engagement and increasing tension throughout the wrist and hand. Practice “floating” your hands above the keyboard with fingers naturally curved, striking keys with minimal downward pressure.
Adjust your mouse sensitivity to allow faster cursor movement with less physical motion, reducing the number of clicks required for navigation. Replace frequent clicking with keyboard shortcuts whenever possible—mastering combinations like Ctrl+C, Ctrl+V, and Ctrl+Z dramatically reduces mouse dependency. Many ergonomic keyboards include programmable function keys that further minimize the need for repetitive mouse actions.
Use Wrist Supports Correctly to Avoid Additional Pressure
Wrist rests can either help or harm your carpal tunnel condition depending on how you use them. The critical distinction is that supports should only contact your hands during pauses between typing, not while actively typing. A quality gel-filled wrist rest provides a soft surface for your wrists to rest between typing bursts, but never rest your wrists while actively typing.
Palm supports differ by elevating the heel of your hand rather than your wrist. These devices keep your wrists in a more neutral position during typing when properly positioned. Look for rounded supports that match your hand’s natural curve rather than hard-edged alternatives that create pressure points. Some ergonomic keyboards include integrated palm supports that position your hands correctly from the start.
Maintain Long-Term Relief Through Consistent Practices
Creating an ergonomic workspace marks just the beginning of your carpal tunnel prevention strategy. Schedule quarterly check-ins to verify that your chair hasn’t lost height adjustment, your monitor remains at proper height, and your keyboard positioning stays optimal. These quick assessments catch drift before it causes symptoms.
Monitor your body’s feedback closely—a return of numbness or tingling signals that something in your setup has drifted out of alignment. Treat these symptoms as diagnostic clues prompting immediate reassessment rather than ignoring them. Early intervention prevents the cumulative damage that occurs when strain continues unrecognized.
Start with the simplest changes that deliver the quickest benefits: proper chair height, flat keyboard positioning, and regular micro-breaks. These three adjustments often produce noticeable symptom improvement within weeks. The investment in ergonomic optimization pays dividends far beyond carpal tunnel prevention—improved posture, reduced eye strain, greater comfort, and enhanced productivity all accompany a properly configured workspace.
Leave a Reply