Ergonomic chairs represent a significant investment in your comfort and productivity, but when it’s time to move, store, or repair your chair, knowing how to properly disassemble it becomes essential. Many professionals find themselves frustrated when attempting to break down their Herman Miller, Steelcase, or other premium ergonomic chairs without proper guidance. The good news is that with the right approach and basic tools, you can safely disassemble your ergonomic chair in less than an hour, preserving all components for successful reassembly later. This guide provides the specific steps you need to take, avoiding common pitfalls that could damage your valuable office furniture.
Gather Required Tools Before Starting Your Chair Disassembly
Before attempting to disassemble your ergonomic chair, ensure you have all necessary tools within easy reach. Having everything prepared prevents mid-process interruptions that could lead to misplaced hardware or accidental damage to delicate components. Most ergonomic chairs use standard fasteners accessible with common household tools, though some premium models incorporate proprietary connections requiring specific approaches.
Essential tools for successful ergonomic chair disassembly include:
- Phillips head screwdriver (both short and long shaft versions for accessing recessed screws)
- Flathead screwdriver for prying plastic covers and releasing snap connections
- Adjustable wrench or combination wrench set for handling hex bolts and nuts
- Rubber mallet or soft-faced hammer for gently tapping stubborn components loose
- Optional but helpful: flashlight for inspecting dark areas, magnetic tray for hardware organization, and penetrating oil for stuck fasteners
Create an organized workspace by laying down a soft blanket or cardboard to protect both your chair’s finish and your floor surface. Position your chair in a well-lit area with ample room to move around all sides. Keep small containers or resealable bags nearby for hardware organization—labeling each container with painter’s tape as you remove components will save significant frustration during reassembly.
Document Assembly Before Removing Any Chair Components
Proper documentation before disassembly begins dramatically simplifies the reassembly process and helps you maintain your preferred ergonomic settings. Many people skip this critical step only to struggle later when trying to remember how components connected or where specific hardware belonged.
Take multiple photographs from different angles, focusing on connection points between major components. Capture close-up images of how wires route through the chair frame if your model has adjustable lumbar support or other electronic features. Document the position of all adjustment mechanisms—note the tilt tension setting, armrest height positions, and lumbar support depth before disassembly. These reference points allow you to restore your chair to your exact comfort preferences after reassembly.
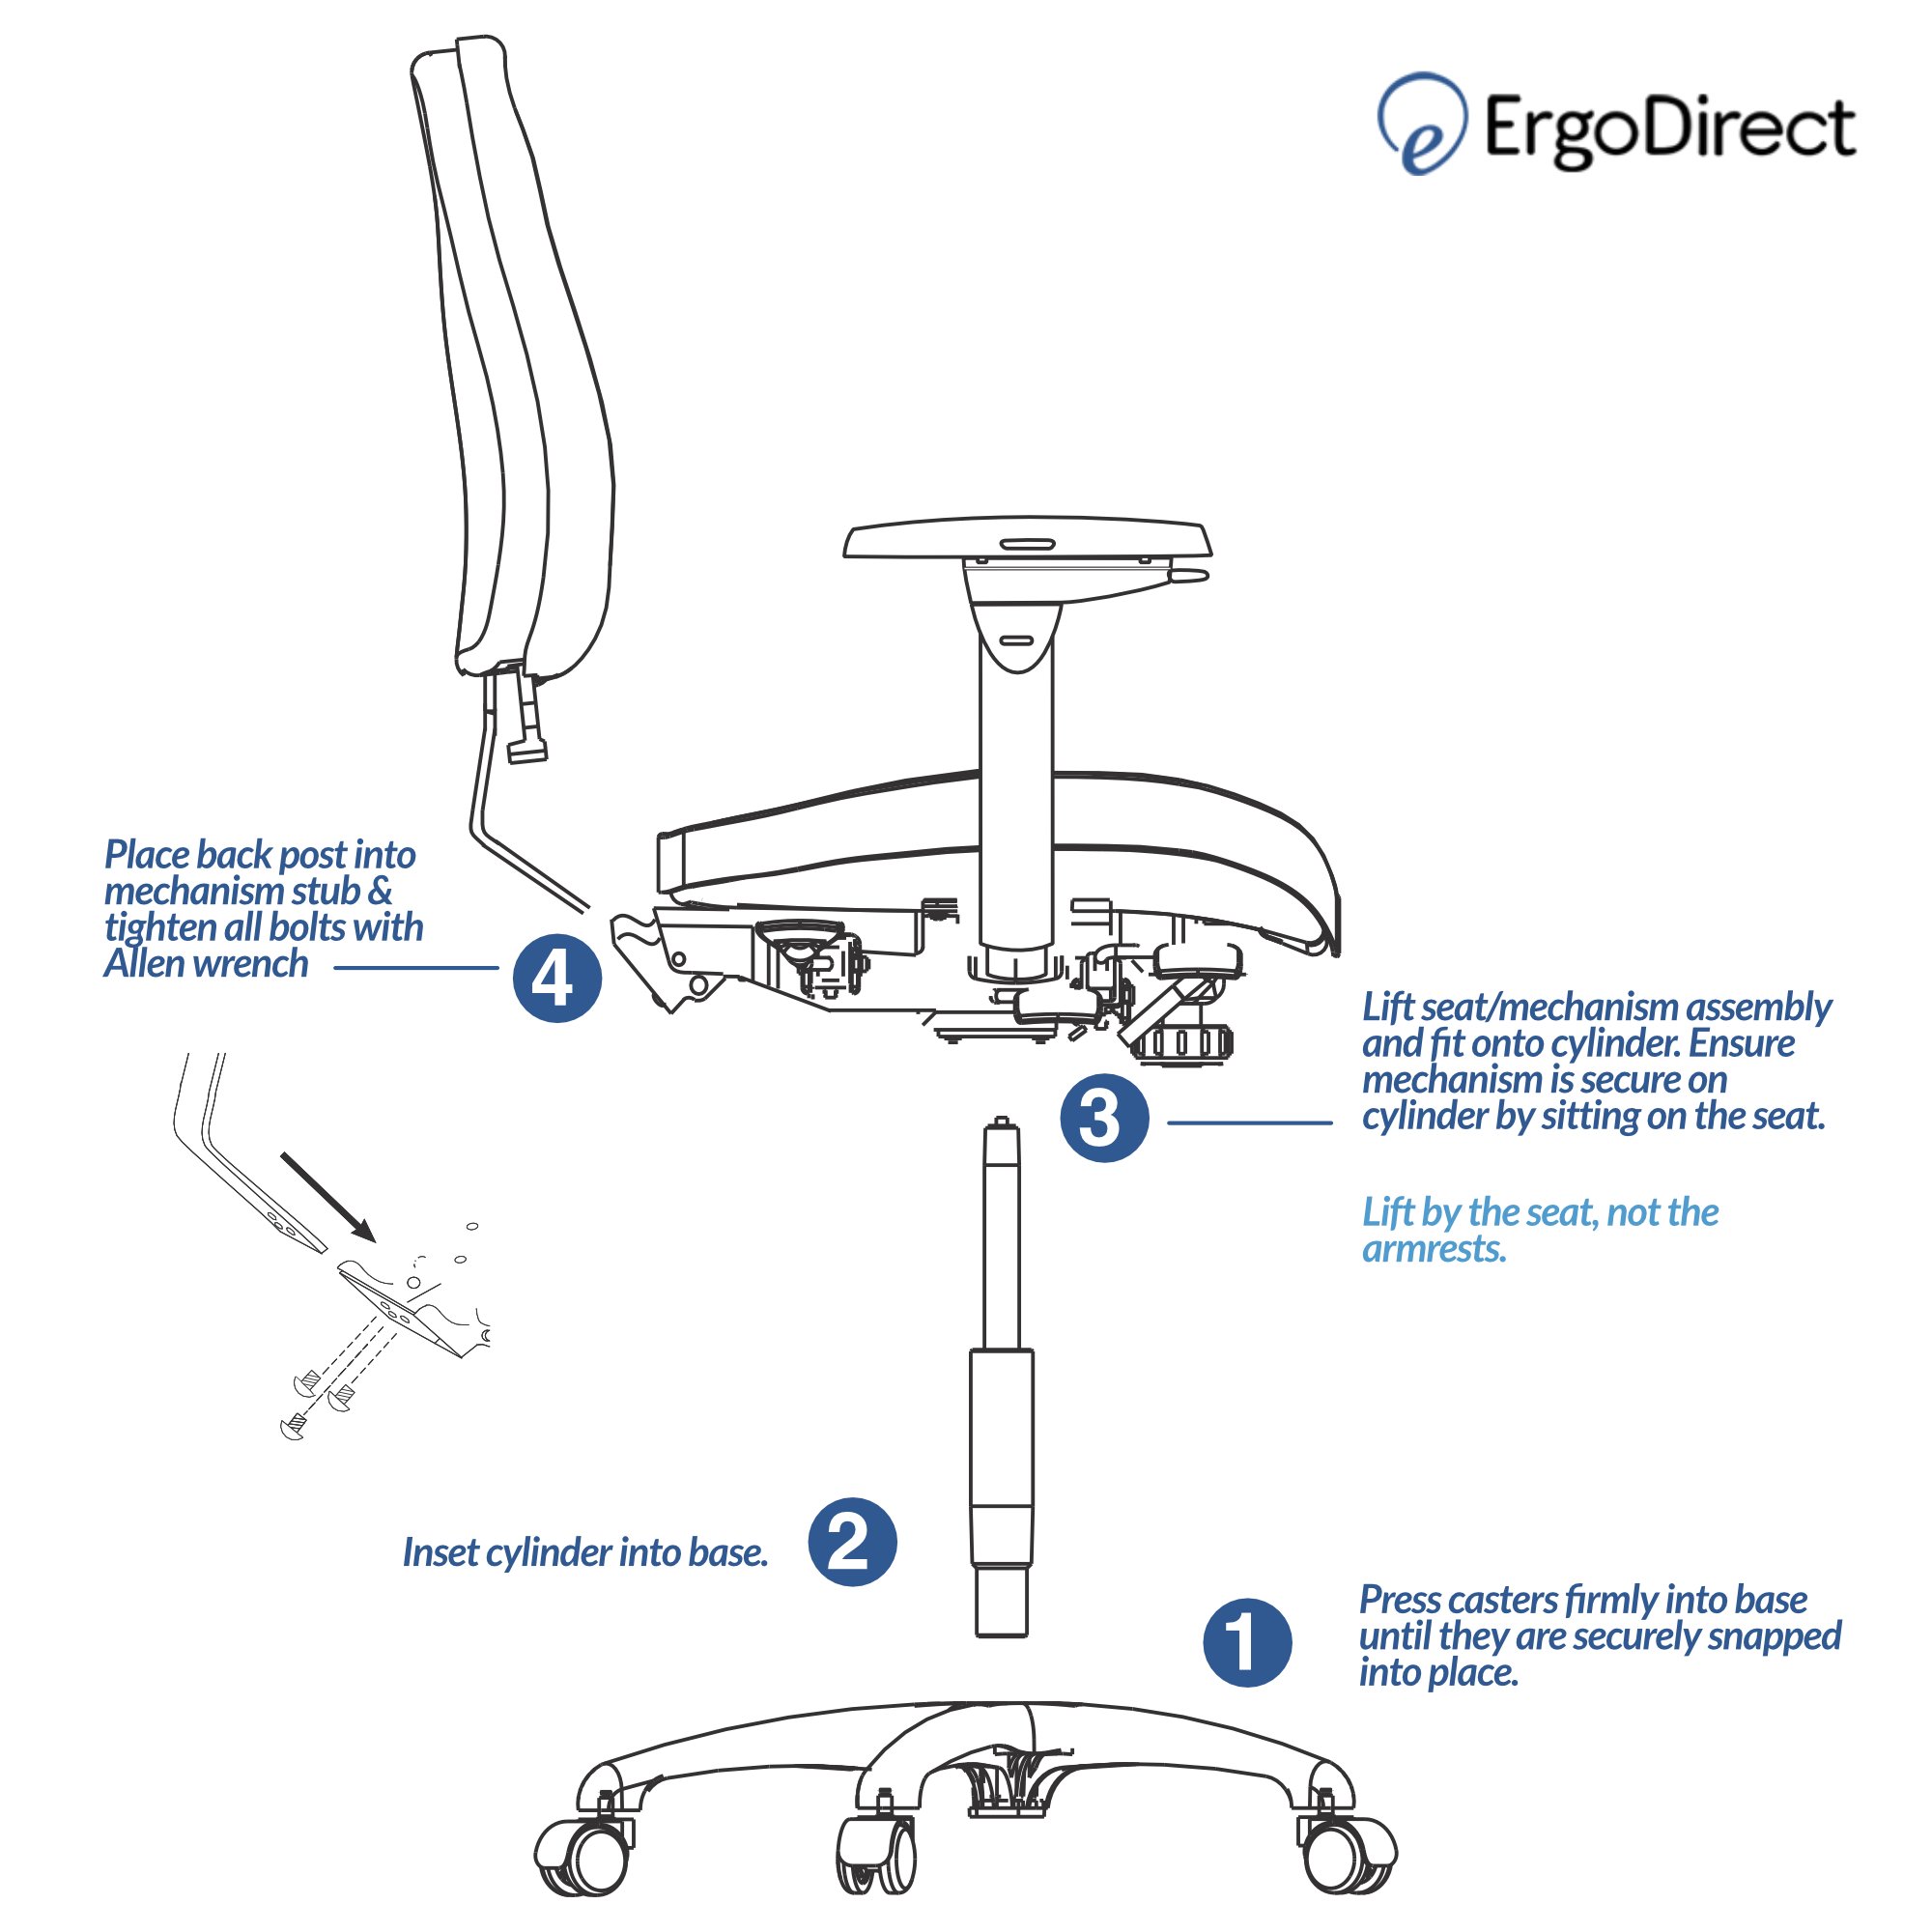
Remove Casters from Base Legs Without Damage
Casters represent the simplest components to remove during ergonomic chair disassembly, but using improper technique can damage both the caster stems and base leg sockets. Most chairs use either press-fit or threaded casters, each requiring a different removal approach.
For press-fit casters:
Grip the caster firmly while applying steady downward pressure on the base leg. Work the caster side-to-side to gradually loosen the connection rather than yanking it straight out. If resistance persists, carefully insert a flathead screwdriver against the base leg edge to create gentle leverage—avoid prying directly on the plastic housing to prevent cracking.
For threaded casters:
Identify the stem type by looking for visible grooves or flat sections. Most threaded casters unscrew counterclockwise, though some premium models use reverse threads. Apply steady rotational force without bending the stem. If threads are tight, apply penetrating oil and wait 5-10 minutes before attempting removal again.
Group removed casters together in a labeled container and clean any debris from the base leg sockets using compressed air or a dry cloth before setting the base aside.
Detach Base from Gas Cylinder Safely
The gas cylinder connection requires careful handling as it contains pressurized nitrogen, though modern office chair cylinders are designed for safe user handling. This connection typically uses a friction fit, adhesive, or clip mechanism depending on the manufacturer.
Lay the chair on its side with the base facing upward to access the connection point between the cylinder and spider base. Look for a plastic cover or retaining clip that may need removal first—some chairs use a C-ring that slides out of its groove using needle-nose pliers.
For friction-fit connections common in premium chairs, grasp the base firmly while having a helper support the seat portion. Apply steady upward pressure while gently twisting to break the friction seal. If absolutely necessary, use a rubber mallet to tap the base upward—but do this sparingly and with minimal force to avoid damaging the cylinder mechanism.
Critical safety note: Never apply heat to the gas cylinder or attempt to disassemble the cylinder itself. If the cylinder shows damage, leakage, or unusual behavior, consult a professional rather than risking injury.
Disconnect Seat from Mechanism Properly
The seat attaches to the main mechanism through bolts, screws, or a combination plate, and improper removal can damage both components. Access to these fasteners typically requires removing a seat cover panel first.
Carefully remove any plastic or fabric cover beneath the seat by releasing snaps, clips, or screws along the perimeter. Once the cover is removed, locate the mounting bolts connecting the seat to the mechanism—these are usually large bolts requiring an open-ended wrench.
Support the seat with one hand while loosening each bolt gradually. Loosen all bolts halfway first before completing removal to prevent binding. Note the arrangement of any washers, spacers, or brackets between components. With all hardware removed, the seat should separate cleanly from the mechanism—if resistance occurs, check for hidden cables or remaining connections before forcing separation.
Remove Armrests Without Damaging Adjustment Mechanisms

Armrests attach through various methods depending on chair design, and identifying your specific attachment type prevents damage to delicate adjustment mechanisms. Common attachment points include the seat pan underside, mechanism sides, or spine structure.
For bolt-through armrests:
Locate bolts accessible from below the armrest or through the seat pan underside. Remove bolts completely while noting any spacers or washers. Some bolts use locking nuts requiring needle-nose pliers to hold the nut while turning the bolt.
For clamp-style armrests:
Identify bolts on the underside or inner side of the clamp mechanism. Loosen these bolts to release the clamp’s grip, then slide or lift the armrest away. Quick-release mechanisms may have buttons or levers that disengage mounting without tools.
For 4D adjustable armrests:
Remove components in reverse order of assembly, starting from the armrest pad and working toward the mounting bracket. Keep meticulous track of small springs, washers, and adjustment buttons that may fall out during disassembly.
Separate Backrest Using Correct Technique
The backrest connection method varies significantly between ergonomic chair models, and using improper technique can damage pivot points or adjustment mechanisms.
For spine and bracket connections, locate the horizontal bolt or pin running through aligned holes in the spine and mechanism. Remove retaining hardware and note the engagement position for proper reassembly. Some designs use ratcheting mechanisms with height adjustment teeth—document how this locks before separation.
For direct seat attachments, remove the seat cover to reveal backward-facing bolts securing the backrest to the seat underside. Support the backrest while removing fasteners to prevent dropping.
For mesh back systems, identify tabs, slots, or friction fits rather than bolts. Release clips or squeeze tabs to allow the backrest to slide out or lift away—avoid excessive force that could break plastic components.
Organize Hardware Systematically for Reassembly
Proper hardware organization during disassembly prevents confusion and missing components during reassembly. Take extra time to categorize and label each piece of hardware as you remove it.
Use small containers or resealable bags to separate hardware by component location. Label each container with painter’s tape indicating chair side (left/right), component name, and approximate location. Group similar hardware together—bolts in one container, washers in another, clips in a third.
Create a simple reference document with photographs of components alongside their hardware. Draw diagrams showing bolt positions and cable routing. Mark the position of any adjustable components so you can restore your preferred settings after reassembly.
Troubleshoot Common Disassembly Challenges
Even with careful preparation, ergonomic chair disassembly sometimes presents unexpected obstacles that require specific solutions.
For stripped screw heads:
Try a different screwdriver with a better fit or apply downward pressure while turning. As a last resort, use a screw extractor kit—drilling through the screw head should be avoided as it damages the fastener and may require replacement.
For frozen connections:
Apply penetrating oil and wait 10-15 minutes before attempting removal. Tapping the head of a frozen bolt with a hammer can break the corrosion bond. Use a hair dryer (not a torch) to gently heat metal components if needed.
For brittle plastic components:
Handle older chairs carefully as plastic parts may have become brittle over time. If a clip breaks, note any visible part numbers for replacement searches. Some manufacturers sell individual replacement parts.
For hidden fasteners:
Examine your chair thoroughly before starting—labels often peel back to reveal screws, and rubber feet may pop off to expose bolt holes. A complete visual inspection prevents surprises mid-disassembly.
Reassembly Best Practices for Perfect Results
Reversing the disassembly process requires attention to detail and patience to avoid common reassembly mistakes that compromise chair functionality.
Work from the inside out—reassemble the central mechanism and gas cylinder first, then attach major components like the backrest and seat, followed by the base and finally the armrests and casters. This sequence provides better access to connections and allows for adjustments as needed.
Tighten all fasteners to firm snugness without overtorquing. Most chair components use materials that can crack or strip if overtightened. If a bolt feels resistant before fully tight, back it out and check for cross-threading.
Test each function as you complete each assembly stage. Verify height adjustment works before attaching the seat fully, and confirm tilt mechanism function before reinstalling the backrest. Identifying problems early makes correction much easier.
Once fully reassembled, cycle through all adjustment functions several times to ensure smooth operation. Check that all fasteners remain tight—vibration from initial use can loosen connections. Finally, restore your documented ergonomic settings for immediate comfort.
Leave a Reply