Apple keyboards deliver that signature minimalist elegance, but their flat, low-profile design often comes at a physical cost. Millions of Mac users experience wrist strain, shoulder tension, and hand fatigue after extended typing sessions on Magic Keyboards or built-in MacBook keyboards. The truth is, Apple’s sleek design prioritizes aesthetics over ergonomics, forcing your wrists into unnatural positions that can lead to discomfort or even repetitive strain injuries over time. The good news? You don’t need to abandon your Apple ecosystem to find relief. This guide reveals actionable, budget-friendly strategies to transform your existing Apple keyboard setup into an ergonomic powerhouse that supports your body rather than working against it. You’ll discover specific adjustments, clever accessories, and macOS features that work together to create a typing experience that’s both comfortable and productive—no expensive replacements required.
Raise Your Keyboard for Proper Wrist Alignment
The flat profile of Apple’s Magic Keyboard creates an immediate ergonomic problem: it forces your wrists into extension, bending them upward at an unnatural angle. This position compresses the carpal tunnel and strains tendons with every keystroke. Creating a slight negative tilt—raising the back of your keyboard while keeping the front lower—allows your wrists to maintain a neutral, straight position throughout typing sessions. This simple adjustment dramatically reduces pressure on sensitive nerve pathways.
Your ideal keyboard height positions your elbows at approximately 90 degrees with shoulders relaxed and arms hanging naturally. If your current setup forces you to raise your shoulders or bend your wrists upward, you’re setting yourself up for discomfort. Measure from the floor to your elbow while seated properly—this determines your optimal keyboard height. Most standard desks sit at 29-30 inches, which often proves too high for users under 5’8″ without keyboard elevation.
Transform your Magic Keyboard instantly with these solutions: adhesive rubber feet applied to the back corners create a subtle but effective incline; repurpose common household items like folded cardboard or pencil erasers as temporary risers; or invest in adjustable keyboard stands that offer precise height control. Start with a modest 5-10 degree tilt and adjust based on comfort—your hands should float effortlessly above the keys without wrist bending.
Position Your Keyboard Correctly in Your Workspace
The horizontal placement of your keyboard matters as much as its height. Center your keyboard directly in front of your body to prevent awkward twisting of your wrists and forearms. If you frequently reach for your mouse, position both input devices within a “comfort zone” that doesn’t require shoulder extension. Many users unknowingly create shoulder strain by placing their mouse too far to the side, forcing constant reaching that pulls the entire upper body out of alignment.
Your keyboard should sit approximately 2-4 inches from the desk edge, allowing your forearms to rest fully on the work surface while your hands hover over the keys. If your wrists press against the desk front, you’re creating pressure points that restrict blood flow. Conversely, if you must stretch forward to reach the keyboard, you’re straining your entire upper body. Test your position by relaxing your shoulders completely—your arms should hang naturally with hands resting gently on the keys.
Don’t overlook monitor placement’s impact on keyboard ergonomics. When your screen sits too low, you’ll hunch forward, which pulls your arms into an unnatural position relative to your torso. Position your primary display directly in front of you with the top at or slightly below eye level. This alignment creates a cascade effect that naturally positions your arms and hands in the optimal typing posture without conscious effort.
Add Strategic Ergonomic Accessories

A quality palm rest provides essential support during typing pauses and maintains consistent wrist positioning. Choose memory foam or gel varieties that contour to your wrist shape without creating pressure points—your wrists should rest lightly, not sink deeply. Position the palm rest so your wrists hover just above it while typing, contacting it only during natural pauses. This prevents the “wrist smash” that occurs when resting wrists directly on hard surfaces during active typing.
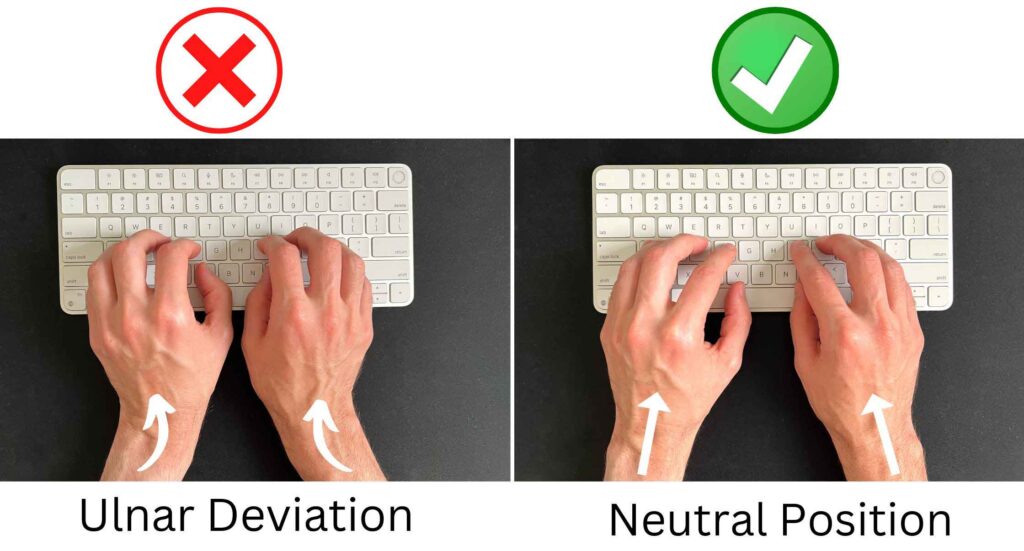
Keyboard tenting devices offer dramatic ergonomic improvements by elevating the sides of your keyboard at different heights, creating a gentle V-shape that matches your hands’ natural rotational position. While Apple keyboards aren’t designed for tenting, third-party stands like the Twelve South Curve or adjustable platforms can accommodate Magic Keyboard dimensions. Start with a modest 15-20 degree angle and adjust based on comfort—many users report immediate relief from ulnar deviation (the inward bending of wrists toward the pinky side).
Consider a split keyboard solution if you’re willing to invest in more significant changes. Devices like the Keychron Q1 Pro with split design allow your arms to rest in a natural shoulder-width position rather than the inward angle required by standard keyboards. These setups require an adjustment period but provide substantial long-term benefits for users experiencing persistent discomfort with traditional layouts.
Configure macOS Accessibility Features for Comfort
Sticky Keys transforms how you execute keyboard shortcuts by allowing sequential rather than simultaneous key presses. This reduces finger strain during complex commands like Command-Option-Control-V by eliminating the need to contort multiple fingers at once. Enable it in System Settings > Accessibility > Keyboard, then experiment with the modifier key highlighting options to find what works best for your workflow.
Slow Keys and Bounce Keys work together to create a more forgiving typing experience. Slow Keys requires keys to be held slightly longer before registering, preventing accidental presses that force tense, careful typing. Bounce Keys ignores rapid repeated presses of the same key, accommodating users who rest fingers heavily on keys. These settings encourage a relaxed typing rhythm since you don’t need to maintain precise, controlled finger movements.
Adjust your Keyboard Repeat settings for ergonomic benefits: increase the delay before key repetition begins and slow the repeat rate itself. This reduces the finger movement required for tasks like holding Delete to clear text. While requiring brief adaptation, many users find these settings promote lighter keypresses and decreased finger fatigue during extended sessions. Access these in System Settings > Keyboard > Keyboard Shortcuts.
Implement Healthy Typing Techniques Immediately

Your typing technique significantly impacts comfort regardless of equipment setup. Practice keeping fingers naturally curved rather than flat—imagine holding a small ball in each hand. This maintains ergonomic alignment from your wrists through fingertips. Key presses should originate from finger knuckle movement rather than wrist action or straight-finger “poking,” which creates unnecessary strain on tendons.
Adopt the Pomodoro technique to build regular movement into your workflow: type for 25 minutes, then take a 5-minute break to shake out hands, stretch fingers, and roll shoulders. Use macOS Focus modes or free apps like Time Out to enforce these breaks automatically. These micro-pauses prevent the cumulative muscle fatigue that leads to chronic discomfort.
Consciously reduce your typing force—most users press keys harder than necessary, especially during focused or emotional moments. Practice “feather-light” keypresses by imagining you’re playing a delicate piano piece. You’ll likely find Apple’s scissor-switch keyboards register input with minimal force, allowing gentler typing that significantly reduces finger strain over time.
Perform Targeted Hand and Wrist Stretches
Incorporate these three essential stretches into your break routine: First, the wrist flexor stretch—extend one arm forward, palm up, and gently pull fingers toward your body with the other hand. Hold 15-20 seconds per side. Second, finger spreads—maximize the space between fingers, hold briefly, then make a gentle fist. Repeat 5 times. Third, wrist circles—rotate wrists slowly in both directions for 10-15 repetitions each.
These stretches require less than two minutes but dramatically improve circulation and flexibility in the muscles controlling your fingers. Perform them hourly during intense typing sessions, focusing on maintaining gentle, consistent pressure without bouncing or forcing movements beyond comfortable range.
Pay attention to early warning signs like tingling, numbness, or warmth in your hands—these indicate immediate strain requiring attention. When you notice these symptoms, stop typing immediately and perform the wrist flexor stretch for two minutes before resuming work. Ignoring these signals can lead to more serious conditions requiring professional intervention.
Maintain Comprehensive Workspace Ergonomics
Your keyboard setup functions within your entire workstation ecosystem. Ensure your chair supports proper posture with feet flat on the floor and back aligned against the chair back. Armrests should position your shoulders in a relaxed state with forearms resting comfortably on the desk surface. An uncomfortable chair creates compensatory postures that undermine even the most perfectly configured keyboard.
Optimize lighting to prevent leaning forward—a common cause of poor typing posture. Position your workspace to minimize screen glare while ensuring your keyboard remains adequately lit. Many modern desk lamps offer adjustable color temperature that reduces eye strain during evening work sessions.
Position your monitor approximately an arm’s length away with the top at eye level. This distance allows relaxed neck positioning while maintaining optimal arm angles for typing. If using multiple monitors, keep your primary display centered directly in front of your keyboard to prevent constant head turning that strains neck muscles and indirectly affects typing posture.
Key Takeaways for Sustainable Keyboard Comfort
Transforming your Apple keyboard into an ergonomic setup requires addressing multiple factors simultaneously: physical adjustments to keyboard height and angle, strategic accessory additions, macOS accessibility configurations, and healthy typing habits. Start with the simplest interventions—adding subtle elevation to create negative tilt, ensuring proper monitor height, and incorporating a supportive palm rest. These low-cost changes deliver immediate comfort improvements with minimal disruption to your workflow.
Progress to more comprehensive optimizations as needed, building a personalized system that works with your body rather than against it. Remember that ergonomic perfection doesn’t exist—your goal is finding the combination of adjustments that allows comfortable typing throughout your workday. Listen to your body’s feedback and adjust your approach accordingly, as what works for one person may not suit another.
If discomfort persists despite thorough optimization, consult an ergonomic specialist who can assess your specific situation. Your long-term health and productivity are worth the investment in creating a workspace that supports your natural physiology while letting you enjoy all the benefits of your Apple ecosystem.
Leave a Reply