You’ve probably experienced the frustration of a kitchen that fights against you—reaching awkwardly for items, bending over counters that are too high, or navigating cramped spaces that make cooking feel like an obstacle course. Kitchen ergonomic design solves these problems by adapting your workspace to your body rather than forcing your body to adapt to the kitchen. When your countertops, storage, and layout align with your natural movements, meal preparation becomes more efficient and enjoyable while protecting you from chronic strain and injury. This guide reveals how to transform your kitchen into a space that works with your body, not against it, whether you’re planning a renovation or making simple adjustments to your current setup.
Most homeowners focus on aesthetics when designing kitchens, but neglecting ergonomics leads to daily discomfort that accumulates over years of use. Proper kitchen ergonomic design considers your height, movement patterns, and cooking habits to create a space where everything feels within comfortable reach. You’ll learn specific measurements for countertops, storage solutions that eliminate painful bending, and layout strategies that streamline your cooking workflow—turning meal preparation from a chore into a pleasure.
Optimize Workstation Dimensions for Your Body
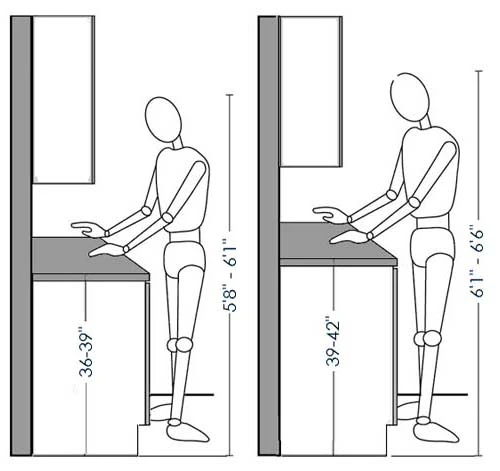
Your kitchen counters bear the brunt of food preparation, yet most are built to standard heights that ignore individual body differences. The right countertop height allows your elbows to rest slightly bent when working, preventing both hunching over the surface and straining upward. Standard 36-inch counters work for many average-height adults, but your ideal height depends on your specific stature and cooking activities. If you regularly knead dough or roll pastry, slightly lower counters (32-34 inches) provide better leverage and reduce shoulder strain. Taller cooks often benefit from counters raised to 38-40 inches, eliminating the constant hunching that leads to chronic back pain.
Calculate Your Perfect Counter Height
Determining your ideal counter height takes just two measurements:
1. Stand normally with arms relaxed at your sides
2. Measure from floor to the bottom of your wrist
3. Subtract 6-8 inches to find your optimal work surface height
This personalized approach ensures your primary work surface supports natural arm positioning during food prep. For specialized zones like baking stations, consider lowering counters by 2-4 inches to provide better leverage for rolling and kneading tasks. Always test your measurements by simulating common cooking motions at the proposed height before finalizing your design.
Wall Cabinet Placement That Prevents Neck Strain
Wall cabinets positioned too high force you to constantly crane your neck upward, while units too low create head-bumping hazards. The sweet spot for most users places the bottom edge of wall cabinets 18-24 inches above your countertop. This clearance provides:
– Ample space for under-cabinet lighting without glare
– Comfortable vertical reach for most adults
– Unobstructed visibility across the workspace
Pro Tip: Install frequently accessed items like spices and cooking oils on lower wall shelves at eye level. Reserve higher shelves for decorative items or rarely used appliances that don’t require daily reaching.
Design Efficient Storage and Accessibility Systems
Traditional deep cabinets create an ergonomic nightmare where you must bend, kneel, or stretch to reach items at the back. Modern kitchen ergonomic design flips this problem by bringing storage to you rather than forcing you to hunt through dark recesses.
Pull-Out Systems That Eliminate Painful Bending
Investing in pull-out storage solutions delivers immediate ergonomic benefits:
– Full-extension drawer slides provide complete access to cabinet depths
– Pull-out pantry systems let you see all stored items at a glance
– Pot and pan organizers mount vertically for easy front-to-back access
– Under-sink pull-outs keep cleaning supplies visible and reachable
These systems transform deep cabinets from inaccessible black holes into fully functional storage zones. You’ll eliminate the need to kneel on hard floors while searching for baking sheets or contort your body to reach items stored in the back.
Smart Storage Organization Based on Usage Frequency
Arrange your kitchen storage using the “golden zone” principle:
– Prime zone (waist to shoulder height): Daily-use items like plates, glasses, and cooking utensils
– Middle zone (below waist to floor): Heavy items like pots, pans, and appliances
– Upper zone (above shoulder height): Rarely used items like holiday dishes or specialty appliances
Critical Warning: Never store heavy items above shoulder height—reaching for these creates serious shoulder injury risks. Save overhead spaces for lightweight decorative items only.
Create Efficient Movement Patterns and Traffic Flow

The kitchen work triangle connecting your sink, refrigerator, and stove remains the cornerstone of functional kitchen design, but proper implementation matters more than rigid measurements.
Optimize Your Work Triangle for Natural Movement
Your ideal work triangle should:
– Keep each leg between 4-9 feet long
– Prevent crossing paths between primary workstations
– Allow simultaneous use by multiple people
– Position the refrigerator near both prep and storage areas
When the triangle works properly, you move efficiently between stations without backtracking or unnecessary steps. For example, your path from refrigerator to prep area to stove should flow naturally without sharp turns or obstructions.
Minimum Clearances for Comfortable Movement
Ensure adequate space for comfortable movement with these measurements:
– Single-cook workspace: Minimum 42 inches between counters and islands
– Two-cook workspace: Minimum 48 inches between work surfaces
– Appliance door clearance: Allow full swing without blocking pathways
– Seating areas: Minimum 36 inches per person with 15 inches of armroom
These clearances prevent the constant bumping and squeezing that makes cooking stressful and physically taxing.
Illuminate Your Kitchen Effectively
Poor lighting forces you to squint while chopping vegetables or strain to read recipe instructions, creating both safety hazards and eye fatigue.
Task Lighting That Eliminates Dangerous Shadows
Install lighting specifically where you need it most:
– Under-cabinet LED strips directly above prep areas
– Pendant lights positioned over islands and dining spaces
– Adjustable spotlights for sink and stove work zones
– Dimmable fixtures to control intensity for different tasks
Pro Tip: Place task lighting closer to the front edge of countertops to prevent your body from casting shadows on your work surface—a common problem with poorly positioned overhead lighting.
Natural Light Integration for Visual Comfort
Maximize natural light benefits by:
– Positioning main work areas near windows when possible
– Using light-colored surfaces to reflect available daylight
– Installing window treatments that allow adjustable light control
– Avoiding placing dark cabinets directly under windows
Natural light not only reduces eye strain but also helps you accurately judge food colors and doneness—a critical factor for both safety and culinary success.
Manage Ventilation and Air Quality
Poor ventilation turns your kitchen into a steamy, greasy environment that affects both comfort and health.
Range Hood Specifications for Effective Air Removal
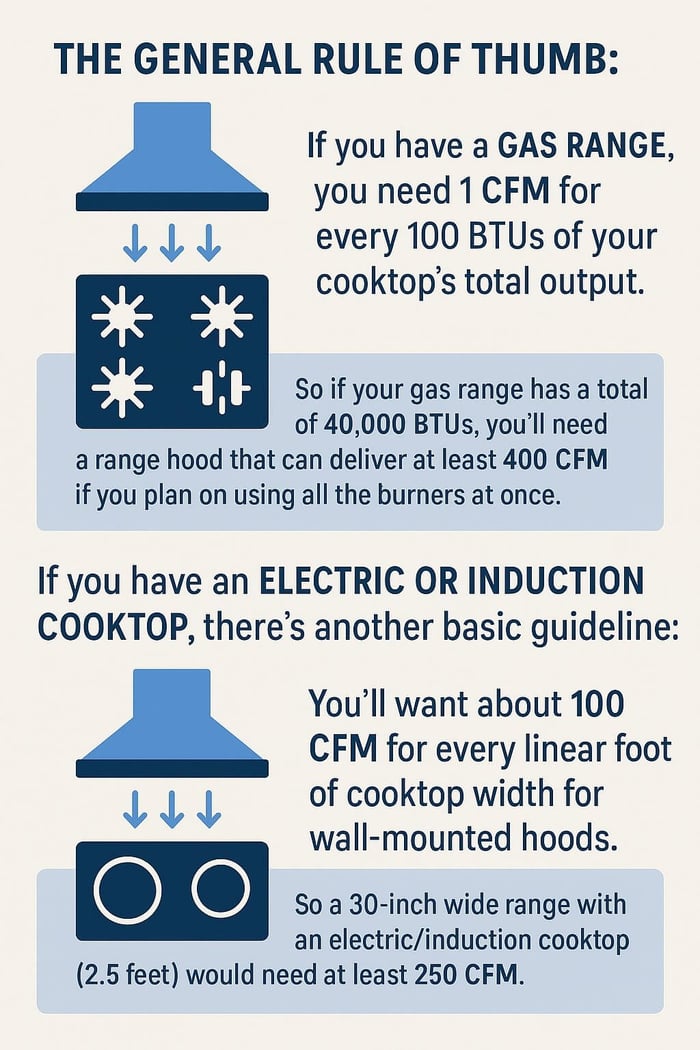
Choose a range hood that:
– Covers the entire cooking surface width
– Provides 100-150 CFM per linear foot of stove width
– Ducts directly outside (not recirculated)
– Includes adjustable fan speeds for different cooking tasks
Critical Warning: Never skip proper ducting—recirculating hoods merely filter grease but don’t remove moisture and cooking odors that contribute to long-term respiratory issues.
Prioritize Safety in Ergonomic Design
Many kitchen safety hazards also create ergonomic problems that compound over time.
Flooring and Edge Treatments That Prevent Accidents
Optimize your kitchen safety with:
– Slip-resistant flooring materials, especially near water sources
– Rounded countertop edges to prevent bumps and bruises
– Adequate lighting in all work zones to avoid missteps
– Clear pathways free of tripping hazards
These features not only prevent immediate accidents but also allow you to move confidently through your kitchen without tensing up to avoid potential hazards—a subtle but significant ergonomic benefit.
Key Takeaways for Kitchen Ergonomic Design
Transforming your kitchen with ergonomic principles delivers immediate comfort benefits and long-term protection from chronic strain. Start by measuring your ideal counter height based on your body, then implement pull-out storage to eliminate painful bending. Optimize your work triangle to minimize unnecessary steps, and invest in targeted task lighting that eliminates dangerous shadows during food preparation. Remember that the most beautiful kitchen design fails if it forces your body into uncomfortable positions day after day.
The true measure of kitchen ergonomic design is how it feels after hours of cooking—your body should feel supported, not strained. Whether you’re renovating or making targeted improvements, prioritize solutions that match your specific body and cooking habits. Small changes like adding under-cabinet lighting or installing pull-out drawers can dramatically improve your kitchen experience without major construction. Your kitchen should serve you, not the other way around—apply these ergonomic principles to create a space where cooking feels natural, efficient, and enjoyable every time you step inside.
Leave a Reply