
Your Microsoft ergonomic keyboard has developed sticky keys or unresponsive buttons, and you’ve decided to tackle the repair yourself. Before you grab any tools, understand that successfully disassembling your Microsoft ergonomic keyboard requires precision—not force. Most users damage their keyboards during disassembly by missing hidden screws or forcing clips apart. This guide reveals exactly how to open your keyboard safely, whether you own the Sculpt Ergonomic, Natural Ergonomic Keyboard 4000, or similar Microsoft ergonomic model, without causing permanent damage to the case or internal components.
Microsoft ergonomic keyboards follow a consistent internal architecture across models: a top case secured by multiple screws, rubber dome sheets providing tactile feedback, a printed circuit board (PCB) registering keypresses, and a bottom housing with integrated palm rest. Knowing these layers prevents costly mistakes during disassembly. The entire process takes 20-45 minutes depending on your experience level, but rushing leads to broken clips or misaligned components that compromise the keyboard’s functionality after reassembly.
Before starting, gather these essential tools: a PH00 precision Phillips screwdriver (standard Phillips #0 is too large and strips screws), plastic spudgers or guitar picks for prying, compressed air for cleaning, a magnetic screw tray to prevent losing tiny screws, and adequate lighting. Work on a clean, static-free surface with your keyboard disconnected from power and batteries removed—this prevents accidental short circuits that could permanently damage your keyboard’s electronics.
Identify and Remove All Hidden Mounting Screws
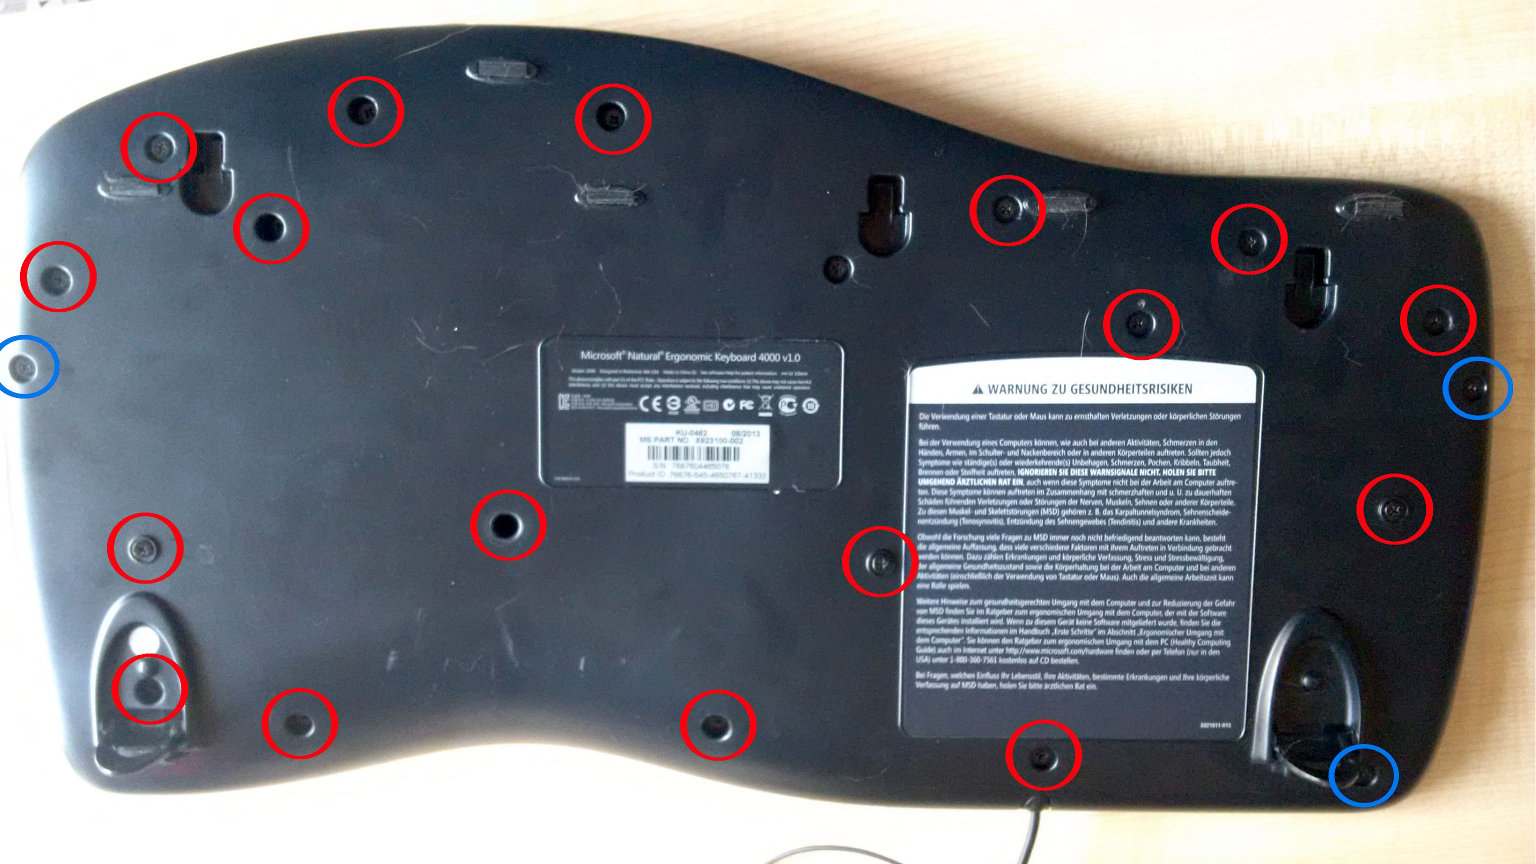
Finding every screw is the most critical step in Microsoft ergonomic keyboard disassembly—missing just one can crack the case when you attempt separation. Your keyboard contains between six and ten screws of varying lengths, with some cleverly concealed beneath rubber feet, under the palm rest assembly, or beneath decorative stickers that peel away cleanly.
Begin by removing all keycaps to expose the entire top surface. Carefully pry up rubber feet using a plastic spudger, noting that some feet contain screws while others simply cover access points. On Natural Ergonomic Keyboard 4000 models, four screws secure the palm rest assembly beneath removable feet—these must be removed before accessing the main case screws. The Sculpt Ergonomic model hides additional screws beneath the detachable number pad module.
Place each screw on a labeled diagram or magnetic mat in its exact position—bottom-case screws are typically shorter than PCB-securing screws, and mixing them during reassembly creates uneven pressure that cracks plastic housings. Count screws as you remove them; Microsoft ergonomic keyboards commonly have eight screws (six visible, two hidden under palm rest), but verify your specific model’s configuration before proceeding.
Properly Separate Top and Bottom Cases Without Damage
With all screws removed, resist the urge to pry the cases apart immediately—most Microsoft ergonomic keyboards use plastic retention clips along the edges that require specific release techniques. Forcing the case open without releasing these clips is the #1 cause of irreparable damage during disassembly.
Insert a plastic spudger into the seam at the keyboard’s rear edge, where the plastic is thickest and least prone to cracking. Work your way around the perimeter, gently releasing each clip with a slight twisting motion of the spudger. Pay special attention to the wrist rest area where additional reinforcement creates stronger clip connections. If you encounter significant resistance, stop immediately—this usually indicates a missed screw or an internal ribbon cable still connecting the halves.
The Natural Ergonomic Keyboard 4000 typically has a single ribbon cable connecting the top case to the PCB near the USB port. This cable uses a zero-insertion force (ZIF) connector that must be released by lifting a small brown tab before sliding the cable out horizontally. Never pull the cable vertically from a ZIF connector—this rips delicate traces from the PCB. The Sculpt Ergonomic model often includes additional connections for its separate number pad module that require disconnection before complete separation.
Safely Remove and Document Internal Components
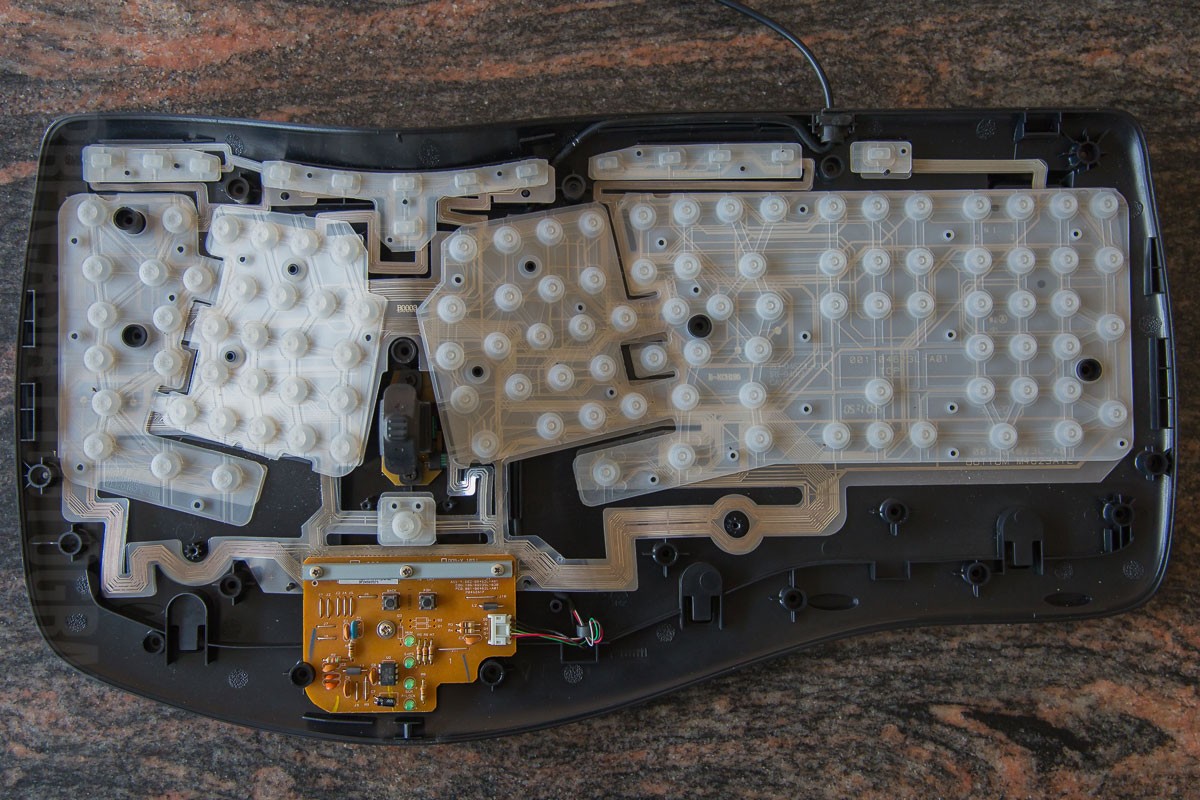
With the cases separated, you now access the internal layers that require careful handling. Microsoft ergonomic keyboards use a three-layer design: the top case with contact traces, a rubber dome sheet providing key resistance, and the main PCB registering keystrokes. Some models include a metal plate between the domes and PCB for structural reinforcement.
Document component placement with photos before removing anything—this prevents misalignment during reassembly that causes unresponsive keys. Start by lifting the rubber dome sheet straight up; these domes easily tear if stretched or twisted. Note that domes for larger keys like the spacebar have different shapes and must return to their exact positions. Inspect domes for permanent compression (visible flattening) that explains inconsistent key feel—these may need replacement.
The PCB typically secures with additional small screws to a metal plate or directly to the bottom housing. Remove these carefully before lifting the PCB, noting any additional ribbon cables connecting LED indicators or multimedia controls. When cleaning the PCB, use 90%+ isopropyl alcohol on a cotton swab for stubborn residue—never spray liquid directly onto the board. Allow all components to air dry for at least 30 minutes before reassembly to prevent short circuits.
Model-Specific Disassembly Considerations for Common Variants

Microsoft’s ergonomic lineup has distinct disassembly requirements you must recognize before proceeding. The Sculpt Ergonomic Keyboard features a split design where the number pad detaches via two clips and a ribbon cable—remove these before separating the main case halves. Its palm rest attaches with four clips along the bottom edge that release with gentle pressure from a spudger.
The Natural Ergonomic Keyboard 4000 requires special attention to its fold-out feet, which conceal two additional screws often missed by first-time technicians. These feet pivot on small plastic hinges that break easily if forced—extend them fully before checking for hidden screws. This model’s wrist rest screws secure directly to the main PCB, so removing them before separating cases prevents strain on solder joints.
Newer Microsoft Modern Keyboards with fingerprint ID present additional challenges—the biometric sensor connects via a fragile ribbon cable that must disconnect before case separation. These models often use tamper-resistant screws requiring specialized drivers, so verify your tool compatibility before attempting disassembly. If you encounter tri-wing screws, purchase the correct TR5 driver rather than risking stripped heads with improper tools.
Critical Reassembly Techniques for Full Functionality
Reassembly requires equal precision to disassembly—many users complete disassembly successfully only to fail during reassembly. Start by positioning the rubber dome sheet perfectly aligned with switch locations; even slight misalignment causes keys to feel mushy or unresponsive. The spacebar and Enter keys typically have larger domes that must orient correctly—refer to your documentation photos.
Before joining the top and bottom cases, verify all ribbon cables route through designated channels and connect properly. ZIF connectors require the locking flap to be fully open before inserting the cable, then gently pressed closed—test connection security by lightly tugging the cable end. Improperly seated cables cause intermittent functionality issues that are difficult to diagnose later.
Align the case halves carefully before applying pressure, starting at the front edge where alignment pins guide proper positioning. Press around the perimeter to engage all retention clips before inserting any screws. When securing with screws, follow a star pattern (opposite corners sequentially) and tighten incrementally—overtightening by just one-quarter turn can crack the plastic housing or warp the PCB.
Prevent Future Disassembly Needs With Proper Maintenance
After successfully reassembling your keyboard, implement maintenance practices that reduce the need for future disassembly. Clean your keyboard weekly with a soft, slightly damp microfiber cloth to remove surface debris before it penetrates switch mechanisms. For deeper cleaning between keys, use compressed air at a 45-degree angle to avoid forcing debris further in.
Avoid eating or drinking near your keyboard—the most common cause of internal contamination requiring disassembly. If you must consume beverages while working, use spill-proof containers and maintain at least 18 inches between your drink and keyboard. Consider investing in a silicone keyboard cover during periods of non-use, especially in dusty environments or shared workspaces.
Test all keys thoroughly before considering the job complete—open a text document and press every key, including modifiers and function keys. Pay special attention to the spacebar and Enter key, as these frequently develop issues from improper stabilizer alignment. If any keys feel inconsistent, disassemble just enough to verify dome and stabilizer placement without fully separating the cases.
Taking apart your Microsoft ergonomic keyboard seems daunting initially, but following these precise procedures ensures success while preserving your keyboard’s ergonomic functionality. Remember that patience and documentation are your most valuable tools—rushing leads to broken components, while thorough photos and careful screw management guarantee successful reassembly. Whether you’re cleaning spilled coffee residue or replacing worn rubber domes, this systematic approach keeps your ergonomic keyboard performing like new for years beyond its expected lifespan.
Leave a Reply